Score Metrics
Azure Automation – How to Automate Secure Score Metrics

Secure Score metrics are an important guideline used to ensure security and performance across your Office 365 tenant. Secure Score analyzes your Office 365 organization’s security based on your regular activities and security settings and assigns a score. Think of it as a credit score for security.
A few tasks in the Secure Score toolbox are repeated tasks of reviewing certain logs within Office 365 and Azure. These tasks are typically repeated on a weekly or monthly basis. In this article, we will discuss how to automate a couple of these review tasks. By the end of this article, you should have a good understanding of how Azure Automation is used and how you can continue to use it to help streamline your Secure Score efforts.
Creating an Automation Application
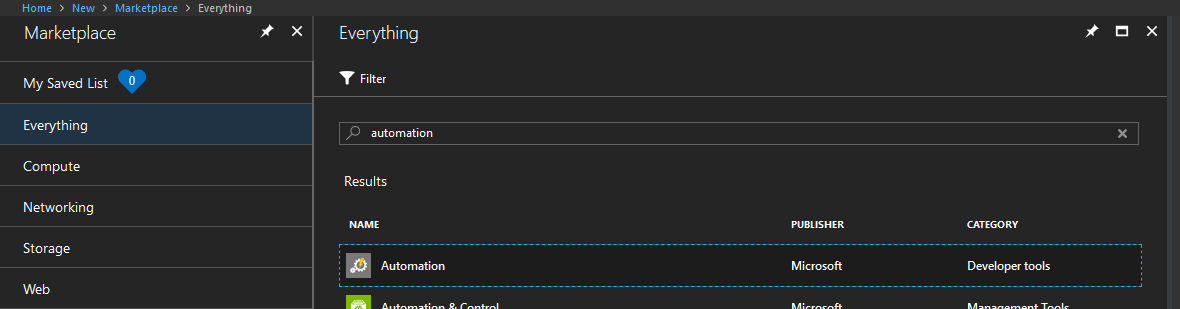
Our first step in the process is to create an Azure Automation application.
Navigate to your Azure portal (https://portal.azure.com), click on “Create a resource”, search for “Automation” and click on “Create”.
Please note that provisioning a Microsoft Bot, Azure Active Directory Application, App Service, and other Azure resources will result in associated costs. In order to fully understand the associated costs that may incur from following this guide, please refer to the Azure Pricing Calculator which can be found here.

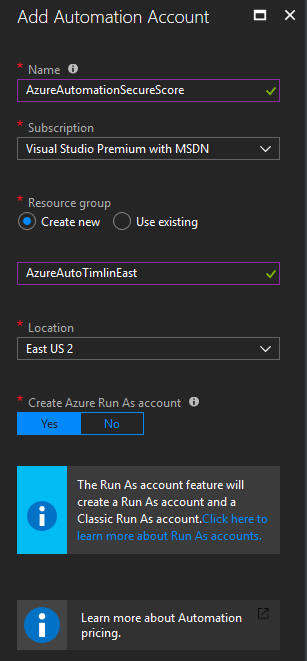
In the configuration menu, give the Automation Account a Name, select the appropriate Subscription based on your tenant, select “Create New” or “Use Existing” Resource group, and then select the appropriate Location. The last option to “Create Azure Run As account” is not necessary in this guide but is something you may want to utilize in the future, so we can leave this set to “Yes”. This account can be used to automate Azure specific functions. These are functions that you can run within the Azure CLI (not functions such as Exchange/MSOL commands). When finished, click on “Create” to create all the required resources.
When all resources have finished provisioning, click on the “Go To Resource” button in the notifications area to go to our new Automation resource or search for it in your resources list.
Once there, navigate to “Runbooks” in the “Process Automation” section.
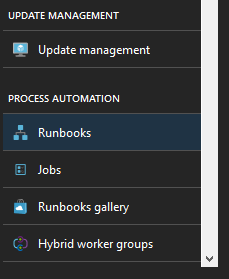
By default, these resources are provisioned with example runbooks. The runbooks here are using the various methods of creating an automated function such as Python, PowerShell, and the Graphical Interface provided by Microsoft. We can ignore all of these examples, but feel free to look at them later on as they provide a good insight into everything we can do with Azure Automation.
Creating Our Runbook
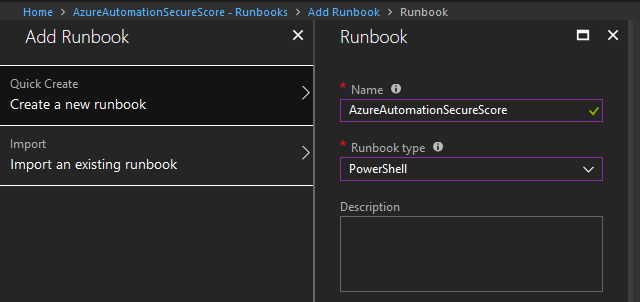
While still in the Runbook section, click on the “Add Runbook” button.
In the new menu that appears, click on “Quick Create”. You will need to fill in two values here: the Name of the runbook and the platform or Runbook Type in which we will build it. Type in the name of the runbook that you would like, and select PowerShell as the Runbook type.
Before we jump into the code of the runbook, we need to set up the credentials that we will use for automation. The account that we use will need to be an Exchange Administrator, have the Discovery Management role in Exchange, and not have MFA configured on the account (unfortunately, there is no way to handle this automation on an account with MFA just yet, but this may change in the future). We recommend provisioning an Azure Service Account that you can use for this functionality. This will ensure that you don’t have an overly provisioned account that is currently being used for other things in your tenant.
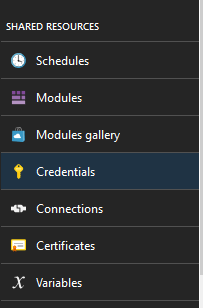
In the Automation Resource section, scroll down to the Shared Resources section and click on “Credentials”.
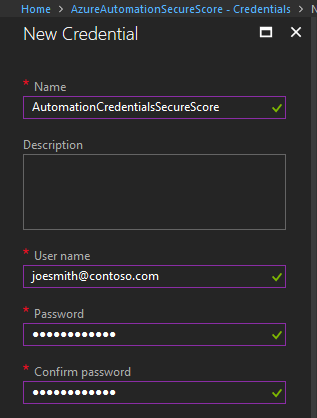
Once there, click on “Add a Credential” and fill in all of the required fields. The name of this can be whatever you’d like it to be. This will be used to reference this set of credentials within the code. The username and password should be one with the roles defined above and should follow standard login standards for Office 365 such as joesmith@contoso.com.
Coding our Azure Automation Runbook
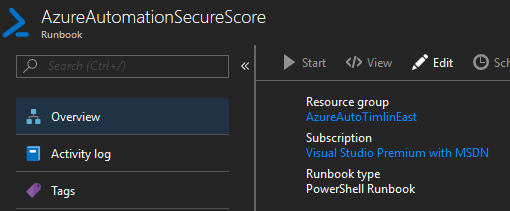
Navigate back to the runbook you created earlier.
Once there, click on the “Edit” button to edit the code within.
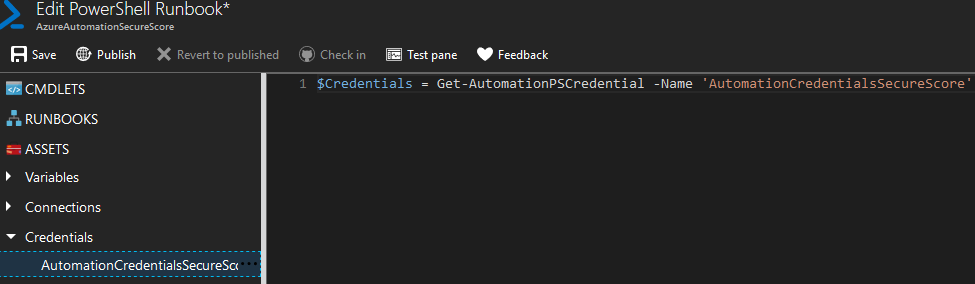
Our first step is to grab the set of credentials we stored in our application earlier. To do so, use the dropdown on the left-hand side for “Assets”, click on “Credentials”, and you should see the credential object you created.
Use the … menu to “Add to Canvas”. This should then give you the PowerShell needed to pull the Credential object. We will also store this as a variable as shown below.
In this article, we will be covering how to automate two Review processes in the Secure Score toolbox. These are mailbox auditing and mailbox forwarding rules. Mailbox auditing needs to be automated as it will only affect users currently in your system. Any users added after this command is run will not have Mailbox Auditing enabled and therefore you will receive no points on Secure Score. The review of Mailbox Forwarding rules is something done weekly, and with this process automated you should always receive the Secure Score points for this task. We will first need to connect our runbook to the necessary areas of Office 365. These will be the ExchangeOnline and MsolService connect prompts. I will be posting the remainder of the code required for this runbook below and will break down what each piece is doing afterwards.
#Connect to Azure Automation
$Credentials = Get-AutomationPSCredential -Name ‘AutomationCredentialsSecureScore’
#Connect-MsolService -Credential $Credentials
The first function exists to connect to Exchange Online Management via PowerShell. As we are looking to take care of the Mailbox Auditing as well as Mailbox Forwarding, we give it the commands you see in the $Commands array. We specify the commands for performance reasons as there is no reason to load every single Exchange Admin command here. The next few lines utilize this function as well as the standard Connect-MsolService command to connect to both services using the credentials object we grabbed earlier. Once connected, we first take care of mailbox auditing.
The code between lines 22 and 29 are set up to take care of Mailbox Auditing. These lines will loop through all users in the tenant that do not currently have Mailbox Auditing configured and setup auditing on them with a time frame of 365 days.
Next, we take care of compiling all forwarding rules that are reviewed within Secure Score. Lines 31 to 47 take care of this task and store all User Inbox Rules, User Delegates and SMTP Forwarding rules inside variables we use next. Lines 49 to 87 serve the primary purpose of reporting. These lines are set up to utilize the Send-MailMessage function to send out an email to whomever you specify (group or single user) for them to review everything this script has done. The content of the email will be all users (if any) that now have Mailbox Auditing configured that did not have it before. In addition, it will send three attachments which are the output of all User Inbox Rules, User Delegates and SMTP Forwarding we stored earlier. Once the code has been implemented, publish the current revision and we are ready to set up our schedule for this runbook.
Scheduling our Runbook
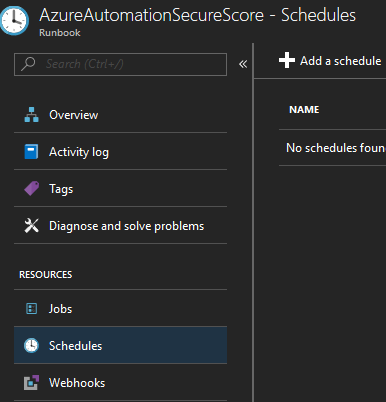
Navigate to the overview of the current runbook we have been working on. Scroll down to the “Resources” section and click on “Schedules”. From here, click on “Add a schedule” to implement a schedule for this runbook.
Once here, click on “Link a schedule to your runbook”, then on “Create a new schedule” and finally fill in all required fields. We will want this runbook to run weekly, so set up a time in the future that you’d like to start the schedule on, select “Recurring” and have it repeat once each week on the day of your choosing. For the foreseeable future, we won’t want this expire so leave the “Set expiration” option to “No”.
Once this has been completed, the setup of your Azure Automation resource and its runbook will run once a week, take care of a couple of your Secure Score review tasks automatically, and email your administration the report for review.