Tips & Tricks
Azure Logic Apps: Connectors and REST and SOAP, oh my
When you start working with Logic apps, one of the things you’ll encounter is that there are hundreds of services presented as actions available to add easily to your integration workflows. Along with the numerous Azure services, there’s Dropbox, Slack, GitHub, Jira, Salesforce, and many, many more. As long as you have a license to access these services, and a way to authenticate, it is easy to begin interacting with them. However, what if you need to access an API that is not in the actions library? For instance, what if you have an on-premises application, or are connecting to a less-popular service such as openweathermap.org? Assuming the API is using REST, it would be possible to manually construct URLs and JSON documents and then use the HTTP actions in Azure to get, post, delete, etc. It is also possible, if your API has a correlating Swagger or OpenAPI document, to reference the document from an HTTP+Swagger action. However, Logic apps is not able to expose the returned data elements as easily consumable Dynamic content without further definition. Fortunately, there’s a relatively simple, more reusable way to add APIs, including those implementing SOAP, while also providing drag-and-drop access to the returned data elements. And you may be able to do it without writing any code, JSON, or other computer-readable syntax.
Logic Apps Custom Connector Walkthrough
For this simple example, I’ll use openweathermap.org. It’s free, but does require registration to get an authorization key. I promised not to give you mine, so you’ll have to sign up and get your own. It’s easy, and I’ve yet to see any spam from them. After you’ve done that, I encourage you to take 10-minutes and follow along!
- Log into https://portal.azure.com
- Maybe I should have mentioned that you’ll need access to Azure. If you don’t have access, they have a trial subscription. Oh, and Thrive resells and helps navigate and manage your Azure environment
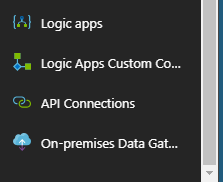
- On the left navigation pane, click All services, then use the filter field to find “Logic apps”
- Tip: click the star next to Logic apps to add it as a favorite to your left navigation pane
- You might as well add Logic apps Custom Connector too since it comes up in this search. Want to get crazy? Filter for “API Connections” and “On-premises Data Gateways” too and add those to favorites for later
- If you followed my tip, you’ll now have 4 new items at the bottom of your left navigation pane. You can drag those up or down if it scratches an OCD itch

- Tip: click the star next to Logic apps to add it as a favorite to your left navigation pane
- Create a Custom Connector
- Now click on Logic apps Custom Connector in the left navigation pane, then click the + Add button at the top of the Logic apps pane
- Name is the name. It does not accept spaces. I called mine “BlogWeatherMap”
- Subscription is auto filled
- Resource group is a container of associated Azure services. For this test, I’d create a new one, unless you already have a test resource group you’d rather use
- Location is a data center or cluster of data centers somewhere in the world. I chose East US 2 because I bet the first one is up by Boston and NY, and I work way south of those places
- Create button: click. Then wait a while for it provision. You’ll see a notification that it’s finished, then you need to refresh the Logic apps list to see it
- Click the new connector you just created once you see it on the list
- Click the Edit link at the top of the app pane. Here’s where it gets interesting
- The first section invites you to reference an OpenAPI (Swagger) document or Postman collection for REST, or WSDL document for SOAP. I’ve attached an OpenAPI file that you can use so you don’t have to manually complete the rest of the setup. However, note an important point: you don’t have to. As I’m about to show you, the rest of the forms in the Custom Connector setup allow you to describe the API manually in case you don’t have a Swagger or other document for your API. In fact, when you’re done, you can download the results as a Swagger document! (how do you think I created the attached?)
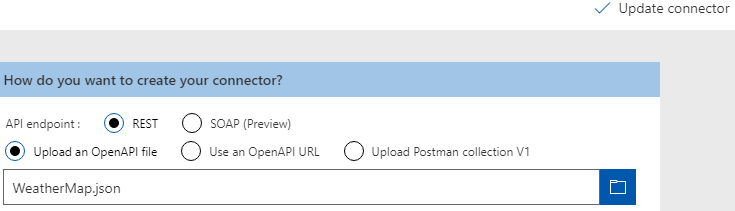
- Select the REST and Upload options as pictured above, then use the blue folder button to navigate to the downloaded and unzipped BlogWeatherMap.swagger.json from this blog. Then click Update connector
- I’ll save you and me the trouble of looking at every field that just got populated by the Swagger document, but be sure to at least take a look at the following:
- Host is the URL, using the Scheme selected above it
- Base URL is the path to the resource at the host we’re calling
- On the Security page, there’s no authentication for this service (though there is an “appid” sent as a parameter in the next page)
- The Definition page is where the real magic happens
- Under Actions, note that there is a GetWeatherByZip and + New action button
- In the General area for the GetWeatherByZip action is how you describe the action in the catalog in Logic apps
- In the Request area for the action is where you can see the parameters and documents for interacting with the API. To set them up (without the Swagger), the easiest way is to provide a sample. I’ll show how to try that in just a bit. For now, you need to click on the … by appid to add your authentication key


- The name must match the parameter defined by the API, but also notice the following:
- Default value is where you can put your key so you don’t have to add it every time you reuse this connector
- Visibility: advanced will hide the key in Logic apps until you expose advanced options
- Now, back to how to setup the request area in the first place. For now, you can’t do it entirely manually, nor would you want to. In a pinch, you could export, edit, and reload the Swagger, but there’s no need to even think about that for this example. Here’s an image of all you need to input to reproduce what you already have (note that the headers pictured are just suggested text superimposed on an empty field. However, those 2 exact headers are a good idea for most REST APIs and would work if you input them here). Also, note that the URL, format can be grabbed from https://openweathermap.org/current, and clicking on the example under By ZIP code


- If you’ve made any changes (like the default appid) be sure to click Update connector
- Now click on Logic apps Custom Connector in the left navigation pane, then click the + Add button at the top of the Logic apps pane
- Create a Logic App
- Next, click Logic apps in the left navigation pane, then click the + Add button at the top of the apps pane
- Name is the name. It does not accept spaces
- Subscription is auto filled
- Resource group: Use existing and chose the one you created earlier
- Location is auto filled based on resource group, because resources in a group should be close together in most cases
- Log analytics? OK, if you want to. I’m not for this demo
- Click the create button, then wait and refresh as you did for the custom connector
- Click the new app you just created once you see it on the list
- Click on When a HTTP request is received in the common trigger section of the designer pane
- Note the many other options, and a video! These are available every time you start a new Logic app. You can skip the video for now
- The HTTP trigger is neat, and very useful, but we’re using it just because it’s also an easy way to test other actions. We can ignore it for now
- Click + New step
- Search for your brand new Custom Connector! Recall that I named mine “BlogWeatherMap.” Click it once or twice
- Input a zip (your zip?) into the zip field
- Click Show advanced options. You should see your appid, unless you did not change the default. If not, paste it in now
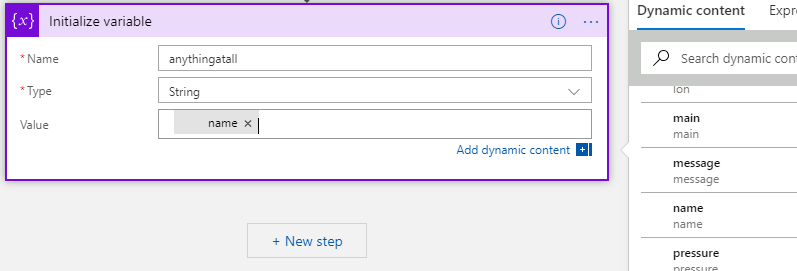
- Click + New step, search for “variable” and click Initialize variable
- Name: anything, type: string, value: the name part from Dynamic content (see image). To get it, you just click in the Value field, then click on name in the Dynamic content list. Note that other attributes listed may cause the variable to get wrapped in a for-each construct. There’s a reason, but that would make this blog much longer. For now, trust me and use name

- Save it and you’re done!
- Next, click Logic apps in the left navigation pane, then click the + Add button at the top of the apps pane
- Try it out
- Click Run up by the Save button
- In a few seconds, you should see happy green checkmarks on each of your 3 steps.
- Click on the middle step to expand it, then examine the OUTPUTS section. Behold all that weather data!
- Experiment
- If you have a Slack or Teams account, try sending yourself some weather data
- If you have a gmail or Outlook online account, you could try that too
- What else could you do with all those connectors and weather data?
- How might you input zip from something else rather than hardcoding it in the action?
- If you have a Slack or Teams account, try sending yourself some weather data
That’s a lot of steps for what turns out to be a pretty easy configuration. I hope it worked for you. Note that you can use this exact technique to describe on-premises APIs as well, and simply couple it with an On-premises Gateway to give secure access to Azure and only Azure.
Further reading and resources:
How to install the on-premises gateway
Make sure to pay attention to the fact that the Azure connection user must be the same as the Logic app user
How to establish a connection to on-premises resources from Logic apps
Make sure to pay attention to the fact that the Azure user must be the same one that setup the Logic app connection on the gateway
If you’re looking to take step one and introduce your organization to an Azure environment, contact Thrive today.