An intranet is a great way to improve communication, collaboration, and knowledge sharing within your organization.
A modern SharePoint intranet takes it a step further. By leveraging SharePoint and incorporating efficient Office 365 applications – including OneDrive, Microsoft Teams, Power BI, Yammer, Flow and PowerApps – you can dramatically improve internal communications and increase employee efficiency.
Before your team can fully realize the benefits of a modern SharePoint intranet though, you need to build it properly. We put together some tips to help you get started.
1. Identify The Purpose For Building A SharePoint Intranet
Before you start building your SharePoint intranet, it’s important to identify the key business use cases for which it will be used. Ask these questions as you start the project:
- What are some of the outcomes your organization aims to achieve once the intranet is in use?
- Which kind of intranet is best for your use cases — a hub site? Communicate site? Or team site?
- Which departments will be using it? HR? Finance? Internal Comms/PR? Everyone?
- What information and applications do users access on a regular basis? Calendars? Tasks? Reporting?
It’s imperative that the use of the SharePoint intranet is aligned with the needs of the business. IT can no longer stand-alone. An intranet should be driven by the user community with input from all key departments (Marketing, HR, Legal, Finance, C-Level, and Communications).
A solid commitment to business and IT alignment, where you include all your IT and business stakeholders, is critical for success and user adoption.
Before building your intranet, set meetings for planning and discussions to pinpoint the purpose then to align all parties involved in the process. By understanding your stakeholders’ specific requirements and clearly communicating why an intranet will benefit them, you will be on the right path to better collaboration and buy-in.
2. Focus On Functionality And Usability
One of the strengths of a SharePoint intranet is how visually pleasing you can make the site. It can look like an actual website that people want to visit every day!
However, a ‘Build it and they will come’ perspective doesn’t work with this type of solution.
While you’re in the planning stage of your project, consider the various use cases of your employees who will be using the SharePoint intranet. What content and applications will they access? How can the intranet be personalized to each employee?
That’s why it’s critical to speak with stakeholders and employees who will be using the tool daily. Think about the type of content you will be presenting and make sure you have the stakeholders in place to ensure your content will remain fresh with constant ongoing updates.
How will the pages be structured? How will users navigate? How can we make it easier to find information?
Gathering answers and mapping your project plan to these use cases should be your top priorities. Focus more on the functionality at the beginning of the intranet build project and incorporate visual branding elements later.
Intranets vary by customer, but consider if/how you may want to use some of these components:
- News
- Quick links
- Social Features
- People Search
- Social Features
- Calendars and Events
- Company Classifieds
- Employee Directory / Organization Chart
- Business Process Automation (Expenses, Vacations/ time off, Onboarding, etc.)
3. Nail Your Information Architecture
It’s not the most exciting aspect of building a SharePoint intranet, but ensuring you have a well-defined information architecture (IA) and site structure is crucial to success.
When applied intelligently, the right IA combined with structured metadata helps your employees find documents faster using SharePoint’s powerful search engine. However, if it’s overly complicated to add metadata, or your chosen terms are too vague, then employees will give up on their search and will revert to their old habits of using the wrong tools to find information or to collaborate.
Want More?
Our team mapped four more best practices for you to follow and implement when building a SharePoint intranet. Get access to them here in this free guide.
Bottom Line On Building An Intranet
With a solid plan in place, building your modern SharePoint intranet can be an easy and seamless process, and you’re on the road to improved communications, collaboration, and operations.
Download the full, free guide of best practices for building a modern SharePoint intranet for your organization.
And let us know if you have any questions or need any help.
How To Manage Office 365 Access Without Hindering Owner Confidence
Are your powers users confident about the security of their content in Teams? A constant point of contention for power users are uninvited guests or unfamiliar users found within an Office 365 group, team, or site the power user owns. This persistent issue negatively impacts adoption and needs to be addressed. Surprisingly enough, SharePoint admins usually wind up being one of the root causes. Let’s investigate why.
Currently, in SharePoint Online, support staff with the SharePoint Administrator role must grant themselves Owner rights before they can access a site, team, or modify group membership. Admins that perform this action show up on the modern permissions display panel and in the O365 group causing concern amongst the site owners who quickly feel that they have no control over the access of their content.
So what are these admins up to?
Most SharePoint setups today use this method to perform system maintenance. In some cases, support may be performing a change request or resolving an issue.
6 Steps To Secure Access
These headaches can be alleviated by one Office 365 Group, a few updates, and a little scripting. Just follow the below steps:
- In the Office 365 Admin Center, create a “SharePoint Administrators” Office 365 Group and add all your SharePoint Support staff to it as “members” (Owner rights don’t seem to be as effective in this scenario).

- Request temporary Global or User Management Administrator rights.
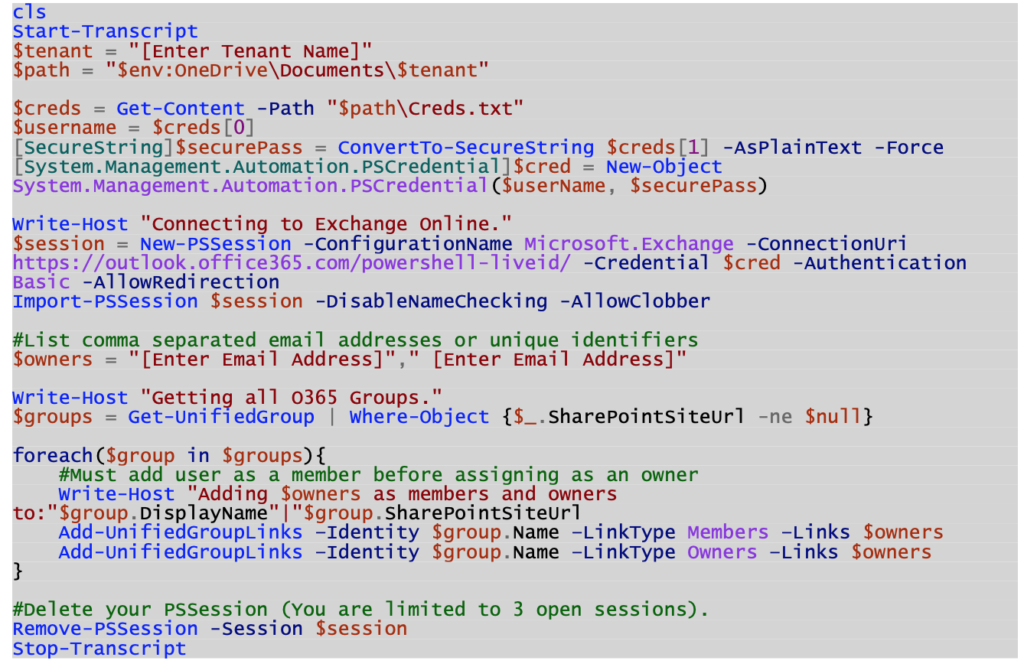
- Run a PowerShell script to add “yourself” as an owner to all group connected SharePoint sites (Requires Global or User Management Administrator rights).

- Add “yourself” as an owner to all other Team and Communication sites (not group connected) via the SharePoint Admin Center: https://[TenantName]-admin.sharepoint.com/_layouts/15/online/AdminHome.aspx#/siteManagement
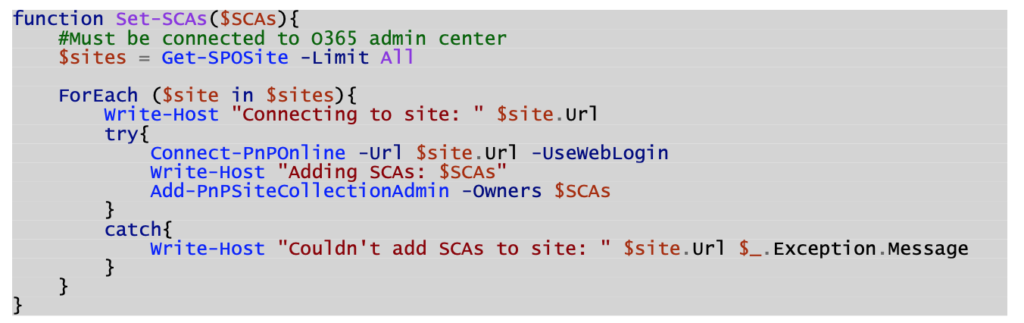
- Run another PowerShell script to add the “SharePoint Administrators” Office 365 Group to the “Site Collection Administrators” section of all sites.

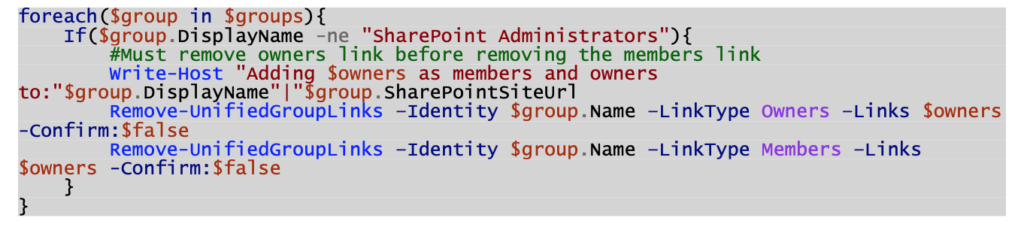
- Run a final PowerShell script to remove your personal account’s access from the sites and the Office 365 Groups minus the “SharePoint Administrators” Office 365 Group.

That’s it! Your support staff now have Full Control access to all sites so that they can perform their daily duties without:
- Disrupting the end-users by showing up in the Owners section and/or Office 365 Group.
- Needing to add and remove themselves to make SharePoint changes.
Likewise, you can and should use this same process in tangent with a “SharePoint Service Accounts” Office 365 Group. Otherwise, whenever your Flow or analysis service account or job needs to access something, it will take additional steps to manually grant it access.
The Final Touch
Make adding these groups part of your manual and/or automated site creation process.
Interested in diving deeper on secure internal and external collaboration? Reach out to our team here to set up a free consultation call.


Microsoft Ignite 2019 has come to a close, but we’re recapping all the fun that was had with a round-up of the top takeaways, announcements, and moments at this year’s event in Orlando.
This year’s attendees were lucky enough to experience first-hand new Microsoft feature announcements, compelling sessions, and inspiring keynote speakers.
Top Announcements from Microsoft Ignite
- Autonomous Systems – You can now design and manage autonomous systems across their lifecycle with a comprehensive portfolio of leading-edge technology that you can apply to your real business scenarios.
- Microsoft Endpoint Manager – Provides transformative, modern management and security that meets customers where they are and helps them move to the cloud.
- Microsoft Flow Becomes ‘Power Automate’ – UI flows bring together the rich feature set of API-based digital process automation (DPA) that is available today, with RPA UI-based automation to create a truly end-to-end automation platform.
- Power Platform Certification – In addition to the existing fundamentals and role-based certification types, Microsoft has added a third certification type—specialty. Specialty certifications validate deep technical skills and the ability to manage industry solutions, including third-party solutions, on or with Microsoft platforms.
- Teams Announcements – At Ignite, Microsoft announced a variety of new capabilities in Teams to help customers in all industries work in new ways and better respond to the evolving needs of their business.
- Project Cortex – A new service that uses AI to create a knowledge network that reasons over your organization’s data and automatically organizes it into shared topics like projects and customers.
- Teams for Virtual Consultation – Healthcare providers can now schedule and conduct B2C virtual consultations through Teams with new Virtual Consults capabilities, and new features like SMS Sign-In and Global Sign-Out make it quick and easy for Firstline workers to securely access Teams from their mobile devices.
- Edge Announcement – The new Microsoft Edge is built on the Chromium engine, providing best-in-class compatibility with extensions and web sites, providing great support for the latest rendering capabilities, modern web applications, and powerful developer tools across all supported platforms.
- Updates to Azure Product and Service Offerings – A host of exciting updates about Azure Arc, Azure Stack, Azure Quantam, and Azure Synapse.
Top Takeaways from Microsoft Ignite
- The Microsoft community is stronger than ever: Community Central proved to be a popular place for the Microsoft community to gather and connect at this year’s event.
- The tech industry is truly investing in women in business: Female power and investment was a huge focus during the 2019 event, with daily sessions regarding women in business and technology, and a successful lunch & learn panel event. In addition, Microsoft is keeping the investment going after the conference — for every Ignite conference evaluation submitted, they are donating $1 to Girls Who Code.
View this post on Instagram
- Microsoft Azure and the future of cloud computing: From the Community Central day dedicated to Azure topics to the community whiteboard wall which encouraged people to talk about what Azure means to them, there sure was a lot of buzz about the future of cloud computing.
Top Moments from Microsoft Ignite 2019
Attendees of Microsoft Ignite know how to get social! Here are a few of our favorite photos shared during the week through the #MSIgnite hashtag.
View this post on Instagram
View this post on Instagram
View this post on Instagram
View this post on Instagram
View this post on Instagram
View this post on Instagram
View this post on Instagram
View this post on Instagram
My summary of #Teams announcements from Ignite 2019. Great to see better integration with Yammer and Outlook, and private channels finally available. #MSIgnite #Office365 pic.twitter.com/MdzYwDcbUq
— Chris O’Brien (@ChrisO_Brien) November 6, 2019
This may be the most awesome sticker I’ve gotten at #MSIgnite ✨ pic.twitter.com/Gf29FUxQ38
— Jen Gentleman 🌺 (@JenMsft) November 6, 2019
Today, I shared my story of how I’ve used personal branding to redefine myself from a shy, awkward outsider to a confident speaker at #MSIgnite. It was the most challenging and terrifying session I have ever presented, but also the most rewarding. Thank you all 💙 #HumansofIT pic.twitter.com/WrZBCB9hSS
— Cathrine Wilhelmsen (@cathrinew) November 7, 2019
My most important take-away from #MSIgnite:#Microsoft transformed totally into an open, diversity embracing company. At the booth and on stage I met knowledgeable people with different genders, colors and nationalities. This is how it should be everywhere. Well done 👍🏻
— Tobias Zuegel (@MrAzureAD) November 8, 2019
#MSIgnite smiles from amazing people! pic.twitter.com/HiUiolwzRm
— Octavian (@octav_cm) November 7, 2019
The power of computer to produce images is mind blowing, stepping into technology literally… #MSIgnite pic.twitter.com/V5M9SvwZ91
— Tim Milan🏳️🌈 (@tmilan) November 6, 2019
Great things happening at @MS_Ignite! Hear what #LiveTiles Enterpise Sales Lead, Colin Burke has to say about the experience below.
Learn more: https://t.co/tf2aouGGkR#wiseupyourworkplace pic.twitter.com/FSm0nDeuYw
— LiveTiles (@livetiles) November 7, 2019
What were your favorite moments from MS Ignite? Let us know by following us on LinkedIn and starting a conversation with a comment on this post!
How to Initiate Flows from PowerAppsFlows and PowerApps go hand in hand recently. They can transform many different business processes such as Employee Onboarding/Offboarding, Nominations, Permissions, Site Creation, etc.
A great way to utilize Flows and PowerApps in tandem is to allow a PowerApp to initiate a Flow and feed the Flow that information which is already provided in the PowerApp Form.
Creating the PowerApp
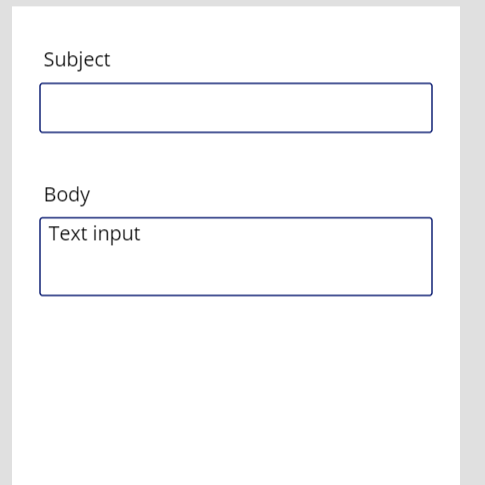
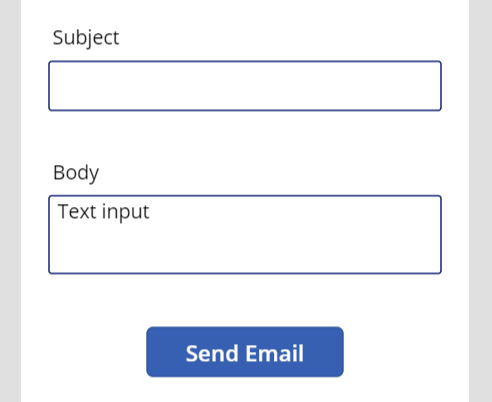
In this example, we are going to create a simple blank PowerApp that will have two fields: Subject and Body.
If you haven’t guessed already, the PowerApp will contain a button that when clicked will initiate a Flow that consumes the information entered by the user into the Subject and Body fields and send an email to whoever the Flow has defined as a recipient (you could theoretically go a step further here and define the recipients in the PowerApp but I’ll leave that up to you).
Your new PowerApp should contain at a minimum two Text Input fields. You can make one of them multi-line if you’d like for the Body. Ours looks like the image below.
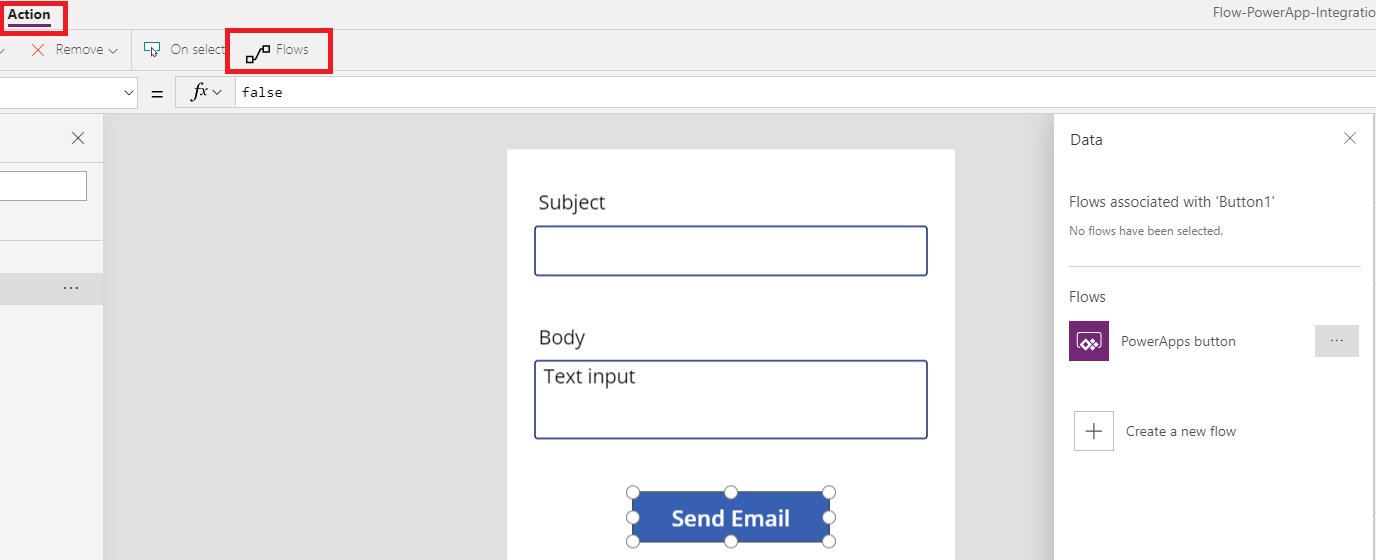
Next, we will add a simple button to the PowerApp labeled “Send Email”.
With the button highlighted/selected, navigate to the “Action” tab and click on “Flows”.
You’ll notice in our example, one Flow already appears. This is because any Flow you have created in this environment that has a plain trigger of “PowerApps” will be consumable in the PowerApps themselves.
Creating the Flow
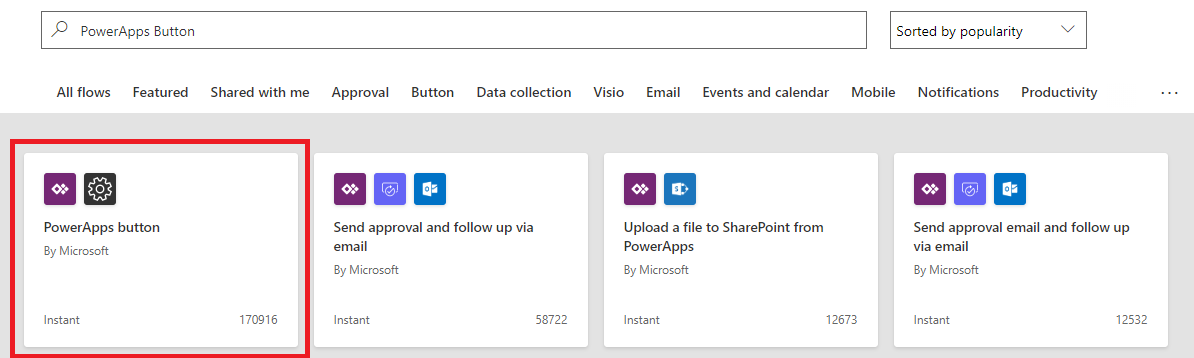
For this example, click on “Create a new flow” to start the Flow Creation process. We want to make a simple two-step Flow so click on the first template available which is the PowerApps to Custom Action flow template.
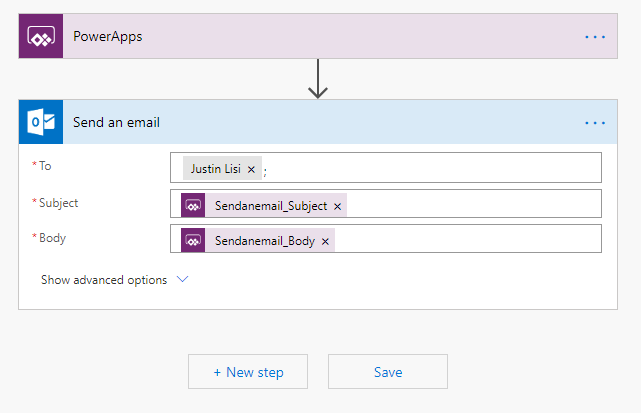
Next, we will want to create a single new step called “Send Email”. You can define yourself or anyone you’d like as the recipient and when clicking on the “Subject” or “Body” property, you will be given the dynamic content property of “Ask in PowerApps”.
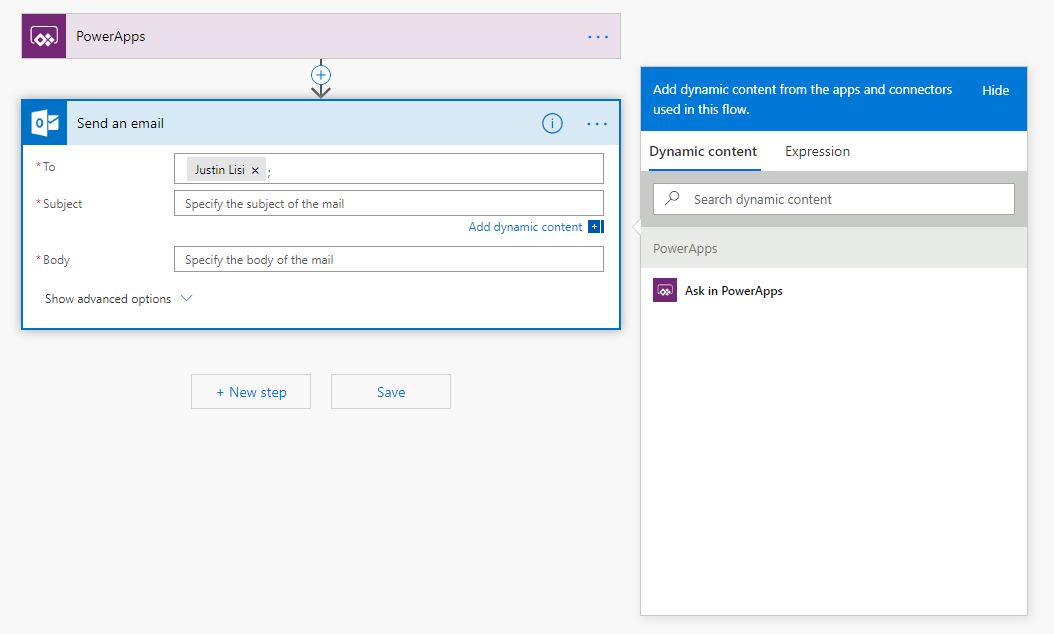
If you use that property for both values, you should then be presented with something like the image shown below.
Setting Up The Action Button
Save your Flow and head back to the PowerApp we created earlier.
If you close and re-open the “Flows” panel, your new Flow should now be available. While you still have the “Send Email” button selected, click on our new Flow to add it to the button. Once added, you will notice that the “OnSelect” property has been filled in with the action of “SendEmailfromPowerApp.Run(“.
The name of this action may vary based on what you named your Flow. You will also notice that it is asking for two parameters. These parameters are the Subject and Body we asked for in the Flow.
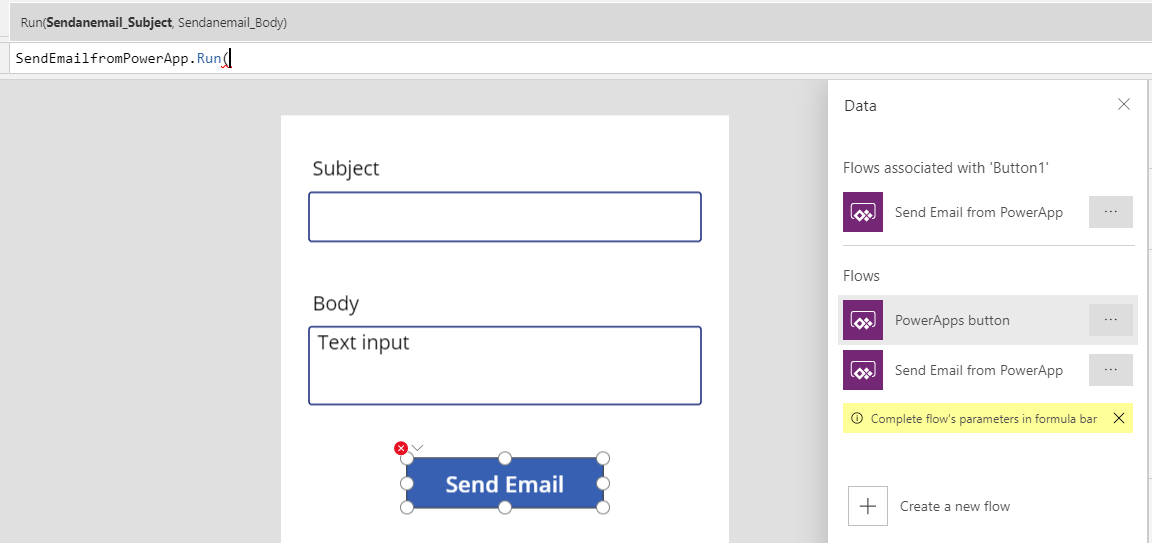
We can now feed the Text value from the first Text Input in for the first value and the same for the second.
![]()
![]()
With this, the PowerApp and Flow should now be integrated. If you run the app, fill in the values and click on “Send Email” your Flow should kick off emailing your recipient with the values you input for Subject and Body.
Read Next: How to Create Filtered Relational Drop-downs with Choices in PowerApps
How to Create Filtered Relational Drop-downs with Choices in PowerApps
Relational drop-downs are something that come up quite frequently but aren’t always straight forward.
PowerApps gives you a relatively friendly manner of creating simple relational drop-downs when using the “Depends On” functionality but this falls apart when utilizing anything but simple fields (text, number, etc.) and trying to further drill down into filtered results. You may have noticed that when you start trying to use Choice fields to filter your drop-downs on, it is not inherently possible.
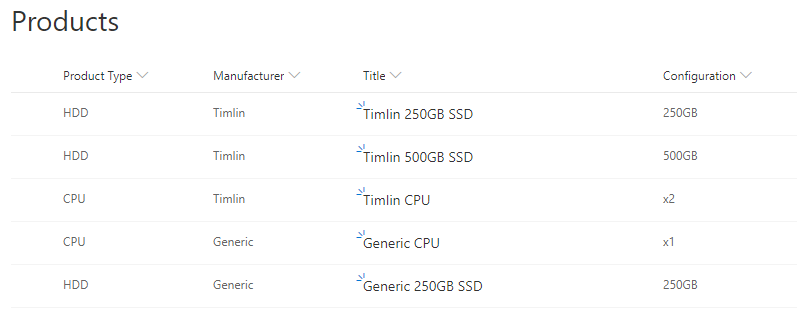
In our example, we will work off a mock Products list in SharePoint. The SharePoint Products list will be made up of the following columns (yours can vary):
- Product Type – Choice field – Choices: HDD, CPU
- Title – Text (Product Name)
- Manufacturer – Choice field – Choices: Timlin, Generic
- Configuration – Choice field – Choices: 250GB, 500GB, x1, x2
Below is a screenshot of how this list looks and some sample data we have input for testing.
Once your list is setup, we can hop straight into PowerApps. If you aren’t familiar with how to get started, simply click on the “PowerApps” button followed by the “Customize Forms” button.
We arranged our fields in the PowerApp to go in the following order: Product Type, Manufacturer, Configuration and Title.
The end goal of this is to have it so the end-user will go through the menu one by one and be provided a final filtered list of products that follow the selected Type, Manufacturer, and Configuration.
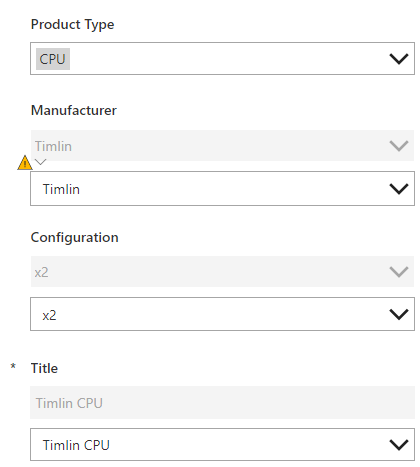
You might notice from the screenshot of the layout of the PowerApp above that there are duplicate fields. The reason for this is that the more advanced filtering we will be doing on the fields does not work when using the out of the box choices column in PowerApps.
To circumvent this, we unlock each of these data cards and add a “Dropdown” control (to make things easier, set “AllowEmptyField” to true in the properties of each drop-down we add).
Currently, the fields are disabled just as a visual aid but in normal circumstances, you can set the value of the fields to the value of the drop-down and have them hidden in the background so nothing is visually different to the end-user. In our example, Product Type won’t need to be filtered in any way so we can leave that card alone.
Our options in Product Type are CPU and HDD.
In this instance and given the sample data above, when we select “CPU” we will want to see both the Timlin and Generic manufacturers (we will filter this even though each manufacturer has a CPU, there will be instances in production where a manufacturer will exist that does not offer a CPU product).
To filter the Manufacturer drop-down based on the Product Type, we can set it’s “Items” property to the following formula (keep in mind that the numbers or names of the Data Cards may vary on your application):
Distinct(Filter(Products, ‘Product Type’.Value = DataCardValue2.Selected.Value),Manufacturer.Value) – DataCardValue2 is associated with Product Type
Using the “Distinct” operation, we ensure that we do not pull back the same manufacturer more than once. The second parameter following the filter (Manufacturer.Value) is the return value, which in this case is the Manufacturer value that we want.
The Filter operation is ensuring that we are only getting products in the list that match the product type we selected in the first field. One other thing we want to do on this drop-down is to set up a variable that stores the filtered results so we can easily filter our next field. To do so, we can change the “On Change” operation to the following formula:
Set(ManufacturerFilteredProducts, Filter(Products, Manufacturer.Value = DataCardValue4.Selected.Value)) – DataCardValue4 is associated with Manufacturer
This will provide us with the list of products we have filtered on Product Type and on Manufacturer.
Next, we will want to set up our Configuration drop-down to only show us products that have the Product Type and Manufacturer the user has selected. To do so, we can set the “Items” property on the Configuration drop-down we added (the control, not the field) to the following:
Distinct(Filter(ManufacturerFilteredProducts,’Product Type’.Value = DataCardValue2.Selected.Value),Configuration.Value)
We should now have a drop-down with only the results that match the Product Type and Manufacturer the user chose in the previous two fields.
Lastly, we will want to make sure that when a user chooses a configuration that the product names that appear in the “Title” drop-down are those that match all of the previous filters. To do so, we set the “On Change” property of the Configuration drop-down to a new variable (FinalFilteredProducts).
This variable will filter the results we stored in ManufacturerFilteredProducts based on the Configuration value the user chooses and store the results for use in the Title/Product Name field. We can do this via the formula below:
Set(FinalFilteredProducts, Filter(ManufacturerFilteredProducts, Configuration.Value = DataCardValue3.Selected.Value)) – DataCardValue3 is associated with Configuration
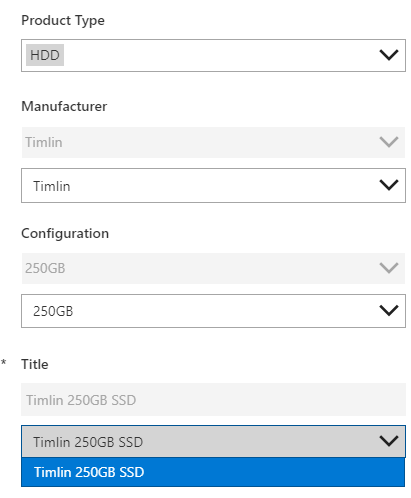
Finally, we want to make sure that the only Titles we get back are for products that are related to all three previous drop-downs. This is simply just the Title rows in the FinalFilteredProducts variable we just created. To do this, set the “Items” property on the custom Title drop-down to the following:
FinalFilteredProducts.Title
This should produce a fully filtered list of choices for the products (as shown in the original screenshot). Given the sample data, if a user were to look at SSDs made by Timlin with a 250GB capacity, the only title we should get back is the “Timlin 250GB SSD”, which we do (shown below).
Interested in diving in deeper to Filtered Relational Drop-downs? Reach out to our team here to set up a free consultation call.


One of the features in Microsoft 365 which can be overlooked is your User Profile.
Delve User Profile pages contain a lot of information about your business users, including:
- Contact information
- About
- Projects
- Skills and Expertise
- Schools and Education
- Interests and Hobbies
- Additional Information
When you have accurate data in these fields, it can be a huge benefit to your organization, especially large organizations with multiple locations and/or where a good percentage of people work remotely.
Having users keep profiles up to date, enhances People Search and the ability for users to efficiently find the right resource or expertise.
With accurate data, users can better search for colleagues, whether they’re looking for expertise on a subject, wish to collaborate on a particular project, or just want to see if there is any fellow alumnus in the company!
While what Microsoft provides out-of-the-box is a good start, often we need to enhance the profile with custom fields.
We can do this by adding Custom properties to the User Profile service, making the property searchable, and choosing to display property under the Additional Information section within Delve profiles. The custom property can be edited by administrators from User Profile service or directly by users at the Delve profile page.
Below, I have outlined how to create a new custom user profile property.
If you need any help, please reach out and we’d be happy to answer any questions you may have.
Creating a New Custom User Profile Property
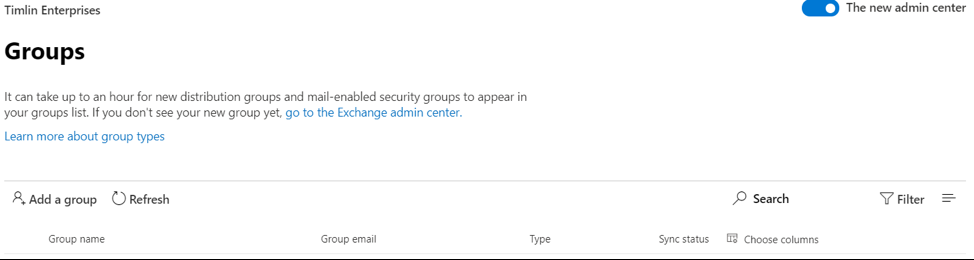
Login to your SharePoint Online admin center and go to Manage User Properties within User Profiles. Select “New Property.”

Assign the new property a Name, and Display Name. Choose the data Type you want property to contain.
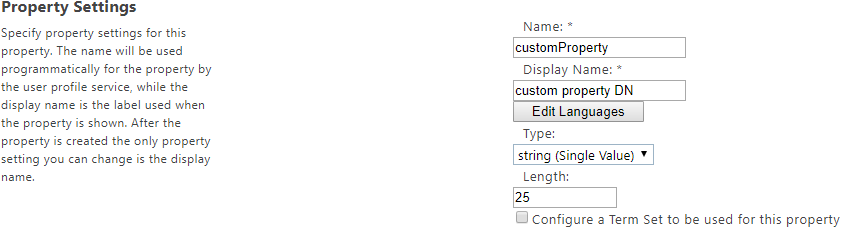
When configuring the property, we need to determine how we want the property to behave.
- Should the users be able to hide this property so only they can view it, or should we require it’s shown to Everyone?
- Do we want users to be able to edit this custom property, or only allow Administrators?
These scenarios are managed through your Policy and Edit settings.
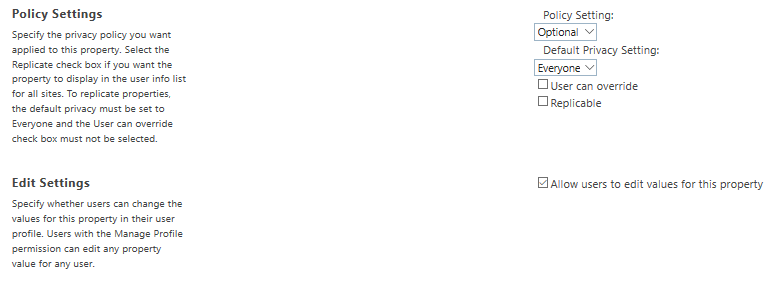
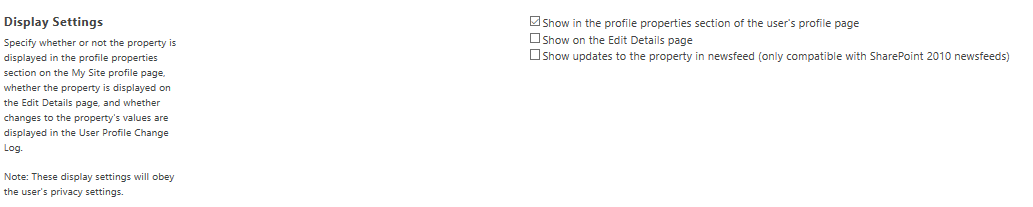
To display the custom property in Delve profile page, and to be able to manage it within User Profile service > Manage User Profiles > Edit, enable the setting “Show in the profile properties section of the user’s profile page”.
Select “Show on the Edit Details page” if you want a user to be able to edit the property.
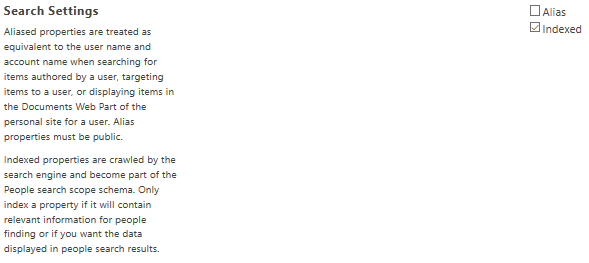
By default, the new custom property will be Indexed by Search service.
After creating a custom property, it will immediately display under Additional Information in your Delve profile pages.
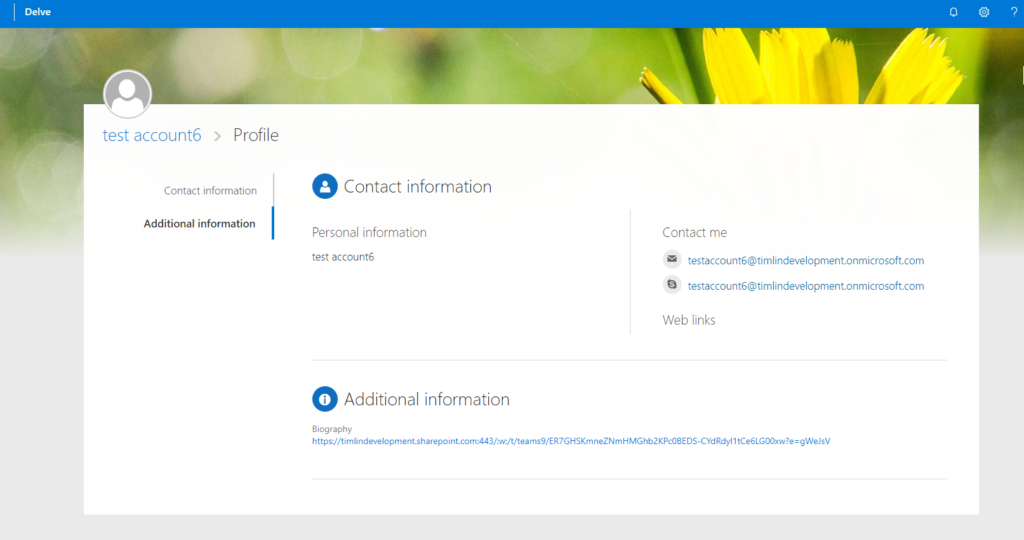
As mentioned, if you need any help with this process, please reach out and we would be happy to answer any questions you may have.
The successful completion of another SPTechCon Boston is under our belt.
As I like to do after these events, I stop and think about the people I talked to in the industry, the problems, and challenges they are encountering with various aspects of Office 365 tools and their businesses, plus what they hoped to achieve by attending the conference.
One of my main goals at SPTechCon is to speak with attendees and understand why they came to the event. Most people come with some problems or ideas and hope to get more direct-human feedback on technology issues.
Here are the big takeaways, challenges, and trends that I uncovered from conversations throughout the week:
Takeaways and Trends from SPTechCon 2019
1. Collaboration and Automation Are The Future
Microsoft Teams, Flow, PowerApps are the big winners over the past year and continue to lead today into the future. The desperate need for a powerful workflow engine to replace classic SharePoint features has put us in the driver’s seat to create real-world applications in SharePoint Online.
Microsoft Teams has been such a needed addition to the toolset that it’s no surprise how quickly it has taken off. Users have switched over almost entirely to this tool for communication and collaboration, relying on classic SharePoint features for more process-based on document and information management.
2. Change is Constant in the Office 365 Ecosystem
Office 365 users have a difficult time making sure their team (often a team of one) can keep track of the features being updated and introduced by Microsoft.
From small changes that derail a training exercise to whole new applications becoming available to an entire organization, changes to the platform are constant and can have a huge impact on how teams do business.
We, collectively, haven’t fully converted from the classic installation, service pack, and major revision model of yesterday. In the past, users and admins could review the release notes, understand the changes, test the installation, and release several feature changes on our schedule. Now, enhancements come in an unsteady stream.
This is a scary proposition to those who try to build and maintain the confidence of business while offering cutting edge capabilities.
It’s one of the reasons I publish the Timlin Office 365 Monthly Buzz Newsletter every month with updates, trends, and goings-on related to Office 365 and SharePoint. If you’d like to receive it, sign up here.
3. Understanding the Longer Microsoft Roadmap is Challenging at Best
Microsoft has never done a great job at helping us build a 3-5-year technology plan based on their feature and release roadmap – the guidance just isn’t cohesive enough.
For example, if we knew that InfoPath and Workflow were going to be abandoned and replaced with PowerApps and Flow, we could have planned for it in advance. Also, the new versions of these tools don’t have feature parity, so they aren’t completely compatible as replacements.
This is a frustrating proposition for CIOs and technology leaders to recommend a plan, not knowing if the technology will be abandoned, what its possible replacement may be, and if something else will take its place within 2-3 years.
The strategy, training, and political clout required to correctly implement these tools are too high to guess and hope.
4. Using Strategy and Governance Helps Identify the Right Tool(s) for the Job
The features in the Office 365 Suite contain several overlapping and interconnected capabilities. Organizations struggle to understand how set the proper guidance, support, and train people down a path they are comfortable managing.
When there are too many ways to manage tasks, it becomes almost impossible to severely limit the choices, so many organizations turn to a “free for all” approach. This methodology can increase initial user adoption, but almost always creates major problems if the platform takes off.
Organizations should consider when to use which tools and how to set the stage to provide solutions to their internal business problems in a well-orchestrated capacity. Information architecture, business analysis, governance, training, and ongoing support are all crucial to the success of user adoption and achieving digital transformation.
5. Guaranteeing Proper User Adoption Isn’t Easy
Hopefully, you are noticing a theme here. Most of these issues stem from similar problems. Without the time or resources, you often have one of two paths to choose, or possibly both paths at the same time:
- Pick and choose high-value problems/solutions and solve for those.
- Open the spigot and let people use the tools in whatever way works for them.
Both approaches have their pros and cons, but I talked to a lot of frustrated business analysts and administrators that were expected to make these tools useful for thousands of people with no help beyond their knowledge of the platform. This is not a good recipe.
6. Limited Time and Resources for Management and Maintenance are Commonplace
The obvious final piece of the puzzle is there isn’t enough time to make the impact these professionals want to make on their businesses.
For example, if an organization decides it needs a new ticket tracking system, it will create a team, spin up the plan, work it through to completion, provide training, support, and ongoing resources for management. They will then require that all new tickets come through this system, thus ensuring its viability.
When organizations start using Office 365, they treat it much differently. They bought it for email, Microsoft Office, and possibly OneDrive, and go into it assuming these are essentially desktop/individual tools.
The mindset and business approach to implementation are entirely different. Unlike a mandated/required ticketing system, many of the capabilities and solutions within Office 365 are not a pure requirement to complete work.
Instead, they are optional tools designed to create efficiency and error reduction. You must think ahead, build solutions, and entice or require people to perform certain activities within these tools to solve specific problems.
The Roadmap Ahead In The Office 365 Industry
As you will note from these takeaways, the world, and the businesses that thrive within it, are changing.
Where we used to work so hard to create process, efficiency, and predictability, the new methods of succeeding are based on adaptability, flexibility, and some bravery to embrace and accept that the world around will be adjusting a pace that we’ve never seen before.
Information (and misinformation) is given to the entire world in seconds, ideas, concepts, and features show up without warning.
The classic IT mentality has been tested and appears to be failing in a world that needs something different.
In conclusion, Office 365 and SharePoint continue to help organizations harness the power of technology to improve operational efficiency. As with any technology that has numerous, regular updates, it can be challenging to keep up, though, but it’s worth it.
Reach out if you need any help as our team is very well versed in all of Office 365’s tools and capabilities.


Next week, the annual SPTechCon Boston Conference is returning for another exciting year of training, problem-solving, and networking.
SPTechCon will cover a wide range of SharePoint and Office 365 topic areas and attendees will walk away with practical knowledge that they can apply immediately within their organization We’re excited to be a Gold Sponsor of the conference again this year.
There’s a lot happening during the week so read through this guide to make sure you attend the most important sessions and meet the right people while you’re in Boston for SPTechCon. Get all the important details, dates, and insider tips below.
SPTechCon Schedule At A Glance
Sunday, August 25th: First day of the conference. Tutorials, Hands-on lab, happy hour.
Monday, August 26th: Technical sessions, sponsored sessions, Microsoft Keynote, networking breaks, round tables, reception in Exhibit Hall (at 5:45 pm).
Tuesday, August 27th: Technical sessions, general sessions, networking breaks, prize announcement in Exhibit Hall, SharePoint.
Wednesday, August 28th: Technical sessions & general sessions. Conference closes.
For a complete list of sessions and descriptions click here.
Don’t Miss These Exciting Events And Sessions
Office 365 Hands-On Kitchen
When: Sunday, August 25th — 9 am – 5 pm
Join a select group of “chefs” (speakers) as they create recipes for collaboration challenges with cooks (you!). There will be up to five teams led by two master chefs to guide them through the solution cooking process using all the ingredients available in Office 365!
Planning a Successful Migration to Microsoft Teams and SharePoint Online
When: Monday, August 26th — 9:15 – 9:45 am
Senior Consultant of Timlin Enterprises, Nick Bisciotti, is sharing his top tips for executing a successful migration to Microsoft Teams and SharePoint Online. During this presentation, you will develop a plan and identify tools to make your migrations a smooth and seamless process.

Microsoft Keynote on Monday Morning
When: Monday, August 26th — 10 am
Join Dan Holme, Director of Product Marketing, as he shares the latest innovations and solutions for content collaboration, security, teamwork, process transformation, employee engagement & communications, and knowledge sharing & discovery. Learn how the experiences in Microsoft 365–including SharePoint, OneDrive, Yammer, Stream, PowerApps, Flow–integrate to power collaboration and the intelligent workplace across devices, on the web, in desktop and mobile apps, and in the hub for teamwork, Microsoft Teams.
Stump the Experts – Win a Microsoft Surface Go!
When: Tuesday, August 27th — 5 pm
Timlin is hosting this flagship SPTechCon event for the second year in a row! Ask clever, challenging questions of Microsoft experts. The person with the best question will win a Microsoft Surface Go!
This will be an open discussion where you can test your knowledge against some of the best, discover answers to troubling SharePoint and Office 265 topics, and take your turn at winning this awesome prize.

#TimlinTrivia — Join Us On Twitter
Join us every morning on Twitter from Monday to Wednesday for a round of #TimlinTrivia!
Before the morning keynote each day, we will tweet a tricky Office365 or SharePoint question. The first attendee to respond with the correct answer will win an Amazon gift card!

How To Get the Most Out Of Your SPTechCon 2019 Experience
- Preparation is key! Be sure to draft your conference schedule in advance and highlight the events that interest you the most.
Leave some free time during the day to recharge, grab a bite to eat, and network with others. Conferences are often jam-packed with back to back sessions and information, so it’s important to soak in as much information as you can without burning out by the end of each day. - Find the right sessions for you with filters. Use the robust filtering system on the SPTechCon program agenda to identify the right sessions to add to your schedule. You can filter by topic, session type, session category, level, and date.
- Set goals for yourself and your experience. Decide on whether your priority is networking or building your skillset, and make that your priority during each day. Make a list of things you’d like to learn and people you’d like to connect with. Discover the complete list of this year’s speakers.
- Meet the many sponsors and companies in the industry who are changing and challenging the status quo with their Office 365 and SharePoint solutions. Meet the Timlin Enterprises team and learn more about our Center of Excellence approach by stopping by booth #209.
- Join in on the fun on social media. A great way to network and connect with the conference is by chatting on Twitter under the official conference hashtag #SPTechCon.
We’re excited to experience the 2019 SPTechCon with you! Let us know if you’d like to connect during the conference by sending us a message on Twitter at @TimlinEnt.
How to Fix Timestamp Issues Between Exchange and SharePoint in Microsoft Flow
Microsoft Flow is often used so users can consume emails and post their content and attachments into a SharePoint list for processing.
The date and time that an email was received are common metrics that users would like to track in SharePoint lists, and the metadata on the email contains that information. However, when you try to use this field, the date and time that flows into the SharePoint list isn’t the date and time the email was received.
Why Is There an Automatic Timestamp Issue in SharePoint?
The problem stems from the variation in date formatting.
The date and time format that comes back from Exchange emails will resemble the following: 2019-07-02T17:10:36+00:00.
To compare, the date and time format that will be stored in a SharePoint list defaults in the following format: 2019-07-02T17:10:36.0000000Z.
Due to the difference in formatting, if you simply try to store the date and time from Exchange in a SharePoint list without converting it, you will end up getting completely different times than what you would expect.
How to Fix Timestamp Issues with Microsoft Flow
The easiest way to solve this problem is to simply convert the time we receive from the email into the SharePoint friendly format. To do so, we can use the “Convert time zone” action in Microsoft Flow.
By default, the time zone that items come back in is the UTC Coordinated Universal Time and then it is converted into the end-users local time zone from that base.
With this information, you can convert the Base Time (the email’s received time) into the “Round-trip date/time pattern”. Our source time zone and destination time zone will remain the same as we do not want the actual timestamp itself to change.

The output from this action can then be used to store the proper timestamp in a SharePoint list item as shown below and from there the issue has been resolved.
![]()
![]()
If you have any questions with this process, let us know. Also, if you work a lot with Microsoft Flow, check out one of our most popular blogs entitled How Substring Works in Microsoft Flow.


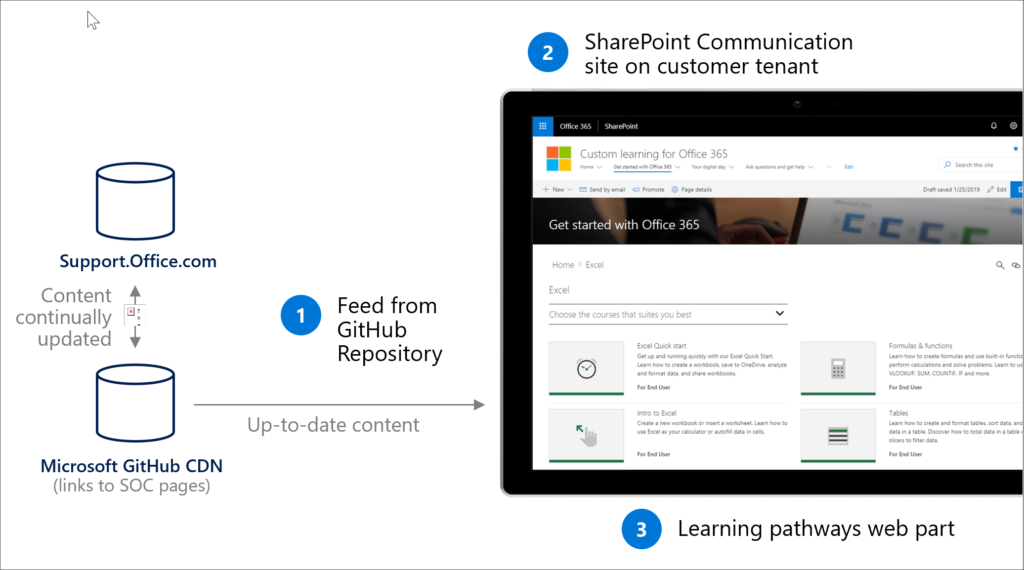
Timlin has been engaged with Microsoft over the last couple of months providing support for the beta rollout of their new Custom Learning solution for Office 365.
In typical Microsoft fashion, they recently renamed the solution to Microsoft 365 Learning Pathways. The Timlin Engineering team has been supporting the first customers by resolving issues and providing documentation for the tool.
We are very excited to work with our customers and this training tool as it provides a great framework and content for your training programs, including the following capabilities:
- A SharePoint Online communication site that acts as your Custom training portal. The site can be customized to add your organization’s help, support, and community content.
- The tool is easy to provision and Timlin now brings great expertise to the provisioning process.
- The ability to create your own training playlists. With Learning Pathways, you can create targeted training playlists to meet the unique needs of your environment and focused on the Office 365 tools and features pertinent to you.
- Up-to-date content. This is a huge win as the Learning Pathways tool provides content through a Microsoft online content catalog, so the content at your site is regularly updated. In addition, the Solution is connected to an online catalog of Microsoft content.
- Learning Pathways provides a SharePoint web part that can be filtered to present targeted training content. Organizations can also use the Web part to create their own custom playlists.
We think there is great potential in the Learning Pathways tool to help your end-users stay trained on the latest features and functions in Office 365. No longer will your training content be out-of-date after 3 months as Microsoft will constantly be updating the training materials.
The provisioning process is relatively simple but as with most technology, can be confusing the first time. Reach out to help with the setup as our team is very well versed in the tool and the capabilities.