Microsoft Teams
Microsoft Bot Framework: Integrating Microsoft Teams, Graph API and SharePoint
Have you ever come across a time where you’ve needed to take information from Microsoft Teams, Skype for Business or another Office 365 Communication Application and copy it onto other Office 365 products for safekeeping or collaboration? The process of manually taking this information and putting it into a list in SharePoint or copying into an Excel file can be very tedious but the process can be optimized and streamlined using the Microsoft Bot Framework. The Bot Framework gives us the ability to create intelligent bots that can be triggered to take information from systems like Microsoft Teams or Skype For Business and publish it into other Office 365 platforms, such as SharePoint, for us.
Getting Started on the Microsoft Bot Framework
We can get started with creating our first bot on the framework by navigating to the Microsoft Bot Framework Developer platform, which can be found here. Once here, we can follow the prompt triggered by the “Create a Bot” button. This will then redirect you to your Azure portal to select between three types of bot templates (if you do not have an Azure subscription, you can sign up for a trial here and receive $200 in credit to utilize).
Please note that provisioning a Microsoft Bot, Azure Active Directory Application, App Service and other Azure resources will result in associated costs. In order to fully understand the associated costs that may incur from following this guide, please refer to the Azure Pricing Calculator which can be found here.
In this instance, we will want to select the “Web App Bot” template and select “Create”. You will be brought to a screen as shown below.
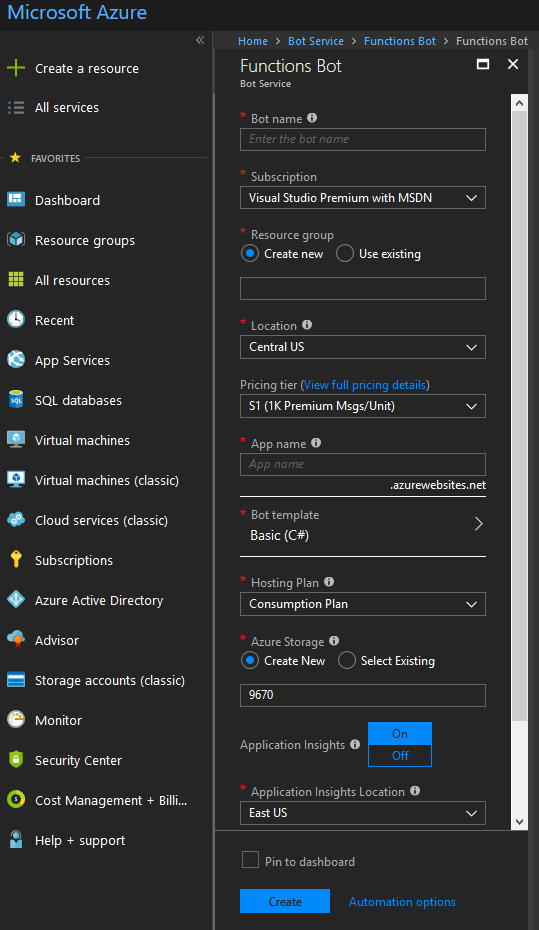
Once here, proceed to fill in all the required information for the bot. Feel free to create a new resource group or Azure storage blob or use existing instances if you have them. This guide will be using Node.JS so please select Node.JS Basic as the Bot template option.
Once all the information has been filled in, click on “Create” and wait for Azure to provision all necessary resources. When all resources have been successfully provisioned, navigate to your new Web App Bot resource. The management of this bot is very similar to managing other applications in Azure.
Enable the Bot for Microsoft Teams
In this guide, we will be integrating the bot with Teams to allow for messages to be posted to a SharePoint list from Teams by means of the bot.
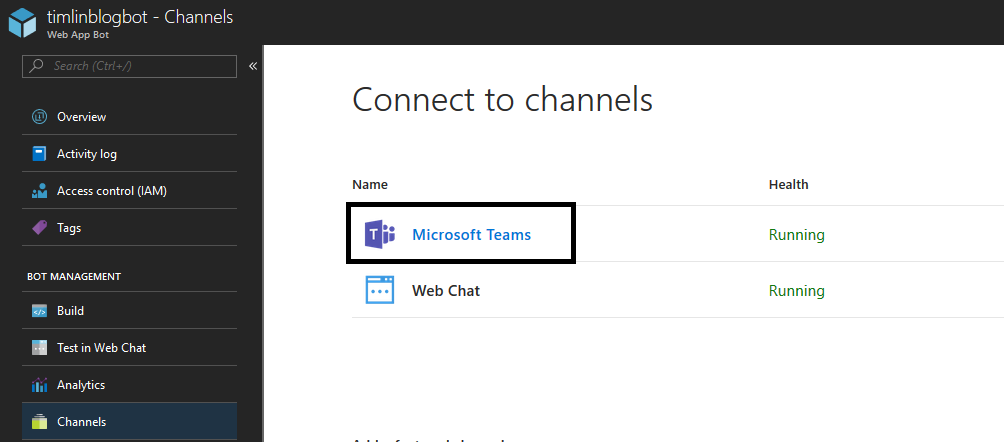
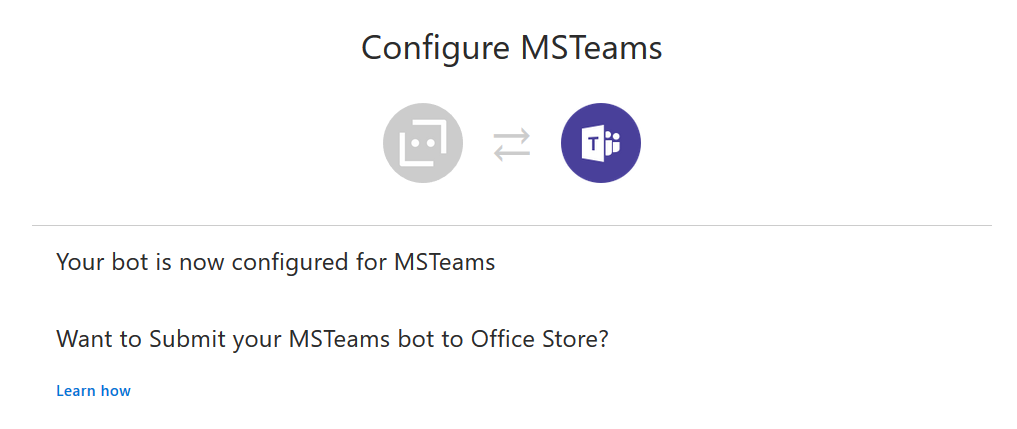
To enable the Teams channel, proceed to the “Channels” section of the bot and select the Microsoft Teams icon. If the channel was successfully configured, you should see the screen below.
Preparing our Bot for Microsoft Graph API and SharePoint Integration
Considering that we want our bot to communicate with the Microsoft Graph API and can read and post information to and from a SharePoint list, we will need to provision an Azure Active Directory Application.
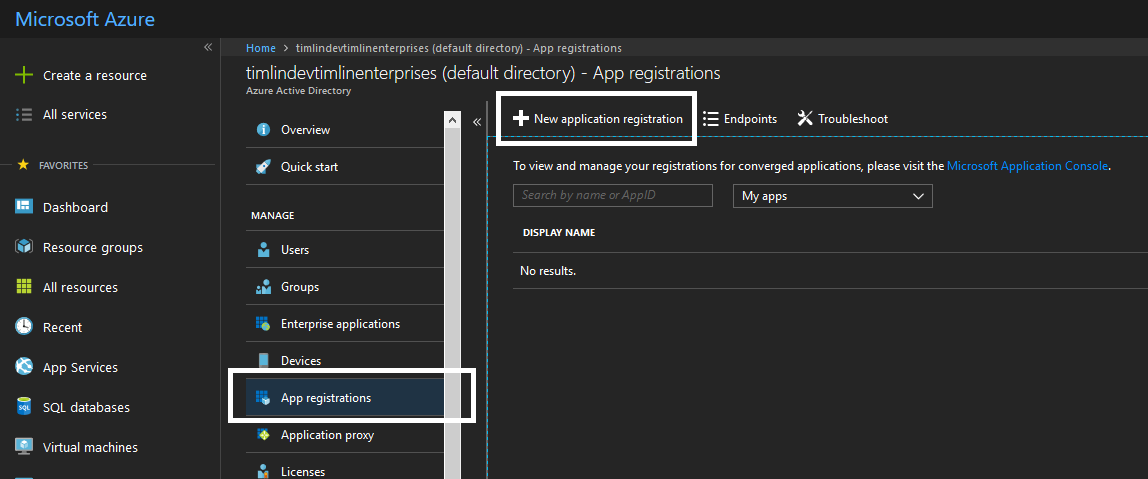
To do so, navigate to the Azure Active Directory section of the portal, select App registrations and then “New Application Registration”, as shown below.
We need to fill in the required fields which are the name of the app, its application type, and the Sign-on URL. In this instance, we want the application type to be Web app / API and the sign-on URL can be pretty much anything.
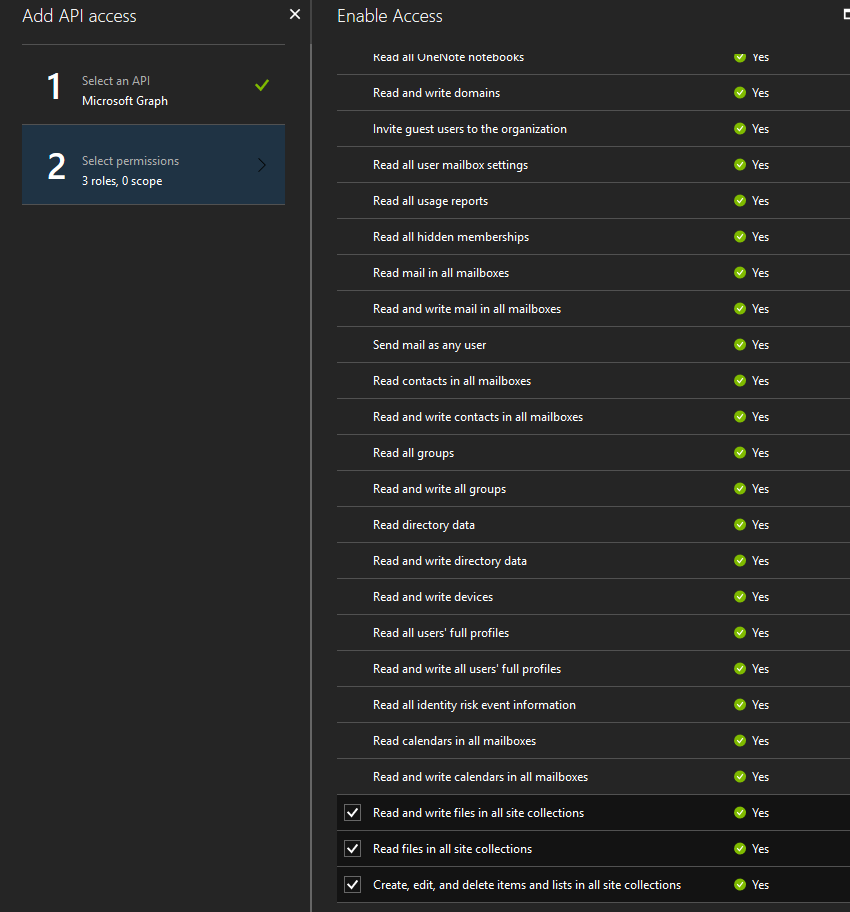
For example, you can use something along the lines of https://contoso.com as your sign-on URL. We aren’t creating an Azure web application that requires authentication redirect, so this URL won’t be used in our bot. Once created, we need to assign the bot a few permissions. Select the “Required Permissions” option and click on Add. We will now add the required API access for Microsoft Graph (most of these permissions require that you be a Global Administrator to add them).
Select the following permissions: Read and write files in all site collections, read files in all site collections and create, edit and delete items and lists in all site collections (as shown below).
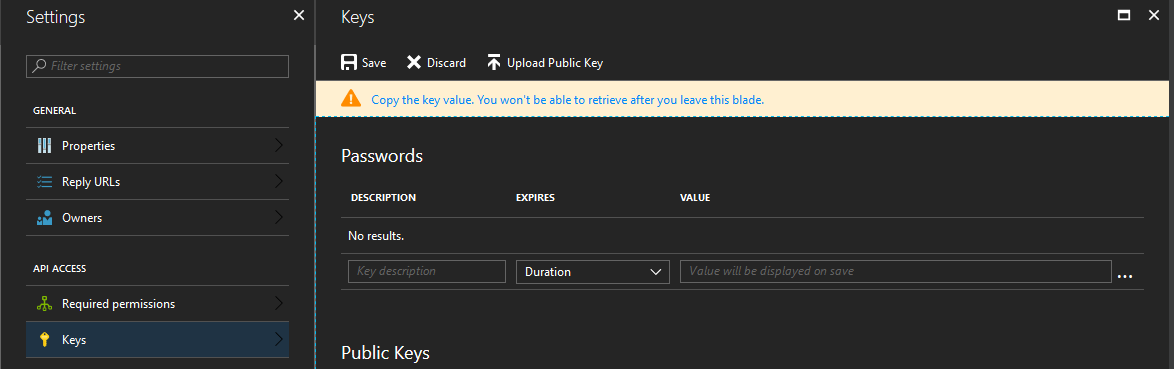
 Once the permissions have been delegated, we will now need to generate a secret application key that will be used in our bot’s code to authenticate with the application.
Click on the “Keys” button and under the “Passwords” section, give the key a name and duration.
When you click save the key will be generated. Please copy and save the key to a safe place for now as we will need it later. Also, while we are here, copy and save the Application ID as this is our client public key that we will also need later.
Starting to Code and Build our Bot
For simplicities sake, we will be using the online code editor for editing code in our bot.
Alternatively, you can download a .zip package of the bot to use a local IDE of your choosing and set up a deployment option for deploying updated code to Azure from your local development environment. Before we jump right into the code, we will want to add our Azure Active Directory App Client ID and Secret Key we copied earlier to the environment variables.
Adding these to the environment variables as opposed to in the code itself ensures that the keys aren’t stored in plain text in the code.
Navigate to “Application Settings” and under “App Settings” we will add the two keys. The first key will be named “ClientID” and have the value of your Application ID you copied earlier. The second key will be named “AppSecret” and have the value of the Secret Key you copied earlier.
Now that we’ve done that, navigate to “Build” then “Open online code editor”.
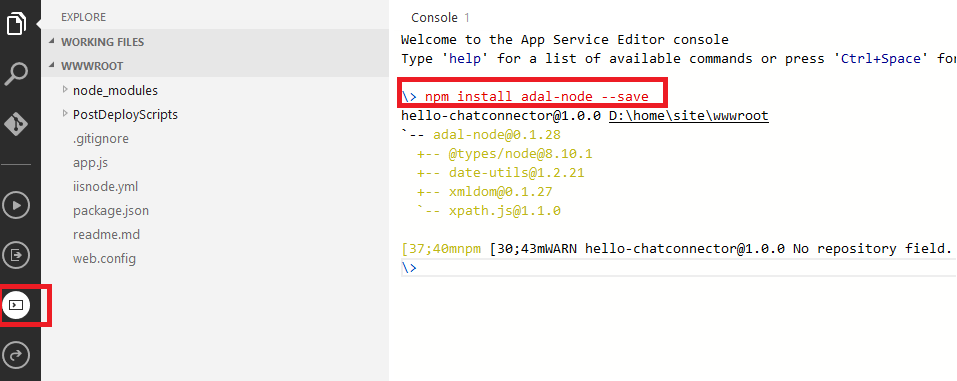
In here, our main application code is found under the app.js file. A standard project comes with three npm packages: restify, botbuilder and botbuilder_azure. In order to connect to the Microsoft Graph API and make post requests to SharePoint, we will be using the adal-node npm package.
This guide won’t be going too in-depth on using Node.JS or breaking down how Node.JS works but will give you a base understanding of the code works so no previous knowledge of Node.JS is necessary to make everything function.
First, we are going to need to install the adal-node package. To do so, click on the console icon (sixth icon on the left-hand side of the screen), type ‘npm install adal-node –save’ without quotes and press enter.
When the install is complete, we will need to require the package in our app.js. Add the following code below the botbuilder_azure line at the top.
var adal = require(‘adal-node’);
Next, we will have to the same thing for another package from Microsoft that integrates with Teams. Head back to the console and run ‘npm install botbuilder-teams –save’. Once the package has installed, add the following line under the adal line we just added.
var teams = require(“botbuilder-teams”);
Finally, there is one last package we need to install which is the Microsoft Graph Node.JS package. Navigate to your console and type in ‘npm install @microsoft/microsoft-graph-client –save’. When the package has finished installing, add the following line under the teams line added previously.
const MicrosoftGraph = require(“@microsoft/microsoft-graph-client”);
Now we are going to add the core of the code. First, we will want to remove all lines from the code after the connector was configured (var connector) while leaving in the server.post(‘/api/messages’, connector.listen()); line.
At the time of writing this, these would be lines 27 to 43. This will leave the following line as the last line of our code now.
server.post(‘/api/messages’, connector.listen());
Next, we will add the code below and talk a bit about what it is doing.
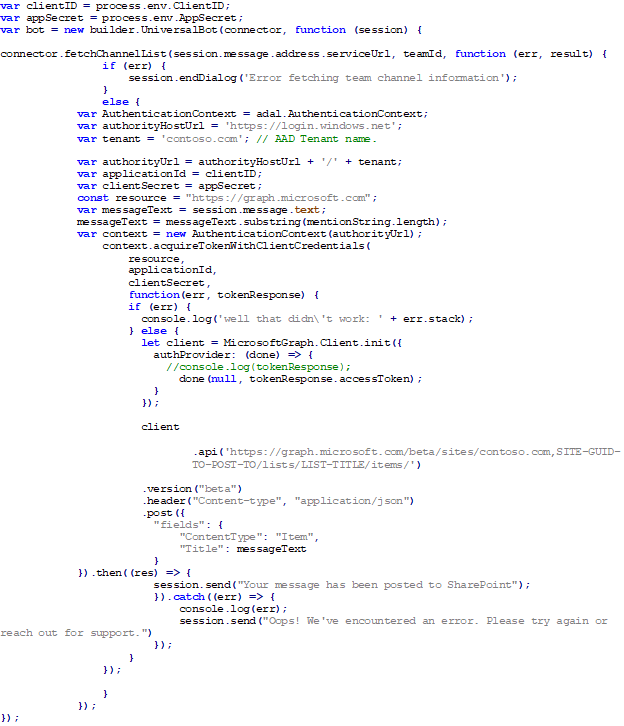
First, we are committing our ClientID and Secret Key to a variable for use in authentication using ADAL later on in the code. We then initiate the builder.UniversalBot function which takes the connector and a function that passes the session as arguments.
The connector.fetchChannelList is technically optional here. This function was put here to show you how you might go about fetching specific channel information in case you wanted to post what channel the information came from to the SharePoint list.
Next, we are setting up the ADAL package, so we can authenticate with Microsoft Graph API and start to utilize its functionality. The application ID is our Azure Active Directory App Application ID and the Client Secret is the key we generated earlier. These are both currently stored in our application’s environment variables.
Using the ADAL package, we can then generate an authenticated context token that has all of the permissions we assigned to it earlier. Next, we are initializing the Microsoft Graph client and passing it the authenticated access token. We can then use this instance to build our Graph Query that posts information sent to the bot to a specified list of our choosing in SharePoint.
In the following line you will need to replace the two variables being queried with your root SharePoint URL (in the format of xxxx.sharepoint.com), the GUID of the site that contains the list we want to post information to (this GUID can be found by using the Microsoft Graph explorer to query all of your sites or even by using the SharePoint REST API) and the title of the list we are posting to.
.api(‘https://graph.microsoft.com/beta/sites/contoso.com,SITE-GUID-TO-POST-TO/lists/LIST-TITLE/items/’)
We are then defining the fields of the list item that is going to be posted. Here, I’m using the messageText variable to set the Title of the object. The messageText variable is being provided by the user when they call our bot. Their message will be what is stored under ‘session.message.text’.
Finally, we post the request and resolve the promise using a .then() statement. If the promise resolves successfully then we let the user in Microsoft Teams know that their content has been published to SharePoint.
Testing our Bot using Microsoft Teams
Now that the code has been implemented, we can test our bot before deploying it to a team. To do so, navigate to your bot application in Azure and select “Channels” and then “Microsoft Teams”.
This will ask you if you’d like to open your Microsoft Teams client or open Teams in the web. You can pick whichever platform you’d like to test this out. Once the application opens, you should be automatically directed to the bot conversation window. Test the bot by sending any message to it. If everything goes as planned, you should see the screen below.
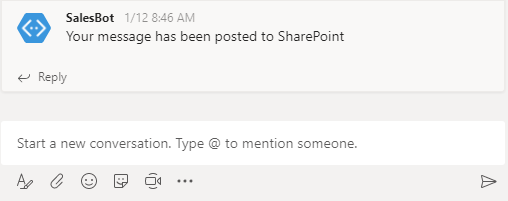
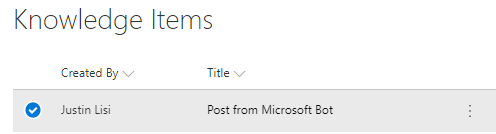
You can also check the SharePoint list you specified in the Graph API call earlier for the new list item.
Packaging and Deploying your Bot
In order for your bot to be deployed to your instance of Microsoft Teams, you need to create a package. The package is essentially 3 separate files: Color Icon, Outline Icon, and your manifest.json.
The Color Icon is used throughout Microsoft Teams and should be an icon of 192×192 pixels. The Outline Icon is used as the smaller app tray icon and should be 32×32 pixels. These icons are required and can be made in most design programs. Stock icons may be available online as well. The manifest.json file contains all of the information needed to deploy the bot.
The Bot Framework actually handles the task of gathering the bot from Azure and you merely need to supply the Application/Bot ID in the manifest.json. There are many settings and customizations that can be configured in this file. We won’t cover them in this guide but if you’d like to learn more you can view the current Manifest Schema for Microsoft Teams here.
We will begin by creating a folder that will become our .zip package. Inside the folder, create a file named `manifest.json`, and populate it with the information below. Also, add your outline.png and color.png to the folder.
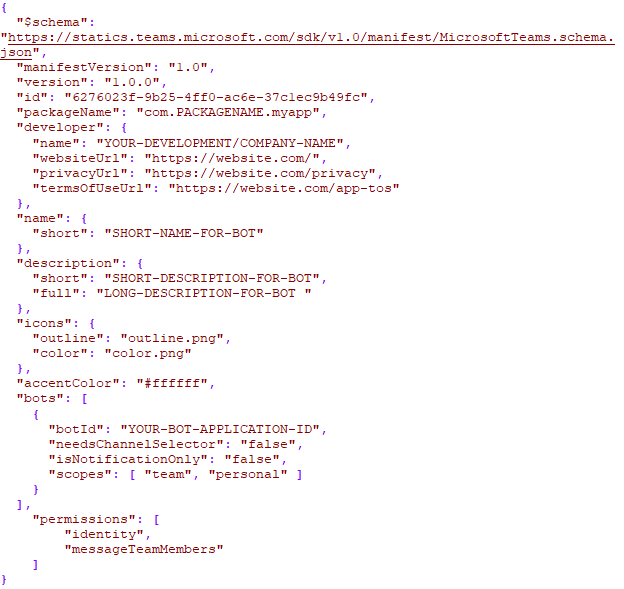 As you may notice, you will need to populate your specific Bot Application ID in the botId parameter. Otherwise, the other information can remain the same or if you choose, you can customize it. When you have completed this, you should have three files in your folder. Proceed to packaging that folder into a .zip.
** Be careful as sometimes you end up having a root folder in the zip with the files inside the root folder. If this happens, you may want to use a program like WinRAR to manually add the three files to the .zip. They should be at the absolute root of the .zip package and be the only files there. **
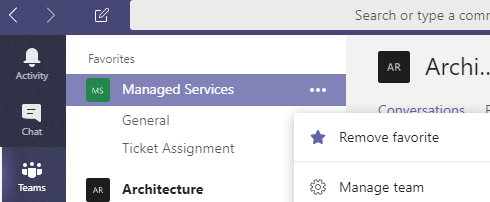
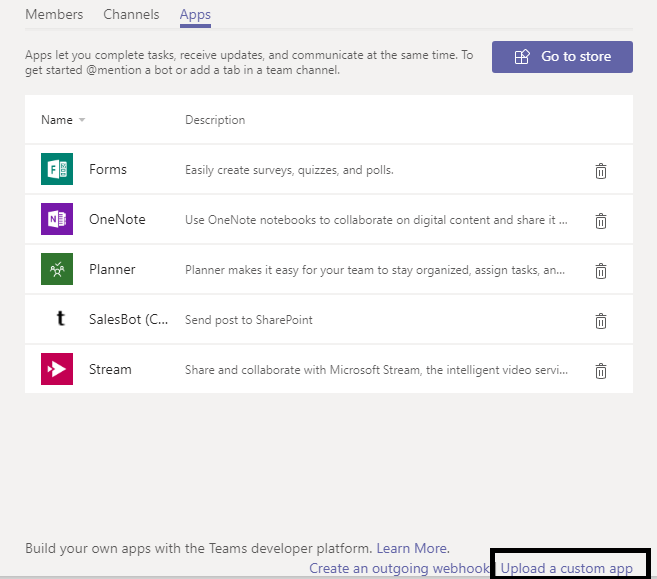
When the package has been created, we can now work on deploying the package in our Teams client. Open the Microsoft Teams application, choose a channel, select the ellipsis and then navigate to “Manage Team”, as shown below.
From here, navigate to “Apps” and then select the option to upload a custom app in the bottom right-hand corner (we have uploaded this same custom bot with the name SalesBot).
Once the package has been uploaded, you should now be able to call the bot from the team you added the app to using @BotName where the BotName is whatever you defined it to be in the manifest.json. At this point, you have successfully created, provisioned and deployed a Microsoft Framework Bot that communicates with Microsoft Teams, Graph API, and SharePoint Online.