Have you ever come across a time where you’ve needed to take information from Microsoft Teams, Skype for Business or another Office 365 Communication Application and copy it onto other Office 365 products for safekeeping or collaboration? The process of manually taking this information and putting it into a list in SharePoint or copying into an Excel file can be very tedious but the process can be optimized and streamlined using the Microsoft Bot Framework. The Bot Framework gives us the ability to create intelligent bots that can be triggered to take information from systems like Microsoft Teams or Skype For Business and publish it into other Office 365 platforms, such as SharePoint, for us.
Getting Started on the Microsoft Bot Framework
We can get started with creating our first bot on the framework by navigating to the Microsoft Bot Framework Developer platform, which can be found here. Once here, we can follow the prompt triggered by the “Create a Bot” button. This will then redirect you to your Azure portal to select between three types of bot templates (if you do not have an Azure subscription, you can sign up for a trial here and receive $200 in credit to utilize).
Please note that provisioning a Microsoft Bot, Azure Active Directory Application, App Service and other Azure resources will result in associated costs. In order to fully understand the associated costs that may incur from following this guide, please refer to the Azure Pricing Calculator which can be found here.
In this instance, we will want to select the “Web App Bot” template and select “Create”. You will be brought to a screen as shown below.
Once here, proceed to fill in all the required information for the bot. Feel free to create a new resource group or Azure storage blob or use existing instances if you have them. This guide will be using Node.JS so please select Node.JS Basic as the Bot template option.
Once all the information has been filled in, click on “Create” and wait for Azure to provision all necessary resources. When all resources have been successfully provisioned, navigate to your new Web App Bot resource. The management of this bot is very similar to managing other applications in Azure.
Enable the Bot for Microsoft Teams
In this guide, we will be integrating the bot with Teams to allow for messages to be posted to a SharePoint list from Teams by means of the bot.
To enable the Teams channel, proceed to the “Channels” section of the bot and select the Microsoft Teams icon. If the channel was successfully configured, you should see the screen below.
Preparing our Bot for Microsoft Graph API and SharePoint Integration
Considering that we want our bot to communicate with the Microsoft Graph API and can read and post information to and from a SharePoint list, we will need to provision an Azure Active Directory Application.
To do so, navigate to the Azure Active Directory section of the portal, select App registrations and then “New Application Registration”, as shown below.
We need to fill in the required fields which are the name of the app, its application type, and the Sign-on URL. In this instance, we want the application type to be Web app / API and the sign-on URL can be pretty much anything.
For example, you can use something along the lines of https://contoso.com as your sign-on URL. We aren’t creating an Azure web application that requires authentication redirect, so this URL won’t be used in our bot. Once created, we need to assign the bot a few permissions. Select the “Required Permissions” option and click on Add. We will now add the required API access for Microsoft Graph (most of these permissions require that you be a Global Administrator to add them).
Select the following permissions: Read and write files in all site collections, read files in all site collections and create, edit and delete items and lists in all site collections (as shown below).
Once the permissions have been delegated, we will now need to generate a secret application key that will be used in our bot’s code to authenticate with the application.
Click on the “Keys” button and under the “Passwords” section, give the key a name and duration.
When you click save the key will be generated. Please copy and save the key to a safe place for now as we will need it later. Also, while we are here, copy and save the Application ID as this is our client public key that we will also need later.
Starting to Code and Build our Bot
For simplicities sake, we will be using the online code editor for editing code in our bot.
Alternatively, you can download a .zip package of the bot to use a local IDE of your choosing and set up a deployment option for deploying updated code to Azure from your local development environment. Before we jump right into the code, we will want to add our Azure Active Directory App Client ID and Secret Key we copied earlier to the environment variables.
Adding these to the environment variables as opposed to in the code itself ensures that the keys aren’t stored in plain text in the code.
Navigate to “Application Settings” and under “App Settings” we will add the two keys. The first key will be named “ClientID” and have the value of your Application ID you copied earlier. The second key will be named “AppSecret” and have the value of the Secret Key you copied earlier.
Now that we’ve done that, navigate to “Build” then “Open online code editor”.
In here, our main application code is found under the app.js file. A standard project comes with three npm packages: restify, botbuilder and botbuilder_azure. In order to connect to the Microsoft Graph API and make post requests to SharePoint, we will be using the adal-node npm package.
This guide won’t be going too in-depth on using Node.JS or breaking down how Node.JS works but will give you a base understanding of the code works so no previous knowledge of Node.JS is necessary to make everything function.
First, we are going to need to install the adal-node package. To do so, click on the console icon (sixth icon on the left-hand side of the screen), type ‘npm install adal-node –save’ without quotes and press enter.
When the install is complete, we will need to require the package in our app.js. Add the following code below the botbuilder_azure line at the top.
var adal = require(‘adal-node’);
Next, we will have to the same thing for another package from Microsoft that integrates with Teams. Head back to the console and run ‘npm install botbuilder-teams –save’. Once the package has installed, add the following line under the adal line we just added.
var teams = require(“botbuilder-teams”);
Finally, there is one last package we need to install which is the Microsoft Graph Node.JS package. Navigate to your console and type in ‘npm install @microsoft/microsoft-graph-client –save’. When the package has finished installing, add the following line under the teams line added previously.
const MicrosoftGraph = require(“@microsoft/microsoft-graph-client”);
Now we are going to add the core of the code. First, we will want to remove all lines from the code after the connector was configured (var connector) while leaving in the server.post(‘/api/messages’, connector.listen()); line.
At the time of writing this, these would be lines 27 to 43. This will leave the following line as the last line of our code now.
server.post(‘/api/messages’, connector.listen());
Next, we will add the code below and talk a bit about what it is doing.
First, we are committing our ClientID and Secret Key to a variable for use in authentication using ADAL later on in the code. We then initiate the builder.UniversalBot function which takes the connector and a function that passes the session as arguments.
The connector.fetchChannelList is technically optional here. This function was put here to show you how you might go about fetching specific channel information in case you wanted to post what channel the information came from to the SharePoint list.
Next, we are setting up the ADAL package, so we can authenticate with Microsoft Graph API and start to utilize its functionality. The application ID is our Azure Active Directory App Application ID and the Client Secret is the key we generated earlier. These are both currently stored in our application’s environment variables.
Using the ADAL package, we can then generate an authenticated context token that has all of the permissions we assigned to it earlier. Next, we are initializing the Microsoft Graph client and passing it the authenticated access token. We can then use this instance to build our Graph Query that posts information sent to the bot to a specified list of our choosing in SharePoint.
In the following line you will need to replace the two variables being queried with your root SharePoint URL (in the format of xxxx.sharepoint.com), the GUID of the site that contains the list we want to post information to (this GUID can be found by using the Microsoft Graph explorer to query all of your sites or even by using the SharePoint REST API) and the title of the list we are posting to.
.api(‘https://graph.microsoft.com/beta/sites/contoso.com,SITE-GUID-TO-POST-TO/lists/LIST-TITLE/items/’)
We are then defining the fields of the list item that is going to be posted. Here, I’m using the messageText variable to set the Title of the object. The messageText variable is being provided by the user when they call our bot. Their message will be what is stored under ‘session.message.text’.
Finally, we post the request and resolve the promise using a .then() statement. If the promise resolves successfully then we let the user in Microsoft Teams know that their content has been published to SharePoint.
Testing our Bot using Microsoft Teams
Now that the code has been implemented, we can test our bot before deploying it to a team. To do so, navigate to your bot application in Azure and select “Channels” and then “Microsoft Teams”.
This will ask you if you’d like to open your Microsoft Teams client or open Teams in the web. You can pick whichever platform you’d like to test this out. Once the application opens, you should be automatically directed to the bot conversation window. Test the bot by sending any message to it. If everything goes as planned, you should see the screen below.
You can also check the SharePoint list you specified in the Graph API call earlier for the new list item.
Packaging and Deploying your Bot
In order for your bot to be deployed to your instance of Microsoft Teams, you need to create a package. The package is essentially 3 separate files: Color Icon, Outline Icon, and your manifest.json.
The Color Icon is used throughout Microsoft Teams and should be an icon of 192×192 pixels. The Outline Icon is used as the smaller app tray icon and should be 32×32 pixels. These icons are required and can be made in most design programs. Stock icons may be available online as well. The manifest.json file contains all of the information needed to deploy the bot.
The Bot Framework actually handles the task of gathering the bot from Azure and you merely need to supply the Application/Bot ID in the manifest.json. There are many settings and customizations that can be configured in this file. We won’t cover them in this guide but if you’d like to learn more you can view the current Manifest Schema for Microsoft Teams here.
We will begin by creating a folder that will become our .zip package. Inside the folder, create a file named `manifest.json`, and populate it with the information below. Also, add your outline.png and color.png to the folder.
As you may notice, you will need to populate your specific Bot Application ID in the botId parameter. Otherwise, the other information can remain the same or if you choose, you can customize it. When you have completed this, you should have three files in your folder. Proceed to packaging that folder into a .zip.
** Be careful as sometimes you end up having a root folder in the zip with the files inside the root folder. If this happens, you may want to use a program like WinRAR to manually add the three files to the .zip. They should be at the absolute root of the .zip package and be the only files there. **
When the package has been created, we can now work on deploying the package in our Teams client. Open the Microsoft Teams application, choose a channel, select the ellipsis and then navigate to “Manage Team”, as shown below.
From here, navigate to “Apps” and then select the option to upload a custom app in the bottom right-hand corner (we have uploaded this same custom bot with the name SalesBot).
Once the package has been uploaded, you should now be able to call the bot from the team you added the app to using @BotName where the BotName is whatever you defined it to be in the manifest.json. At this point, you have successfully created, provisioned and deployed a Microsoft Framework Bot that communicates with Microsoft Teams, Graph API, and SharePoint Online.
Digital Transformation as a Service
The Future is Digital.
If you subscribe to Microsoft’s perspective, every company, irrespective of industry, is, or will soon be, thinking and operating like a digital company.[1]
Why? The high-level answers are similar, and the granular ones vary by organization. At the core, businesses are looking to Digital Transformation to increase efficiency, agility, collaboration, innovation, and security … resulting in a competitive advantage.
It’s a Living Process
Unfortunately, Digital Transformation is not a project. It is also more than email and document storage “moved to the cloud.” It is an ongoing and living process that shifts throughout the journey. An organization cannot simply deploy software and expect the magic to happen. As a matter of fact, most organizations have failed in their Digital Transformation attempts.
An Office 365 ‘Center of Excellence’ Approach Increases Adoption
While there is no magic wand, through our experience in consulting and gaining knowledge about what works, we have uncovered methodologies that drastically increase the odds of user adoption, which is the glue that holds Digital Transformation efforts together. We have developed what we refer to as a ‘Center of Excellence’ service for Office 365 and related technologies. It’s simply a term to describe an ongoing process of defined activities, communications, templates, training, and effort focused on end users.
Many organizations have invested in Office 365 and related technologies and have the capability to execute on Digital Transformation. The difficulty is that Digital Transformation is 100% based on people and their ability and willingness to change how they operate. It’s why 90% of our activities are targeted at the end user, helping them improve their ability to collaborate and communicate, empowering them to do their jobs better and more efficiently.
This Center of Excellence service is made up pillars, or service areas. They are meant to be circular and connected. We start with Vision, Strategy, Governance, Architecture/Design, and then tactically provide Training, Administration, Configuration, Development, and Support. Each service has elements to complete up front to ensure the process runs smoothly. For example, you cannot design a Strategy without understanding the organization’s Vision and the Governance plan to manage the process to get there. There are clear interdependencies in the process, which is why the sum is greater than the parts when all the pillars work together, helping our customers optimize their operations.
Guiding Principles
There are also some guiding principles to a Center of Excellence approach:
- Cross-Pollination by Design – Create and enforce specific scheduled activities that will require collaboration and communication internally and with the customer.
- Create Trust – Solve problems and build credibility by providing the best possible service is a requirement for user adoption. If people do not believe you can help them, they will turn elsewhere.
- It’s About the Business – This is not an IT exercise. The technology is the tool that enables Digital Transformation by solving problems, removing roadblocks, and allowing progress and innovation to occur as new needs arise. It’s NOT a solution looking for a problem.
- It’s a Process – You don’t “install” Digital Transformation, you build it.
- Embrace Change – The platform, business needs, users, and tools are shifting at an incredible pace. Stay on top of those changes and continue to refine the “playbook”.
The process is working. If you have been struggling to gain traction with your business users and only feel as if you’re scratching the surface, a Center of Excellence solution or some of its aspects might be an option for you to consider. Contact us if you’d like to learn more.
As a forward-thinking leader, the starting point is for you to see the vision of what these modern tools and applications can do for your organization and getting stakeholders to and want to get there. Those are two very distinct elements. We talk with a lot of organizations, and they generally fall into two camps. One sees the value, knows why it’s important, but also realizes they have struggled with their current knowledge and resources to get there. The other doesn’t see the value. The latter makes for more difficult conversations and is outside the scope of this post, but look for the “Need and Value for Digital Transformation” in future post.
[1] Microsoft Enterprise Team, March 2017
SharePoint Framework Development IntroductionI recently was asked to customize a SharePoint Online “modern” communication site. I’ve been working with SharePoint steadily for the last 7 years, so I’ve become quite comfortable with it over time. I’m a developer who really doesn’t mind getting his hands dirty and love learning new technologies. I went into this project with a level of enthusiasm that I haven’t had since I first started customizing SharePoint, as I was very interested in learning more about the SharePoint Framework. Interestingly, what I found was, developing modern web parts felt like a trip back in time, but in a good way! Open source tools, command line interfaces, cross-platform development. It’s like taking a trip back 20 years – everything old is new again.
I’m going to share what I’ve learned about creating SharePoint modern web parts using the SharePoint Framework. There are a lot of different pieces that you need to put together:
- JavaScript
- TypeScript
- React
- js
- CSS (SASS)
- Npm
- Gulp
- And more!
What I found was, I could successfully build a simple web part by following instructions I found online, but I really didn’t understand all the moving parts – I just sort of copied working examples and modified them for my use. This technique certainly works, but it may (and probably will) lead to less efficient / harder to maintain web parts. I also found that all the different technologies started to blend together, and I didn’t have a good understanding of what each technology was responsible for. And that’s where this blog fits in.
I’m going to walk through the process of creating SharePoint Framework web parts, but I’m going to take a step back and show each technology independent of the others in the context of building an end to end solution. The application I’ll be creating is near and dear to our company – we here at Timlin are all avid golfers and we participate in a fantasy golf league. To run our league, I need to store and report on individual PGA tour players earnings. This data is all available via a combination of HTML and JSON files on the PGA Tour’s website. I’ve decided to use Node.js and JavaScript to parse and store the data. I will then use SharePoint to create a dashboard with modern web parts to display various statistics, the weekly results, and current standings.
The first step is configuring the development environment, which I’ll be covering in the first part of this blog series… stay tuned!
Timer Trigger Function Apps in AzureIntroduction
In the not too distant past, if you wanted to run code at regular intervals you had a few go-to options to choose from. If you wanted a “down and dirty” solution, a quick PowerShell script could be scheduled using the Task Scheduler. If you needed anything more advanced or formal, you could write a Windows Service to house both the logic and the scheduling for unattended execution. In the age of cloud computing you may think of firing up an Azure Virtual Machine to accomplish the same tasks, but without needing an on-premise server always running. But why maintain an entire machine for code that needs to run once a day, or even once an hour? Fortunately, Microsoft has provided a flexible, easy to use solution for this type of task in the form of Timer Trigger functions within Azure Function Apps.
Azure Functions let you write the code to perform your task, without worrying about the infrastructure that runs it. Depending on the trigger type, there are different languages available to code your logic, including C#, PowerShell, TypeScript, and others. Regardless of which you choose, you get a powerful browser-based user interface with which to write, configure, and monitor your code.
In my case I was looking to create an automated daily check to see who didn’t complete their timesheets for the prior business day, sending an email with the list of offenders should any exist. We use Project Online to track daily hours, so I wanted to directly pull from that data using the OData reporting interface to make the determination. Before running through these steps in your own environment, be sure you understand Azure pricing models. The solution described here costs pennies per month, but that could change based on total usage, subscription plans, or future changes to the pricing models.
Getting started
To get started, navigate to portal.azure.com. In the portal, click on the “All resource” navigation link where you will see everything associated with your instance. To create a new Function App, click on the Add button in the ribbon. This will bring up a list of everything available in the Azure Marketplace. In the search box, search for and select “Function App”, which should bring up the description, publisher, pricing, and documentation panel for the app.
Press the Create button to get started. You will first be presented with a list of general options for your function app.
Notes:
- The app name must be globally unique, so you may want to preface it with your company or product name
- Be sure to read up and understand Resource Groups, Storage accounts, Locations, and the difference between Consumption Plan and App Service plan, as they can have a drastic impact on the charges incurred
Once you have setup the basics of the Function App, it is time to add an actual function. As of this writing, there are 33 different triggers to choose from! For our case we will use the Timer Trigger.
Add the Timer Trigger by finding the Timer trigger card and clicking on a language choice, such as C#. You will then be prompted for a name and a Timer trigger schedule. Don’t worry if you don’t understand cron expressions; there are plenty of examples and documentation within the designer. For our daily job, we use the expression “0 30 14 * * 1-5”, to specify Monday through Friday at 2:30 PM UTC (9:30 AM Eastern).
Setting up
You should now be in the designer, with the file “run.csx” open. This will be the main entry point for your function. The default template will provice a Run method that passes in the time and a TraceWriter for logging purposes. Before we get too far along here, we need to think about what other libraries we want to use in order to gain access to SharePoint Online and the Project OData endpoints. To do this, expand the “View Files” pane on the right and select the “project.json” file. This is the “package reference” used to tell NuGet which packages to retrieve for your project. A reference can be found at https://docs.microsoft.com/en-us/nuget/archive/project-json. For this project, we are using the SharePoint Online CSOM library and the Newtonsoft Json library. Our library file will look like this:
This will implicitly create a project.lock.json file with all of the details regarding the individual assemblies brought into our application.
We’ll also want to add a few application settings for our mail configuration, rather than having them directly within the code. Application Settings can be configured by going to the top-level node of your function in the tree view, and selecting the “Application settings” tab. You can add, edit, or delete your settings in the Application settings section of that page, to be referenced within your code as needed.
On to the code!
Our code will start with our using statements, as well as some configuration data we’ll pull from application settings and/or hard code as desired.
using System.Text;
using System.Threading;
using System.Threading.Tasks;
using System.Net;
using System.Net.Mail;
using Microsoft.SharePoint.Client;
using Newtonsoft.Json;
// Mail server configuration
private static string mailHost = ConfigurationManager.AppSettings[“MailHost”];
private static int mailPort = Convert.ToInt32(ConfigurationManager.AppSettings[“MailPort”]);
private static string username = ConfigurationManager.AppSettings[“EmailUsername”];
private static string password = ConfigurationManager.AppSettings[“EmailPassword”];
private static string toAddress = ConfigurationManager.AppSettings[“ToAddress”];
// Mail message constants
private const string mailSubjectTemplate = @”Missing Hours for {0}”; // {0} = Date
private const string mailBodyTemplate = @”<h3>The following people were missing hours yesterday…</h3>{0}”; // {0} = List of users
// API constants
private const string pwaPath = @”https://timlin.sharepoint.com/teams/projects/PWA/”;
private const string pwaApiPath = @”_api/ProjectData/”;
Next up, we construct a Url to use to retrieve the prior day’s time. This call will use the TimesheetLineActualDataSet data, selecting just the columns we need and filtering to a specific day. The date value will be a string template that we format in at runtime. I would recommend working the exact syntax out in your own environment via a browser to make sure you have it right.
// Templates for REST OData calls
private const string getHoursPwaRequestPathTemplate = @”TimesheetLineActualDataSet?$filter=TimeByDay%20eq%20datetime%27{0}%27&$select=ResourceName,ActualWorkBillable&$format=json”;
Next we create and initialize a dictionary to store the list of users we want to track.
// Dictionary of users to report on
private static Dictionary<string, double> userHours = new Dictionary<string, double>() {
{ “John Doe”, 0.0 },
{ “Jane Smith”, 0.0 },
{ “Hapie Goluky”, 0.0 },
{ “Joe Piccirilli”, 0.0 }
};
We also have a few “helper” functions to keep our main code clean.
// Get the prior business date
private static DateTime GetYesterday() {
var date = DateTime.Today;
switch (date.DayOfWeek) {
case DayOfWeek.Sunday:
date = date.AddDays(-2);
break;
case DayOfWeek.Monday:
date = date.AddDays(-3);
break;
default:
date = date.AddDays(-1);
break;
}
return date;
}
private static dynamic DeserializeJsonObject(string content) {
return JsonConvert.DeserializeObject<dynamic>(content);
}
private static void SendMessage(string subject, string body) {
var smtpClient = new SmtpClient();
smtpClient.UseDefaultCredentials = false;
smtpClient.Credentials = new System.Net.NetworkCredential(username, password);
smtpClient.Port = mailPort;
smtpClient.Host = mailHost;
smtpClient.DeliveryMethod = SmtpDeliveryMethod.Network;
smtpClient.EnableSsl = true;
var mailMessage = new MailMessage();
mailMessage.From = new MailAddress(username);
mailMessage.To.Add(new MailAddress(toAddress));
mailMessage.Subject = subject;
mailMessage.Body = body;
mailMessage.IsBodyHtml = true;
smtpClient.Send(mailMessage);
}
Reading the Project Online data uses .Net’s HttpWebRequest object, with SharePointOnlineCredentials providing the authentication mechanism. We encapsulate the credentials and the web GET calls with other helper properties and functions.
private static SharePointOnlineCredentials _creds;
private static SharePointOnlineCredentials Credentials {
get {
if (_creds == null) {
var securePassword = new SecureString();
foreach (char c in password.ToCharArray()) securePassword.AppendChar(c);
_creds = new SharePointOnlineCredentials(username, securePassword);
}
return _creds;
}
}
private static string WebGet(string requestUrl) {
var req = (HttpWebRequest)WebRequest.Create(requestUrl);
req.Credentials = Credentials;
req.Headers[“X-FORMS_BASED_AUTH_ACCEPTED”] = “f”;
var resp = (HttpWebResponse)req.GetResponse();
var receiveStream = resp.GetResponseStream();
var readStream = new StreamReader(receiveStream, Encoding.UTF8);
return readStream.ReadToEnd();
}
One final helper method constructs the call to WebGet.
// Get hours from PWA OData service for the prior business day
private static string GetHoursPwa(string date) {
return WebGet(pwaPath + pwaApiPath + string.Format(getHoursPwaRequestPathTemplate, date));
}
Within our main Run method, we orchestrate the overall logic. First, we get the date and log a message to know what date we ran for. These messages are visible in the Logs panel below the code window, and in the Monitor page accessible from the tree view navigation for all execution.
public static void Run(TimerInfo myTimer, TraceWriter log)
{
_log = log;
// Get yesterday’s date
var date = GetYesterday().ToString(“yyyy-MM-dd”);
_log.Info($”Running for {date}”);
Next we get and deserialize the data into a “dynamic” object.
// Get the PWA OData
var data = GetHoursPwa(date);
// Deserialize to a dynamic object
var dynamicObject = DeserializeJsonObject(data);
We’ll then iterate over the data in the dynamic object and aggregate the hours for each resource’s time entries into our dictionary.
// Populate our userHours dictionary based on hours in timesheet
foreach (var user in dynamicObject.value) {
if (userHours.ContainsKey(user.ResourceName.ToString())) {
userHours[user.ResourceName.ToString()] += Double.Parse(user.ActualWorkBillable.ToString());
}
}
We only need to deal with users with no hours, so we’ll use a quick Linq statement to extract them.
// Extract the names of users with 0 hours
var usersWithNoHours = userHours.Where(x => x.Value == 0.0).Select(x => x.Key);
Finally, we’ll send an email message out to our distribution list if there are any offenders or log the fact that all is clear if not.
// Send the message, if there are any users without hours
if (usersWithNoHours.Any()) {
var subject = string.Format(mailSubjectTemplate, date);
var body = string.Format(mailBodyTemplate, string.Join(“<br />”, usersWithNoHours));
_log.Info(body);
SendMessage(subject, body);
}
else
{
_log.Info(“No offenders found!”);
}
Wrapping up
Once the code is in place, the App is running, and the timer function is enabled, the code will wake up every day, run through the logic, and go back to sleep until needed again. As we have this configured, using a Consumption pricing tier, this once-daily execution costs less than $0.10 per month beyond any standard subscription costs. As stated before, your mileage may vary based on the specifics of your plan, number of calls, disk / data usage, etc., so be sure to research these items first and monitor your application within Azure to ensure your costs are in line with expectations.
Enhancing Nintex Forms with JavascriptNintex Forms provide an intuitive interface for designers to quickly create form-enabled solutions.
However, some scenarios require us to go beyond the out-of-the-box capabilities. For example, we recently had a requirement involving two lists and the need to read in rate information from a second list. The complexity was that if a specific date field changes in one list, the form would have to refresh the rate information dynamically without closing the form.
The purpose of this blog post is to provide one post that contains the information you need to effectively enhance your Nintex Forms using JavaScript.
How To Enhance Nintext Forms With JavaScripts
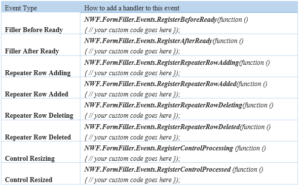
A Nintex Form is bound to both a SharePoint list and an associated content type within that list. To read from a second list requires the use of JavaScript. Form designers with JavaScript knowledge can now leverage the events shown below and are assured that their code runs safely as expected when these events occur during runtime. The following table summarizes the available events.
Embedding Custom JavaScript Within a Nintext Form
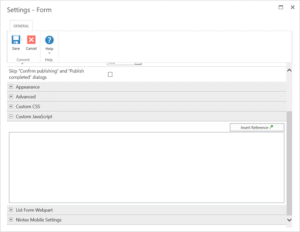
One of the simplest ways to include JavaScript within a Nintex form is to simply embed the JavaScript within the form itself. Within Form Settings, you will find a Custom JavaScript header under which you can include JavaScript. While this is a completely acceptable approach within the design of a single form, you may wish to consider using custom JavaScript includes if the JavaScript is to be reused.
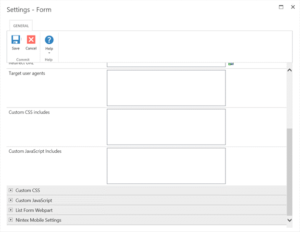
CUSTOM JAVASCRIPT INCLUDES
This setting is found in Form Settings within the Nintex Forms Designer and is used for including custom JavaScript files at runtime. These includes can use local includes from within SharePoint such as ‘/SiteAssets/example.js’ or external includes by simply adding the URL to the desired JavaScript file.
BUTTON ACTIONS
With Nintex Forms Designer, you can drop a Button control onto the Form. By right-clicking on the button control and selecting Settings you can choose to set the Button action to JavaScript. Additionally, under the Advanced header of the control settings you can provide the JavaScript to execute when a user clicks the button under the Client click setting
STORING CLIENT ID IN JAVASCRIPT VARIABLES
This option creates a JavaScript variable that references the Client ID of the form control and is used for allowing data processing between the Nintex Form and JavaScript. These settings are found under the control settings. To allow this to happen you must set Store Client ID in JavaScript variable to Yes and you must set a corresponding JavaScript variable name beside Client ID JavaScript variable name.
client_id_in_javascript.pngFORM CONTROLS AND CUSTOM VALIDATION FUNCTIONS
Nintex Forms allows for custom validation of form controls based on JavaScript. Within the form control settings under the Validation header, set Use Custom Validation to Yes and provide the relevant JavaScript within the Custom Validation Function setting.
form_controls.pngFILLER AFTER READY
By default, a Nintex form will focus on the first enabled input control on the form. However, now you can switch the focus to a specific control using JavaScript. We have demonstrated with the examples below:
Set initial mouse cursor focus in the Single Line Text Control
1. Open the Nintex Forms designer and drag a Single Line Text control onto the canvas.\
2. Click on the control and locate the CSS class field in the Ribbon. Type ‘singlelineFocus’.
3. Click on the Nintex Forms tab, and click on the Settings button in the Ribbon.
4. Expand the Custom JavaScriptsection, and enter the following code:
NWF.FormFiller.Events.RegisterAfterReady(function ()
{
NWF$(‘.singlelineFocus input.nf-associated-control’).focus();
});
Click Save and then publish the form. When you add a new item, you should notice that the initial focus of the form has changed, and it is now occurring in the Single Line of text control
Set initial mouse cursor focus in the Date/ Time Control
1. Open the Nintex Forms designer and drag a Date/Time control onto the canvas.
2. Click on the control and locate the CSS class field in the Ribbon. Type ‘datetimeFocus’.
3. Click on the Nintex Forms tab, and click on the Settings button in the Ribbon.
4. Expand the Custom JavaScript section, and enter the following code:
NWF.FormFiller.Events.RegisterAfterReady(function ()
{
NWF$(‘. datetimeFocus input.nf-date-picker’).focus();
});
Click Save and then publish the form. When you add a new item, you should notice that the initial focus of the form has changed, and it is now occurring in the Date/Time control.
Set initial mouse cursor focus in the People Control
1. Open the Nintex Forms Designer and drag a People control onto the canvas.
2. Click on the control and locate the CSS class field in the Ribbon. Type ‘peopleFocus’.
3. Click on the Nintex Forms tab, and click on the Settings button in the Ribbon.
4. Expand the Custom JavaScript section, and enter the following code:
NWF.FormFiller.Events.RegisterRepeaterRowAdding(function () {
var repeaterControl = NWF$(arguments[0][0]);
if (repeaterControl.hasClass(‘expensesRepeater’)) {
}
});
Click Save and then publish the form. Add a new item, and click on Add New Row to add another row to the repeating section. A message should appear at the top of the form informing you that you are about to add a new entry. When you click OK on the message, the new row should will be added.
Repeater Row Added
You can trigger this event when you want to inform the user that a new row has been added to the repeating section.
1. Open the designer and drag a Repeating Section control onto the canvas.
2. Click on the control and locate the CSS class field in the Ribbon. Type ‘expensesRepeater’.
3. Click on the Nintex Forms tab, and click on the Settings button in the Ribbon.
4. Expand the Custom JavaScript section, and enter the following code:
NWF.FormFiller.Events.RegisterRepeaterRowAdded(function ()
{
var repeaterRow = NWF$(arguments[0][0]);
if(NWF$(repeaterRow.parents(‘.nf-repeater’)[0]).hasClass(‘expensesRepeater’))
{
alert(‘new row has been added to the expenses1 repeater’);
}});
Click Save and then publish the form. Add a new item, and click on Add New Row to add another row to the repeating section. A new row will be added to the repeating section and then a message box will appear.
Repeater Row Deleting
You can trigger this event with you want to inform the user they are deleting a row from the repeating section.
1. Open the designer and drag a Repeating Section control onto the canvas.
2. Click on the control and locate the CSS class field in the Ribbon. Type ‘expensesRepeater’.
3. Click on the Nintex Forms tab, and click on the Settings button in the Ribbon.
4. Expand the Custom JavaScript section, and enter the following code:
NWF.FormFiller.Events.RegisterRepeaterRowDeleting(function ()
{
var repeaterRow = NWF$(arguments[0][0]);
if(NWF$(repeaterRow.parents(‘.nf-repeater’)[0]).hasClass(‘expensesRepeater’))
{
alert(‘you are about to delete a row from the expenses1 repeater’);
}});
Click Save and then publish the form. Add a new item, and click on Add New Row to add another row to the repeating section. Next, click on the delete icon to delete a row. A message will tell you that the row is about to be deleted. When you click OK, the row will be deleted.
Repeater Row Deleted
You can trigger this event when you want to inform the user that a row from the repeating section has been deleted.
1. Open the designer and drag a Repeating Section control onto the canvas.
2. Click on the control and locate the CSS class field in the Ribbon. Type ‘expensesRepeater’.
3. Click on the Nintex Forms tab, and click on the Settings button in the Ribbon.
4. Expand the Custom JavaScript section, and enter the following code:
NWF.FormFiller.Events.RegisterRepeaterRowDeleted(function ()
{
var repeaterControl = NWF$(arguments[0][0]);
if(repeaterControl.hasClass(‘expensesRepeater’))
{
alert(‘you have just deleted a row from the expenses1 repeater’);
}
});
SharePoint CSOM Scripting in PowerShell
I was recently faced with a migration issue that left the documents in a document library mapped improperly to a lookup field in a SharePoint list.
The problem?
The migration tool did not preserve the original document ID’s when it migrated them to a new document library. Since the migration tool had no easy way to preserve the ID’s, I was left with the task of remapping the ID’s and fixing the lookup values post-migration.
I had my migration completely scripted with PowerShell and wanted to use PowerShell for the remapping as well.
I needed a way to access internal servers easily and wasn’t too concerned about performance – it’s a one-time script. Enter CSOM. I decided to write two PowerShell scripts – one that mapped the original ID of the item in the list with the document name, and one that read the list of documents, finds the new document ID of the document and associates it with the lookup column.
This works because the Migration tool is able to maintain list item id’s, i.e. source list item ID 10 will still be item ID 10 in the destination list – it just can’t do it for document libraries!
Let’s walk through creating the first script, “MapItemIdToDocumentTitle.ps1”
Step 1: Add command line parameters to the script
Fortunately, PowerShell makes this so easy:
param (
[string]$url = “https://sourcesiteurl”,
[string]$listName = “Source List Name”,
[string]$associatedListName = “Associated Document Library Name”,
[string]$associatedDocsFieldName = “Associated_x0020_Docs”,
[string]$outfile = “out.csv”
)
Just make sure these are the first lines in your PowerShell script.
Step 2: Add the CSOM references to your script
# the path here may need to change if you used e.g. C:\Lib..
Add-Type -Path “c:\Program Files\Common Files\microsoft shared\Web Server Extensions\15\ISAPI\Microsoft.SharePoint.Client.dll”
Add-Type -Path “c:\Program Files\Common Files\microsoft shared\Web Server Extensions\15\ISAPI\Microsoft.SharePoint.Client.Runtime.dll”
# note that you might need some other references (depending on what your script does) for example:
Add-Type -Path “c:\Program Files\Common Files\microsoft shared\Web Server Extensions\15\ISAPI\Microsoft.SharePoint.Client.Taxonomy.dll”
Step 3: Create the client context and load the web
# connect/authenticate to SharePoint Online and get ClientContext object..
$clientContext = New-Object Microsoft.SharePoint.Client.ClientContext($url)
if (!$clientContext.ServerObjectIsNull.Value)
{
Write-Host “Connected to SharePoint site: ‘$Url'” -ForegroundColor Green
}
$rootweb = $clientContext.Web
$childWebs = $rootweb.Webs
$clientContext.Load($rootweb)
$clientContext.Load($childWebs)
$clientContext.ExecuteQuery()
Note: Nothing is actually executed on the server until the “ExecuteQuery” method is called. This is the key to working with the CSOM – do stuff locally, then execute on the server. You will see this pattern throughout the code.
Step 4: Process the web (create the CSV file)
processWeb($clientContext.Web)
Where processWeb is the method that does all of the work:
function processWeb($web)
{
Grab the lists – remember, nothing happens on the server until ExecuteQuery is called:
$lists = $web.Lists
$clientContext.Load($web)
$clientContext.Load($lists)
$clientContext.ExecuteQuery()
In order to output CSV easily, all output is stored in an array
Write-Host “Processing web: ” $web.Title
$output = @()
Get all items from the source list (note: this works because the source list has less than 10k items). Again, notice the ExecuteQuery line – data is not retrieved from the server until this line executes.
$theList = $lists.GetByTitle($listName)
$docList = $lists.GetByTitle($associatedListName)
$query = [Microsoft.SharePoint.Client.CamlQuery]::CreateAllItemsQuery(9999)
$items = $theList.GetItems($query)
$clientContext.Load($items)
$clientContext.ExecuteQuery()
Now we just loop through each item finding items that have associated docs. I needed to go back to the server to load the actual document item and then again to get the actual file (so I could grab the file name).
foreach($item in $items)
{
$associatedDocs = $item[$associatedDocsFieldName]
if ($associatedDocs)
{
foreach($associatedDoc in $associatedDocs)
{
# get the actual file name from the associated list
$docItem = $docList.GetItemById($associatedDoc.LookupId)
$clientContext.Load($docItem)
$clientContext.ExecuteQuery()
$docFile = $docItem.file
$clientContext.Load($docFile)
$clientContext.ExecuteQuery()
$docName = $docFile.Name
Writing to CSV is picky!
You can output as many columns as you want, just use the “add-member” call with the NoteProperty membertype and name it appropriately. Append each row to the output.
$row = new-object PSObject
$row | add-member -membertype NoteProperty -name “ID” -value $item.ID
$row | add-member -membertype NoteProperty -name “FileID” -value $associatedDoc.LookupId
$row | add-member -membertype NoteProperty -name “FileName” -value $docName
$output += $row
}
}
}
Once we’ve completed the process, simply use the “export-csv” call and PowerShell does all the magic of writing the header and comma separated values. It’s really that easy!
$output | export-csv -NoTypeInformation -Path $outfile
Write-Host “Output saved to $outfile”
}
That’s it.
The second script I wrote is very similar, but reads the CSV file as input and remaps the documents. While writing these scripts, simply refer to MSDN for the CSOM reference: https://msdn.microsoft.com/en-us/library/office/dn268594.aspx
Hopefully, this post will help you get started with your CSOM PowerShell scripting. I love using PowerShell for this type of stuff – it’s super easy to write, easy to run and all it requires is a text editor.