
It’s summertime and that means the annual SPTechCon Boston conference is happening in a few weeks. The Sharepoint & Office 365 conference will be in the Bay State from August 26 – 29, 2018. The conference is a training, problem-solving, and networking event for those who are working with SharePoint, OneDrive, and Office 365. Attendees will have access to users and companies to find solutions to their current environments. In addition, attendees will have many opportunities to collaborate with other users and to discover strategies to work smarter and increase productivity within their organizations.
If you’re planning to attend SPTechCon this year, we put together this ultimate guide so you know all the details, and information, and even a couple of strategies to make the most of your experience.
SPTechCon Key Dates
Now until August 10th: Registration open – get your ticket to SPTechCon Boston here. Register using our code TIM18 to receive a discount.
August 10th: Registration Ends
August 15th: Last day to make hotel reservations at Sheraton Boston Hotel
August 26th: First Day of Conference — Tutorials & Challenges, Exhibit Hall Open and Evening Reception with Lightning talks (at 5 pm)
August 27th: Second Day of Conference — Technical Classes, Keynote by Karuana Gatimu from Microsoft, Exhibit Hall Open, Networking Reception (at 5:30 pm)
August 28th: Third Day of Conference — Technical Classes, Naomi Moneypenny from Microsoft, Exhibit Hall Open, O365 User Group Meeting (at 5:30 pm)
August 29th: Last Day of Conference — Stump the Experts (at 10 am), Interactive Panel Discussion (at 10:45 am), Technical Classes
Exciting Programs Happening at SPTechCon Boston
Office 365 Hands-On Challenge
When: Sunday, August 26, 2018
Description: Join fellow members on August 26th of the collaborative Office 365 and SharePoint community in participating in a challenge to create digital collaborative solutions for Plymouth State University’s Music and Theater Department. There will be up to five teams each with a different Office 365 related challenge to solve, and each team will have an expert advisor from the SPTechCon Speakers to guide them through hurdles uncovered in the challenge. To learn more and to apply to participate in the challenge, visit the conference website.
Communication Sites as a Real-World Example
When: Monday, August 27 at 11:30 am
Description: Ian Dicker, Director of Architecture at Timlin Enterprises will provide a real-world example of an intranet built using Communication Sites, extensions, and web parts using the SharePoint Framework. He will discuss the design challenges and how they were addressed. Add this session to your agenda here.
Digital Transformation and Employee Engagement – How to Make It Happen with Office 365
When: Monday, August 27, 2018, at 3:15 pm
Description: In this session, Ryan Thomas, CEO of Timlin Enterprises, will provide specific ideas on what you can do to help your organization successfully implement features in Office 365 that result in increased user adoption and true employee engagement. User adoption is not a project and requires a disciplined, process-driven approach with the proper strategy, governance, architecture, and training components. This approach ensures you engage your employees and gain the business value of digital transformation using O365.
Ask SharePoint & Office 365 Experts Anything
When: Tuesday, August 28, 2018, from 5:30 – 7:30 pm
Description: This will be a 1:1 discussion with experts in the SharePoint community as we hold a combined SharePoint User Group meeting for the entire New England region. Speakers from the SPTechCon Conference as well as other Microsoft and MVP attendees will take your questions in an informal setting. For more details, visit the conference website.
Stump the Experts
When: Wednesday, August 29, 2018, at 10:00 am
Timlin Enterprises is excited to moderate this year’s Stump the Experts Panel happening on August 29th at 10 am. This will be an open discussion where you can test your knowledge or find out the answers to troubling SharePoint and Office 365 topics against some of the best. So come prepared to listen, learn some new things, and to have some fun.
How To Get The Most Out Of Your SPTechCon Experience
- To make the most of your attendance, you need to prepare. Build your conference schedule in advance, but make sure you leave some time open during the day to recharge and find some solitude. Conferences are jam packed with sessions and networking so you want to make sure you have time in your day to see everything you want to see, without burning out by the end of each day.
- Register for SPTechCon Boston before August 10th and use the Timlin discount code, TIM18.
- Set goals for networking and education. While you’re planning your schedule, make a list of the new things you want to learn while attending SPTechCon and who you want to meet.
- Speak to the companies in the Exhibit Hall. They want to chat with you and this is a great way to warm up to networking and conversing with those people on your list. While you’re in the Exhibit Hall, be sure to say hello to the Timlin team at booth #301.
- Join the conversation on social media. Connect with speakers and other Sharepoint and Office 365 users by chatting on Twitter under the official conference hashtag, #SPTechCon
We can’t wait to SPTechCon Boston and look forward to seeing you there! Let us know if you’ll be coming to the conference by following and sending us a message on Twitter, @TimlinEnt.
Y B a < SP > H8r? Learn to Love the New SharePoint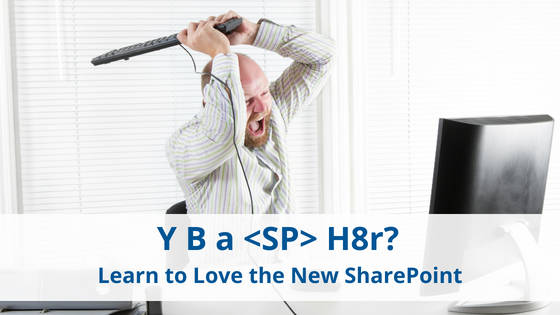
If there’s one, strong, recurring theme I’ve witnessed over my 10+ years working with SharePoint and the people who use it, it’s that most folks love to hate SharePoint!
And for good reasons.
SharePoint is far from perfect – I too have been plagued with deep negative thoughts about the platform. But admittedly, MOST of the time, my frustration has turned out to be my own fault...
- Rushing into building farms by clicking next>next>next
- Building tall, rigid hierarchies that followed my company’s org chart
- Showing enthusiastic power users how to copy their files over with Explorer and build elaborate InfoPath forms
- Installing free 3rd party widgets to make sites “pop”
- Crawling EVERYTHING!
Most of these mistakes were made in my early days of SharePointing, and I learned quickly just how bad they were. Performance would drag, tickets would pile up, and HR folks once asked me to explain why employees’ salary information was visible in SharePoint search results (oops). If you’re anything like me, you don’t often learn things the easy way. So, we repeat these mistakes and keep wondering why the platform is so bad.
And it’s not just the Admins
End users have been forced to adopt a new way of doing things that is clunky, confusing, undependable, and slow …then have to deal with bad attitudes of already frustrated IT techs who helped create these unfortunate messes (or worse, have inherited them, not given time/$$$ to fix them, and have to juggle complaints that grow exponentially). Then, the business gets a vendor quote for an upgrade or migration, and panic ensues. Is it any wonder why some people are visibly shaken when they hear the word “SharePoint”?
Sure, there are bugs – some stuff just doesn’t work the way it should. And, yes, it is true that Microsoft “stitched” together several products from different (and competing) project groups to deliver early versions of SharePoint. This resulted in a disjointed, awkward admin experience that seemed always broken and nearly impossible to troubleshoot with any speed. End users paid the price with poor collaboration experiences and the inability to find their stuff. They reverted to email and attachments from file shares (or their desktops <shudder>). Weren’t these the very things we were all told would never happen in the world of SharePoint?
Then Microsoft wised up

Even with mounting frustrations, Microsoft saw strong potential in this new way to collaborate. With time, they wised up and pulled product teams together with more clarity on vision, leadership, and product strategy. They listened to end users and delivered vast improvements in administrative ease, end-user experience, and scalability with each major release. Since the 2010 version (the first “true” enterprise version), the total cost of ownership has continued to go down even as adoption and overall environment size has gone up.
Now, with the cloud offering virtually unlimited scale, stable performance, flexible costing models, and a constantly evolving set of features/functionality, the platform appears to be unstoppable. While on-prem environments remain highly relevant for some organizations, the steady push from Microsoft is to go to the cloud. It’s better for them (who doesn’t want predictable, recurring revenue?), and they’re doing everything they can to make it better for clients. The more recent enhancements implemented across the Office 365 platform with Microsoft Teams, Planner and Flow/PowerApps to name just a few, make it a quite compelling platform for your digital transformation.
Pushback against going to the cloud

Yet, there has been pushback against going to the cloud. However, in our experience, most of the pushback we see is purely psychological.
- Is it secure?
Fears about data security and/or geolocation abound. However, growing evidence has shown that Microsoft’s infrastructure is likely (and statistically) far more secure than yours. - My portal doesn’t look right.
Yes, businesses may not be able to make their portal look, feel, and act exactly the way they’d like. Trust us, this is usually a good thing! Standardization seems like small beans in the grand scheme of things when weighed against stability, supportability, performance, better end-user adoption, and lower costs. And, keep in mind that migration happens! More customizations = harder, more expensive, longer migrations that no one enjoys. Unfortunately, there is no magic pill for this condition! Even the best migration tools simply cannot handle all the variability of these boutique environments. - If we go to the cloud, what’s a SharePoint Administrator to do?
Rather than shedding their SharePoint administrators, many businesses are finding huge value in leveraging them throughout the organization. Behind the scenes, former admins can prove indispensable for:- Managing external sharing
- Forming and managing governance committees
- Prepping for compliance audits
- Establishing taxonomy/folksonomy
- Archiving stale data
- Monitoring and testing new functionality
- Enforcing the general rules of engagement
- Automating processes
- Building forms
- Setting up managed metadata
- Optimizing search
Bottom line? You can learn to love again.
The Office 365 platform has a lot to offer organizations striving for digital transformation, but balancing flexibility, scalability, performance, end-user experience, administrative overhead, and a constantly-evolving feature set is exceptionally difficult. There are bound to be missteps along the way, and most organizations are not prepared to manage Microsoft’s rapid release cycles. You will want to think differently about your resources, just like you did about your platform.
If you don’t have in-house expertise that has kept up with the evolution of the platform, it will be imperative to leverage a trusted partner who has. Doing so can dramatically improve your business outcomes, increase user adoption, and reduce your long-term costs.

To maximize your Office 365 investment, you need to ensure user adoption, so it’s imperative to incorporate proven change acceptance techniques when introducing new technology to your employees. Once you have business and IT alignment in regards to your innovation goals, it’s time to implement the software and ensure your users adopt, use, and expand their skills within Office 365.
Let’s explore seven key areas of value your business will realize with full Office 365 user adoption.
1.) Increased Efficiency and Innovation
With a functioning and adopted Office 365 solution in place, you save time managing technology and can focus on delivering innovation to your business. In order to achieve this level of innovation, your users will need to know how to properly use the Office 365 tools and will need to be comfortable using them on a daily basis.
Continually provide the solutions you know users need. For example, don’t let users randomly discover tools like Microsoft Teams. Instead, engage with and provide them with training, guidelines, and a process for using Teams to ensure they’re using it optimally amongst their own teams and across departments.
“With a functioning and adopted Office 365 solution in place, you save time required for managing technology and instead, can focus on delivering innovation and value to your business.”
2.) Protected Data: Internally and Externally
In 2017 alone, there were 1,120 total data breaches and more than 171 million personal records of consumers exposed. This number of attacks is only expected to increase, with a target on small and large companies alike.
Luckily, Office 365 has tremendous control and compliance capabilities across email, SharePoint, OneDrive, Teams, and Yammer, which makes it easier to control and protect proprietary information.
Properly enacting the policies, procedures, retention, disposition, data loss prevention, and information protection enable content sharing, internally and externally, while ensuring data is secure. Using Office 365 tools to collaborate with external partners, as opposed to non-supported third-party tools like Box or Dropbox, also ensures your content is properly governed and risk is reduced.
3.) Effectively Managed Intellectual Property
When your users have properly adopted Office 365, confidential or proprietary information moves to your intranet, Teams or team sites, communication sites, project areas, and OneDrive. By reducing your organization’s reliance on email, and instead, storing key information in a reliable system specifically designed for a search-first user experience, you more efficiently manage critical data and intellectual property.
Gone are the days when file shares, email, and the “My Documents” folder are haphazardly used. And with today’s agile workforce, it’s key that your important knowledge is maintained within your organization’s Office 365 structure and not in someone’s inbox, on their own personal device, or another unsupported third-party service.
“Using Office 365 components for more than simple email and document storage creates new opportunities for improving efficiencies.”
4.) Increased Business Intelligence
Once users have adopted Office 365, your organization can use Power BI to access valuable data stored in the various tools and deliver insights to make intelligent business decisions.
Microsoft has long been a leader in this area for a decade. Gartner has positioned them as a Leader in their Magic Quadrant for Business Intelligence and Analytics Platforms for ten consecutive years. Sample areas where Power BI delivers insight include:
- Key financial metrics
- IT spend
- Sales effectiveness
It’s another way using Office 365 components for more than simple email and document storage creates new opportunities for improving your organization’s efficiencies.

5.) Empowered Employees
With Office 365, you can empower employees by enabling more effective collaboration and supporting decentralized teams and remote workers through tools like intranets, extranets, and collaboration solutions using SharePoint, Microsoft Teams, OneDrive and all the features in Office 365. Employees now have a work environment that’s intelligent, flexible, and secure, and they can collaborate from anywhere, on any device.
6.) Decreased Reliance on Email & Client Applications
With Office 365, you eliminate the need to upgrade your desktop software, patch servers, and perform platform migrations every four years. This time savings improves productivity, allowing you to identify your organization’s business opportunities instead of just worrying about the IT problems. The underlying changes with upgrades, server patches, and platform migrations still happen, but they are gradual and more manageable as they happen over the platform life cycles.
Embracing and supporting employees’ use of Office 365 also keeps them on the front edge of modern technology, providing opportunities to grow their skills and career.
7.) Accelerated Digital Transformation
The difficulty with digital transformation is that it is 100% based on people and their ability and willingness to change how they operate. Users can send emails and use online file shares, but social content, publishing, project management, document management, business automation, and business intelligence are a different story. Full user adoption accelerates the speed of business and your digital transformation.
Unfortunately, an organization cannot simply deploy software and expect magic to happen. It’s accelerating broader business activities, processes, competencies, and models to fully leverage digital technologies. It’s challenging business leaders to harness technology to shape their specific destiny. It’s a living process that shifts throughout the journey.
It’s why 88% rely on third-party providers for at least one component.
It’s also why we leverage a proven process methodology that we refer to as Center of Excellence service for Office 365 and related technologies.
Interested in learning more about a Center of Excellence approach? Download our free whitepaper here.
Over the past few years, IT has transitioned from a department focused on infrastructure and support to one of innovation, transformation, and competitive advantage. Traditional roles, resources, and expectations have been disrupted by shifting user demands and needs. To keep up and ahead of these demands, the IT department now has an important seat at the executive table. The role of IT is to not only provide technical support but to also provide fresh solutions and tools that will keep their organization ahead of the wave of innovation.
Cloud Computing Brings Change and Innovation
The focus in IT has been sky-high. Organizations and users fully understand and prefer the flexibility and collaboration of cloud technology. Now, IT is expected to lead the charge into the cloud by providing innovation, efficiency, collaboration, and—most importantly—business value. But many IT departments have high expectations to provide increased, faster, and better results with fewer resources and less time. Without the right technology and budgets, supporting, training, and managing SaaS technology becomes a daunting task.
At the same time of all this change and disruption, Office 365 has emerged and is aimed squarely at supplying the tools to make these capabilities accessible and less daunting for IT departments. By 2019, Microsoft expects two-thirds of their traditional Office customers to migrate to Office 365 subscription plans. This demonstrates a new normal for IT and the end-user community.
So as IT faces this new normal, how can you be successful in this new role? It requires two requisites.
Let’s dive in.
Business and IT Alignment
Leading business transformation with these new tools requires vision and focus. Without a laser-focused vision and a means to measure your intended success, most implementations are based on assumptions, and IT professionals are guessing their way through the process.
Instead of playing a guessing game, IT can take a step up to align technology with the needs of the business. IT can no longer work in a silo — they need to be invited to the table to define, release, and support solutions that will improve the business.
To successfully align IT with business, start by:
- Meet with all stakeholders to understand their specific requirements—in detail—and clearly communicate why the services will benefit them and how business value will be achieved.
- Implement solutions like Office 365 that meet all requirements.
- Align stakeholders when planning and deploying collaboration solutions.
User Adoption
Just because an organization deploys Office 365, doesn’t mean they’ll reap the benefits of digital transformation. ‘Build it and they will come’ simply doesn’t work with this type of solution. The difficulty is that success is 100% based on people and their abilities and willingness to change how they operate. Users can send emails and use online file shares, but social content, publishing, project management, document management, business automation, business intelligence, etc., need support from skilled personnel.
The path to success begins at user awareness, which leads to user engagement, and ends with user adoption. Here are a few ways to become successful in your user adoption strategies:
- Awareness
It’s important to communicate to end users the benefits that the Office 365 platform provides. Initial and ongoing communication across your end user community enlightens them on what is possible, prevents misunderstandings, and provides a sense of belonging to the organization. When internal groups are aware that tools and technologies are available to them, they are more likely to use and build upon them. - Engagement
Aware employees become engaged employees. Employee engagement goes beyond knowing tools, capabilities, and information exist and leads to genuine and sustained interest in how they can do their jobs better for the overall success of the organization. This occurs only when your tools are delivered deliberately and with purpose, training, support, and ongoing enhancements to suit user needs. Ongoing communication of the vision and value these tools bring to the organization fosters engagement and leads to adoption. - Adoption
Successful adoption is the holy grail in the land of collaboration and digital transformation. Adoption occurs when the user community employs the tools, services, and solutions provided for them because they want to take advantage of the value they continue to experience. Additionally, engaged employees who have adopted the use of the tools in their everyday work will encourage their colleagues and new hires to do the same, promoting the use of the capabilities across their own teams and departments. True adoption leads to employee efficiency and fewer user complaints and increases the organization’s confidence in IT to deliver solutions that meet business needs.
How a Center of Excellence Drives User Adoption and Value
In today’s changing IT landscape, it’s imperative to incorporate proven change acceptance techniques. With the above requisites along with a proven, deliberate framework, organizations can begin to truly realize the value of their Office 365 investment.
An alternative approach to achieving this success is the Office 365 Center of Excellence (CoE). What is the Center of Excellence? It is a proven process methodology that utilizes six services areas to improve and execute on digital transformation in Office 365 and SharePoint. It can greatly improve innovation, deliver business value, protect your internal and external data, decrease reliance on email, and empower your employees.
Learn more about the Center of Excellence framework by downloading our free whitepaper here.
Adopting and using Office 365 is a big investment and enabling and sustaining the capabilities of the Office 365 platform can be challenging even for the largest organization. Just maintaining deep knowledge on the entire platform and understanding the implications of each tool and every enhancement on your environment alone can be daunting. It’s why taking the “if you build it they will come” approach to Office 365 is simply destined for failure.
“Just maintaining deep knowledge on the entire platform and understanding the implications of each tool and every enhancement on your environment alone can be daunting”
One proven solution to maximizing and sustaining your Office 365 and SharePoint solutions is to adopt a managed, Center of Excellence approach. Let’s explore the common challenges of companies with Office 365 and SharePoint solutions and how a Center of Excellence can remedy them.
- You struggle with user adoption or see other colleagues struggling to understand the value of Office 365. Users will not flock to the higher value features of Office 365 without training and support. They can send emails and use online file shares on their own, but social content, publishing, project management, document management, business automation, business intelligence, and a lot more, need support from skilled personnel.
- You know you need a broader Vision, Roadmap, and Plan. A plan is required to provide the platform tools, but there are a lot of moving parts required to effectively launch, train, and support your end users for an effective set of capabilities.
- You know there is a lot of capability in those menu items, but you don’t really know what they do or how to use them effectively. Office 365 is a big platform – it’s Microsoft Teams, Project Online, Planner, SharePoint & SharePoint Online, OneDrive, Exchange, PowerBI, Flow, Yammer, and PowerApps and more – and it takes dedication by multiple people to truly understand all the functionality. There is a lot of value to be gained with the right people to help you understand and leverage it.
- You need help with Governance & Communication strategies. Governance is a difficult undertaking for many organizations. You see the value in bringing in a partner that has experience in helping organizations understand how to undertake envisioning of key, strategic elements of platforms this large. A partner with a process and set of questions ready to hit the ground running will save you a lot of time.
- You can’t keep up with all the enhancements. Microsoft is releasing changes to the Office 365 platform at a brisk pace. Keeping up with the features in your tenant, applications, and the impact they have on your end users can be difficult to manage. You need someone who not only is abreast of all of the enhancements but also knows your deployment and is accustomed to reviewing your administration center, identifying the key information, and working within a framework to communicate the updates to you and your team.
- You need Training that is specific to your policies, guidelines, and intended use of Office 365. Generic training falls short when you’ve spent the time to deliver and support Office 365 in a way that works best for your users. You don’t want all that effort to be wasted with “one size fits all” training. You want to guide your users down the path you have built for them.
- You have varying needs that can be difficult to forecast. You may need architecture, development, analysis, or troubleshooting at various times. You also may not understand the best way to solve a problem because you don’t have the experience in-house to understand the depth of all the features available to you.
- Your IT Department wants to focus on solutions, projects, and innovation, not training and support. Time spent supporting user requests takes employees away from other priority work. Ad hoc responses and supporting users is critical, but it’s not what every IT expert or Business Analyst wants from their career. Keep your people happy and engaged in doing the work they enjoy that provides value to your organization. Delegate the rest.
- You need elasticity in your team. Sometimes you need more help for small projects, sometimes you need less. Many times, you have two critical issues or projects, and it’s difficult to triage. Employees go on vacation and many prefer not to be on-call. A small cost to provide around the clock SLAs may be highly valuable to your organization.
- You don’t have a full-time employee with enough skills across the platform. Between a variety of skills (Business Analyst, Developer, Architect, Support Engineer, Workflow Specialist, Information Rights Guru, etc.) it is simply too difficult to have a single person or team fractionally available that knows you, your organization, and Office 365. It’s much more valuable and cost-effective to set this up as a service.
Learn more about the Center of Excellence framework by downloading our free whitepaper here.
Have you ever come across a time where you’ve needed to take information from Microsoft Teams, Skype for Business or another Office 365 Communication Application and copy it onto other Office 365 products for safekeeping or collaboration? The process of manually taking this information and putting it into a list in SharePoint or copying into an Excel file can be very tedious but the process can be optimized and streamlined using the Microsoft Bot Framework. The Bot Framework gives us the ability to create intelligent bots that can be triggered to take information from systems like Microsoft Teams or Skype For Business and publish it into other Office 365 platforms, such as SharePoint, for us.
Getting Started on the Microsoft Bot Framework
We can get started with creating our first bot on the framework by navigating to the Microsoft Bot Framework Developer platform, which can be found here. Once here, we can follow the prompt triggered by the “Create a Bot” button. This will then redirect you to your Azure portal to select between three types of bot templates (if you do not have an Azure subscription, you can sign up for a trial here and receive $200 in credit to utilize).
Please note that provisioning a Microsoft Bot, Azure Active Directory Application, App Service and other Azure resources will result in associated costs. In order to fully understand the associated costs that may incur from following this guide, please refer to the Azure Pricing Calculator which can be found here.
In this instance, we will want to select the “Web App Bot” template and select “Create”. You will be brought to a screen as shown below.
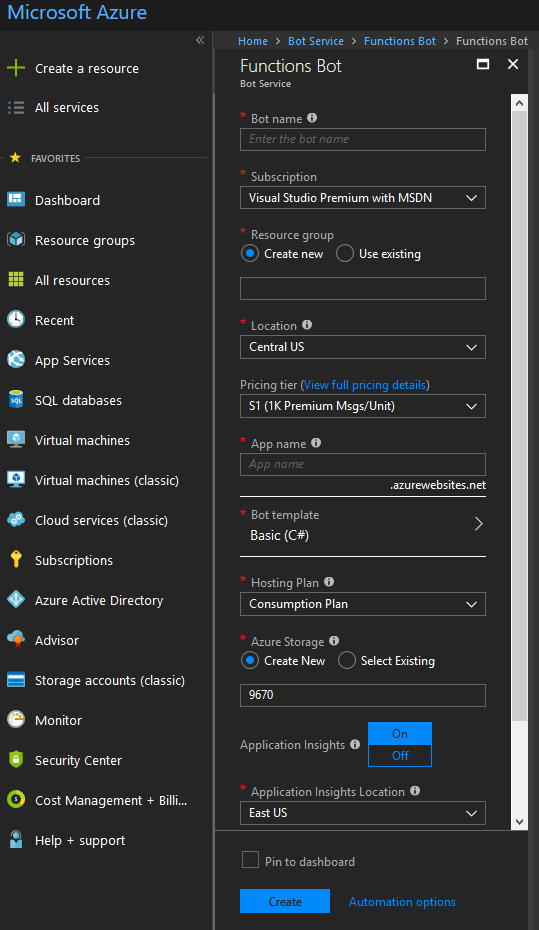
Once here, proceed to fill in all the required information for the bot. Feel free to create a new resource group or Azure storage blob or use existing instances if you have them. This guide will be using Node.JS so please select Node.JS Basic as the Bot template option.
Once all the information has been filled in, click on “Create” and wait for Azure to provision all necessary resources. When all resources have been successfully provisioned, navigate to your new Web App Bot resource. The management of this bot is very similar to managing other applications in Azure.
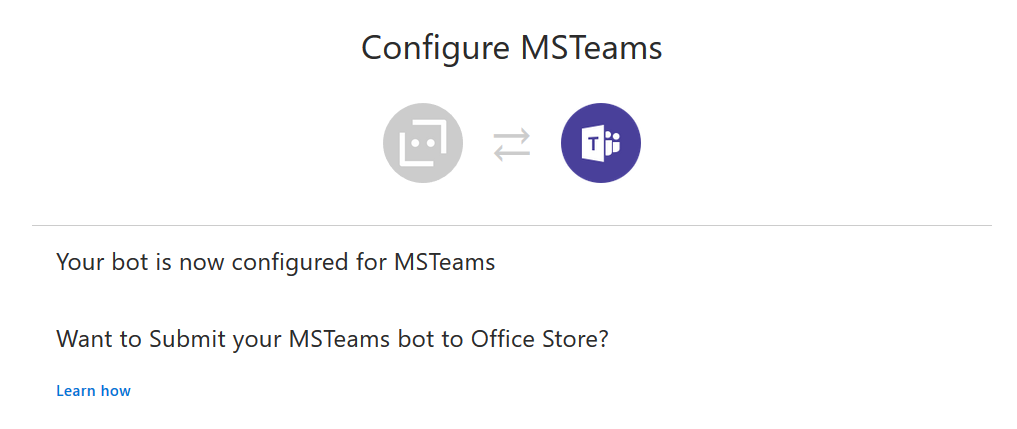
Enable the Bot for Microsoft Teams
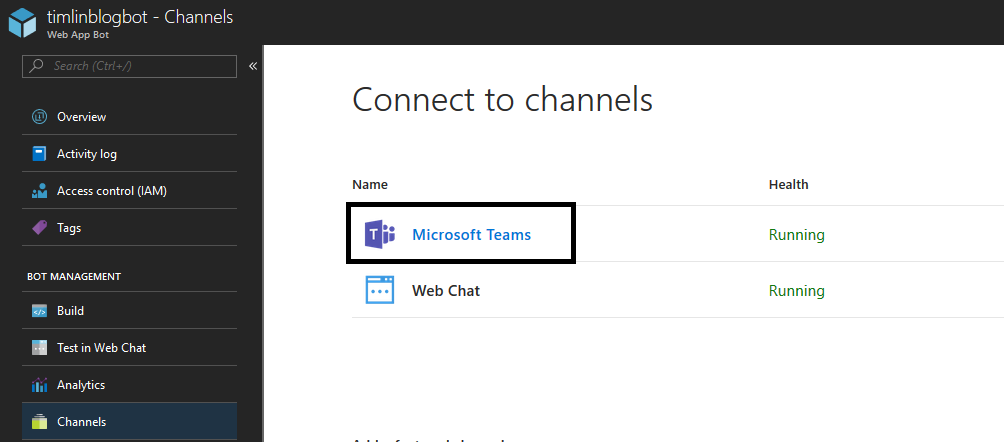
In this guide, we will be integrating the bot with Teams to allow for messages to be posted to a SharePoint list from Teams by means of the bot.
To enable the Teams channel, proceed to the “Channels” section of the bot and select the Microsoft Teams icon. If the channel was successfully configured, you should see the screen below.
Preparing our Bot for Microsoft Graph API and SharePoint Integration
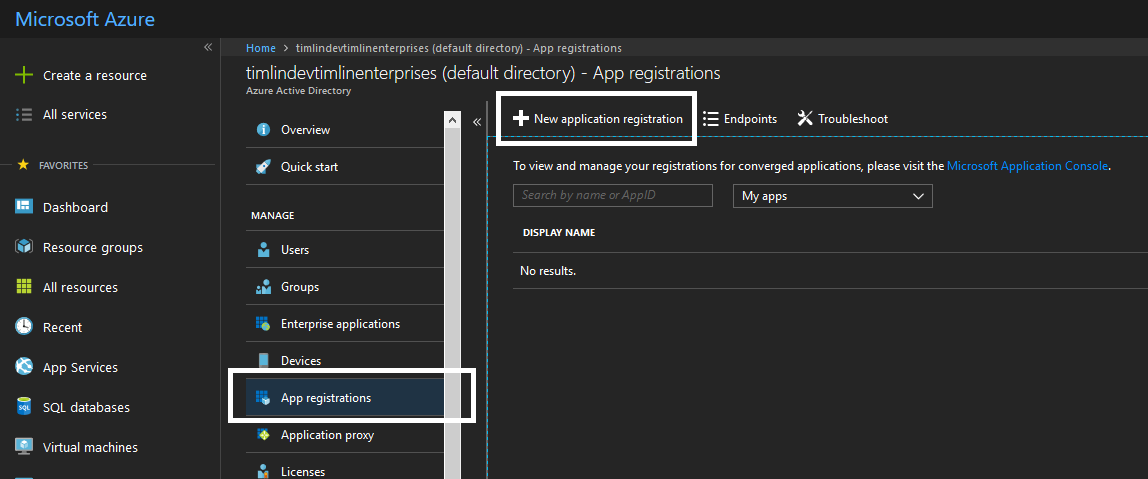
Considering that we want our bot to communicate with the Microsoft Graph API and can read and post information to and from a SharePoint list, we will need to provision an Azure Active Directory Application.
To do so, navigate to the Azure Active Directory section of the portal, select App registrations and then “New Application Registration”, as shown below.
We need to fill in the required fields which are the name of the app, its application type, and the Sign-on URL. In this instance, we want the application type to be Web app / API and the sign-on URL can be pretty much anything.
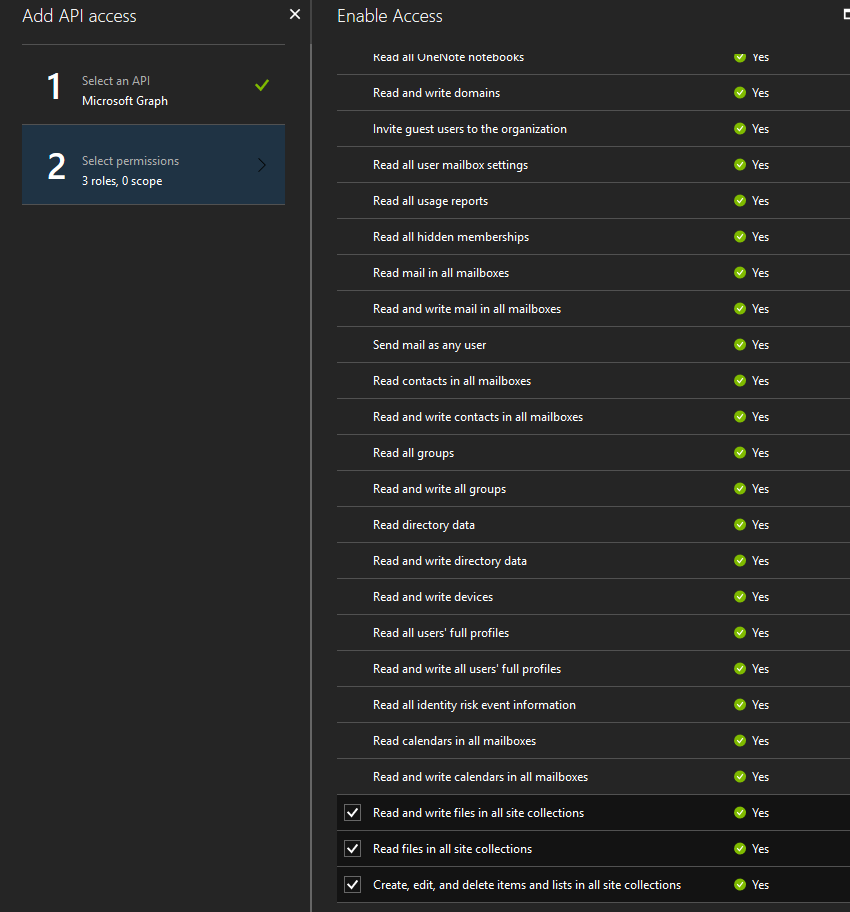
For example, you can use something along the lines of https://contoso.com as your sign-on URL. We aren’t creating an Azure web application that requires authentication redirect, so this URL won’t be used in our bot. Once created, we need to assign the bot a few permissions. Select the “Required Permissions” option and click on Add. We will now add the required API access for Microsoft Graph (most of these permissions require that you be a Global Administrator to add them).
Select the following permissions: Read and write files in all site collections, read files in all site collections and create, edit and delete items and lists in all site collections (as shown below).
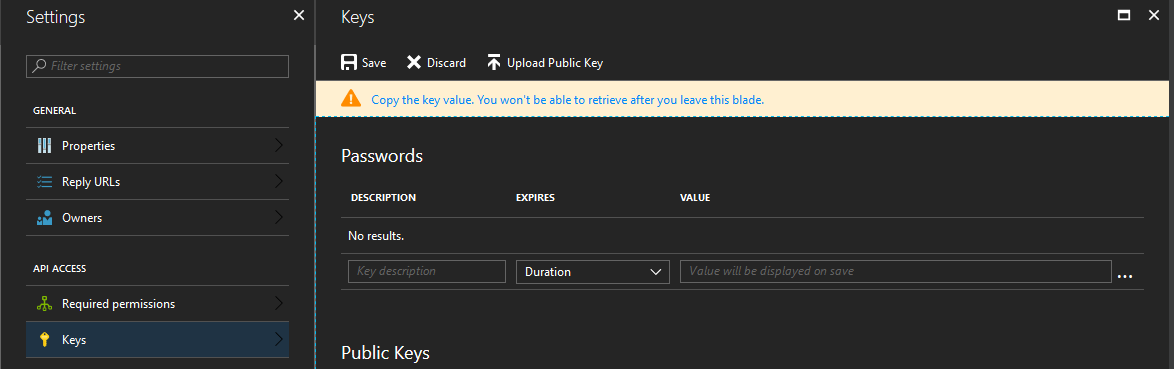
 Once the permissions have been delegated, we will now need to generate a secret application key that will be used in our bot’s code to authenticate with the application.
Click on the “Keys” button and under the “Passwords” section, give the key a name and duration.
When you click save the key will be generated. Please copy and save the key to a safe place for now as we will need it later. Also, while we are here, copy and save the Application ID as this is our client public key that we will also need later.
Starting to Code and Build our Bot
For simplicities sake, we will be using the online code editor for editing code in our bot.
Alternatively, you can download a .zip package of the bot to use a local IDE of your choosing and set up a deployment option for deploying updated code to Azure from your local development environment. Before we jump right into the code, we will want to add our Azure Active Directory App Client ID and Secret Key we copied earlier to the environment variables.
Adding these to the environment variables as opposed to in the code itself ensures that the keys aren’t stored in plain text in the code.
Navigate to “Application Settings” and under “App Settings” we will add the two keys. The first key will be named “ClientID” and have the value of your Application ID you copied earlier. The second key will be named “AppSecret” and have the value of the Secret Key you copied earlier.
Now that we’ve done that, navigate to “Build” then “Open online code editor”.
In here, our main application code is found under the app.js file. A standard project comes with three npm packages: restify, botbuilder and botbuilder_azure. In order to connect to the Microsoft Graph API and make post requests to SharePoint, we will be using the adal-node npm package.
This guide won’t be going too in-depth on using Node.JS or breaking down how Node.JS works but will give you a base understanding of the code works so no previous knowledge of Node.JS is necessary to make everything function.
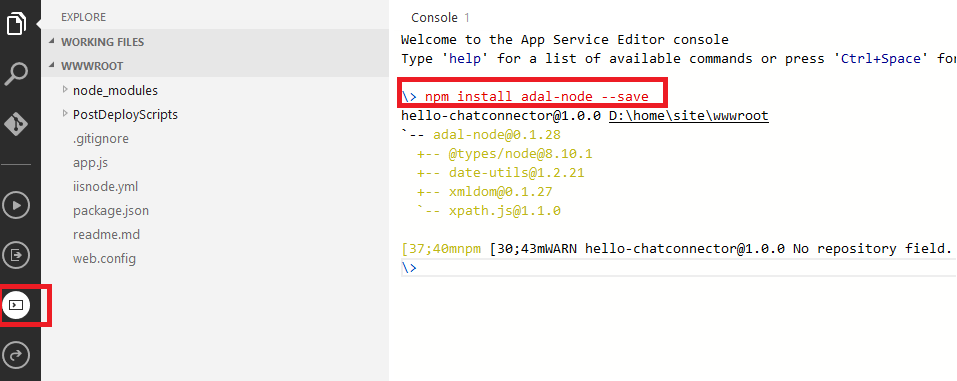
First, we are going to need to install the adal-node package. To do so, click on the console icon (sixth icon on the left-hand side of the screen), type ‘npm install adal-node –save’ without quotes and press enter.
When the install is complete, we will need to require the package in our app.js. Add the following code below the botbuilder_azure line at the top.
var adal = require(‘adal-node’);
Next, we will have to the same thing for another package from Microsoft that integrates with Teams. Head back to the console and run ‘npm install botbuilder-teams –save’. Once the package has installed, add the following line under the adal line we just added.
var teams = require(“botbuilder-teams”);
Finally, there is one last package we need to install which is the Microsoft Graph Node.JS package. Navigate to your console and type in ‘npm install @microsoft/microsoft-graph-client –save’. When the package has finished installing, add the following line under the teams line added previously.
const MicrosoftGraph = require(“@microsoft/microsoft-graph-client”);
Now we are going to add the core of the code. First, we will want to remove all lines from the code after the connector was configured (var connector) while leaving in the server.post(‘/api/messages’, connector.listen()); line.
At the time of writing this, these would be lines 27 to 43. This will leave the following line as the last line of our code now.
server.post(‘/api/messages’, connector.listen());
Next, we will add the code below and talk a bit about what it is doing.
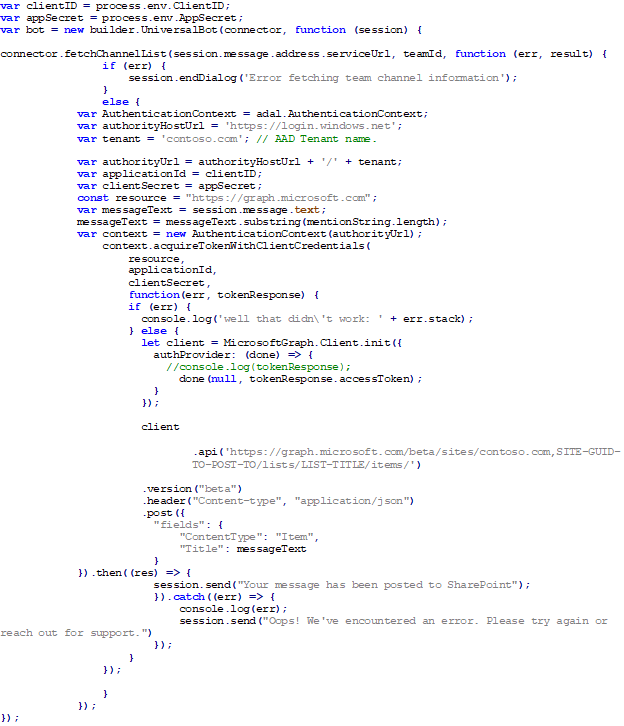
First, we are committing our ClientID and Secret Key to a variable for use in authentication using ADAL later on in the code. We then initiate the builder.UniversalBot function which takes the connector and a function that passes the session as arguments.
The connector.fetchChannelList is technically optional here. This function was put here to show you how you might go about fetching specific channel information in case you wanted to post what channel the information came from to the SharePoint list.
Next, we are setting up the ADAL package, so we can authenticate with Microsoft Graph API and start to utilize its functionality. The application ID is our Azure Active Directory App Application ID and the Client Secret is the key we generated earlier. These are both currently stored in our application’s environment variables.
Using the ADAL package, we can then generate an authenticated context token that has all of the permissions we assigned to it earlier. Next, we are initializing the Microsoft Graph client and passing it the authenticated access token. We can then use this instance to build our Graph Query that posts information sent to the bot to a specified list of our choosing in SharePoint.
In the following line you will need to replace the two variables being queried with your root SharePoint URL (in the format of xxxx.sharepoint.com), the GUID of the site that contains the list we want to post information to (this GUID can be found by using the Microsoft Graph explorer to query all of your sites or even by using the SharePoint REST API) and the title of the list we are posting to.
.api(‘https://graph.microsoft.com/beta/sites/contoso.com,SITE-GUID-TO-POST-TO/lists/LIST-TITLE/items/’)
We are then defining the fields of the list item that is going to be posted. Here, I’m using the messageText variable to set the Title of the object. The messageText variable is being provided by the user when they call our bot. Their message will be what is stored under ‘session.message.text’.
Finally, we post the request and resolve the promise using a .then() statement. If the promise resolves successfully then we let the user in Microsoft Teams know that their content has been published to SharePoint.
Testing our Bot using Microsoft Teams
Now that the code has been implemented, we can test our bot before deploying it to a team. To do so, navigate to your bot application in Azure and select “Channels” and then “Microsoft Teams”.
 This will ask you if you’d like to open your Microsoft Teams client or open Teams in the web. You can pick whichever platform you’d like to test this out. Once the application opens, you should be automatically directed to the bot conversation window. Test the bot by sending any message to it. If everything goes as planned, you should see the screen below.
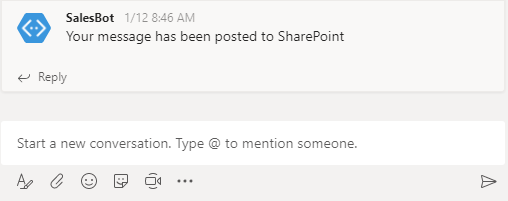
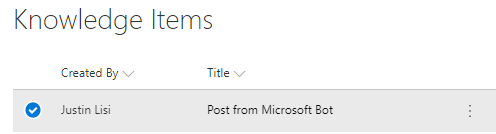
You can also check the SharePoint list you specified in the Graph API call earlier for the new list item.
Packaging and Deploying your Bot
In order for your bot to be deployed to your instance of Microsoft Teams, you need to create a package. The package is essentially 3 separate files: Color Icon, Outline Icon, and your manifest.json.
The Color Icon is used throughout Microsoft Teams and should be an icon of 192×192 pixels. The Outline Icon is used as the smaller app tray icon and should be 32×32 pixels. These icons are required and can be made in most design programs. Stock icons may be available online as well. The manifest.json file contains all of the information needed to deploy the bot.
The Bot Framework actually handles the task of gathering the bot from Azure and you merely need to supply the Application/Bot ID in the manifest.json. There are many settings and customizations that can be configured in this file. We won’t cover them in this guide but if you’d like to learn more you can view the current Manifest Schema for Microsoft Teams here.
We will begin by creating a folder that will become our .zip package. Inside the folder, create a file named `manifest.json`, and populate it with the information below. Also, add your outline.png and color.png to the folder.
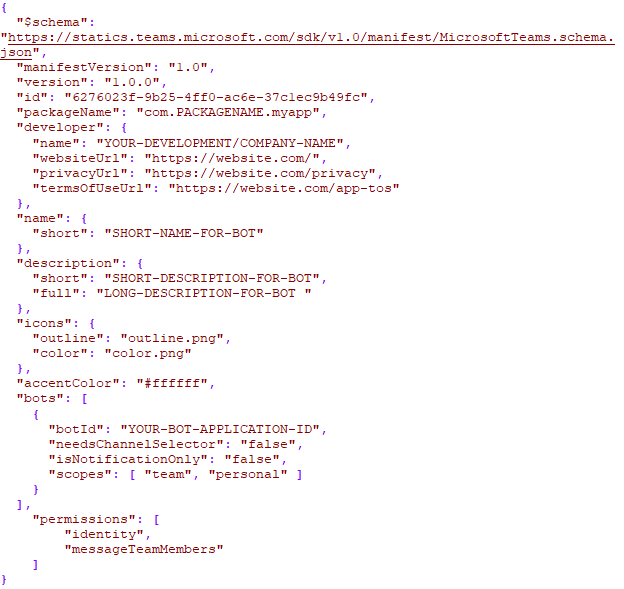 As you may notice, you will need to populate your specific Bot Application ID in the botId parameter. Otherwise, the other information can remain the same or if you choose, you can customize it. When you have completed this, you should have three files in your folder. Proceed to packaging that folder into a .zip.
** Be careful as sometimes you end up having a root folder in the zip with the files inside the root folder. If this happens, you may want to use a program like WinRAR to manually add the three files to the .zip. They should be at the absolute root of the .zip package and be the only files there. **
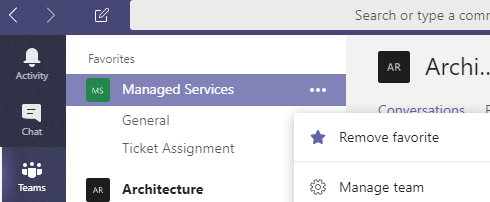
When the package has been created, we can now work on deploying the package in our Teams client. Open the Microsoft Teams application, choose a channel, select the ellipsis and then navigate to “Manage Team”, as shown below.
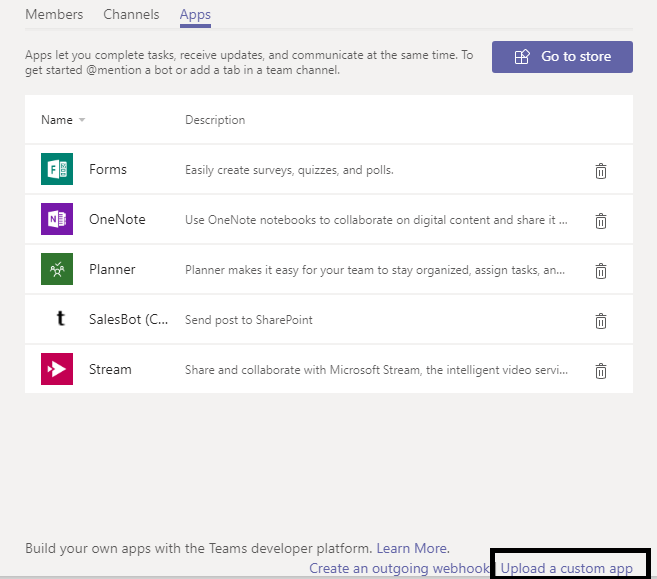
From here, navigate to “Apps” and then select the option to upload a custom app in the bottom right-hand corner (we have uploaded this same custom bot with the name SalesBot).
Once the package has been uploaded, you should now be able to call the bot from the team you added the app to using @BotName where the BotName is whatever you defined it to be in the manifest.json. At this point, you have successfully created, provisioned and deployed a Microsoft Framework Bot that communicates with Microsoft Teams, Graph API, and SharePoint Online.


The Future is Digital.
If you subscribe to Microsoft’s perspective, every company, irrespective of industry, is, or will soon be, thinking and operating like a digital company.[1]
Why? The high-level answers are similar, and the granular ones vary by organization. At the core, businesses are looking to Digital Transformation to increase efficiency, agility, collaboration, innovation, and security … resulting in a competitive advantage.
It’s a Living Process
Unfortunately, Digital Transformation is not a project. It is also more than email and document storage “moved to the cloud.” It is an ongoing and living process that shifts throughout the journey. An organization cannot simply deploy software and expect the magic to happen. As a matter of fact, most organizations have failed in their Digital Transformation attempts.
An Office 365 ‘Center of Excellence’ Approach Increases Adoption
While there is no magic wand, through our experience in consulting and gaining knowledge about what works, we have uncovered methodologies that drastically increase the odds of user adoption, which is the glue that holds Digital Transformation efforts together. We have developed what we refer to as a ‘Center of Excellence’ service for Office 365 and related technologies. It’s simply a term to describe an ongoing process of defined activities, communications, templates, training, and effort focused on end users.
 Many organizations have invested in Office 365 and related technologies and have the capability to execute on Digital Transformation. The difficulty is that Digital Transformation is 100% based on people and their ability and willingness to change how they operate. It’s why 90% of our activities are targeted at the end user, helping them improve their ability to collaborate and communicate, empowering them to do their jobs better and more efficiently.
This Center of Excellence service is made up pillars, or service areas. They are meant to be circular and connected. We start with Vision, Strategy, Governance, Architecture/Design, and then tactically provide Training, Administration, Configuration, Development, and Support. Each service has elements to complete up front to ensure the process runs smoothly. For example, you cannot design a Strategy without understanding the organization’s Vision and the Governance plan to manage the process to get there. There are clear interdependencies in the process, which is why the sum is greater than the parts when all the pillars work together, helping our customers optimize their operations.
Guiding Principles
There are also some guiding principles to a Center of Excellence approach:
- Cross-Pollination by Design – Create and enforce specific scheduled activities that will require collaboration and communication internally and with the customer.
- Create Trust – Solve problems and build credibility by providing the best possible service is a requirement for user adoption. If people do not believe you can help them, they will turn elsewhere.
- It’s About the Business – This is not an IT exercise. The technology is the tool that enables Digital Transformation by solving problems, removing roadblocks, and allowing progress and innovation to occur as new needs arise. It’s NOT a solution looking for a problem.
- It’s a Process – You don’t “install” Digital Transformation, you build it.
- Embrace Change – The platform, business needs, users, and tools are shifting at an incredible pace. Stay on top of those changes and continue to refine the “playbook”.
The process is working. If you have been struggling to gain traction with your business users and only feel as if you’re scratching the surface, a Center of Excellence solution or some of its aspects might be an option for you to consider. Contact us if you’d like to learn more.
As a forward-thinking leader, the starting point is for you to see the vision of what these modern tools and applications can do for your organization and getting stakeholders to and want to get there. Those are two very distinct elements. We talk with a lot of organizations, and they generally fall into two camps. One sees the value, knows why it’s important, but also realizes they have struggled with their current knowledge and resources to get there. The other doesn’t see the value. The latter makes for more difficult conversations and is outside the scope of this post, but look for the “Need and Value for Digital Transformation” in future post.
[1] Microsoft Enterprise Team, March 2017
SharePoint Framework Development IntroductionI recently was asked to customize a SharePoint Online “modern” communication site. I’ve been working with SharePoint steadily for the last 7 years, so I’ve become quite comfortable with it over time. I’m a developer who really doesn’t mind getting his hands dirty and love learning new technologies. I went into this project with a level of enthusiasm that I haven’t had since I first started customizing SharePoint, as I was very interested in learning more about the SharePoint Framework. Interestingly, what I found was, developing modern web parts felt like a trip back in time, but in a good way! Open source tools, command line interfaces, cross-platform development. It’s like taking a trip back 20 years – everything old is new again.
I’m going to share what I’ve learned about creating SharePoint modern web parts using the SharePoint Framework. There are a lot of different pieces that you need to put together:
- JavaScript
- TypeScript
- React
- js
- CSS (SASS)
- Npm
- Gulp
- And more!
What I found was, I could successfully build a simple web part by following instructions I found online, but I really didn’t understand all the moving parts – I just sort of copied working examples and modified them for my use. This technique certainly works, but it may (and probably will) lead to less efficient / harder to maintain web parts. I also found that all the different technologies started to blend together, and I didn’t have a good understanding of what each technology was responsible for. And that’s where this blog fits in.
I’m going to walk through the process of creating SharePoint Framework web parts, but I’m going to take a step back and show each technology independent of the others in the context of building an end to end solution. The application I’ll be creating is near and dear to our company – we here at Timlin are all avid golfers and we participate in a fantasy golf league. To run our league, I need to store and report on individual PGA tour players earnings. This data is all available via a combination of HTML and JSON files on the PGA Tour’s website. I’ve decided to use Node.js and JavaScript to parse and store the data. I will then use SharePoint to create a dashboard with modern web parts to display various statistics, the weekly results, and current standings.
The first step is configuring the development environment, which I’ll be covering in the first part of this blog series… stay tuned!
Timer Trigger Function Apps in AzureIntroduction
In the not too distant past, if you wanted to run code at regular intervals you had a few go-to options to choose from. If you wanted a “down and dirty” solution, a quick PowerShell script could be scheduled using the Task Scheduler. If you needed anything more advanced or formal, you could write a Windows Service to house both the logic and the scheduling for unattended execution. In the age of cloud computing you may think of firing up an Azure Virtual Machine to accomplish the same tasks, but without needing an on-premise server always running. But why maintain an entire machine for code that needs to run once a day, or even once an hour? Fortunately, Microsoft has provided a flexible, easy to use solution for this type of task in the form of Timer Trigger functions within Azure Function Apps.
Azure Functions let you write the code to perform your task, without worrying about the infrastructure that runs it. Depending on the trigger type, there are different languages available to code your logic, including C#, PowerShell, TypeScript, and others. Regardless of which you choose, you get a powerful browser-based user interface with which to write, configure, and monitor your code.
In my case I was looking to create an automated daily check to see who didn’t complete their timesheets for the prior business day, sending an email with the list of offenders should any exist. We use Project Online to track daily hours, so I wanted to directly pull from that data using the OData reporting interface to make the determination. Before running through these steps in your own environment, be sure you understand Azure pricing models. The solution described here costs pennies per month, but that could change based on total usage, subscription plans, or future changes to the pricing models.
Getting started
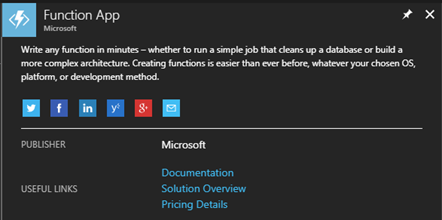
To get started, navigate to portal.azure.com. In the portal, click on the “All resource” navigation link where you will see everything associated with your instance. To create a new Function App, click on the Add button in the ribbon. This will bring up a list of everything available in the Azure Marketplace. In the search box, search for and select “Function App”, which should bring up the description, publisher, pricing, and documentation panel for the app.
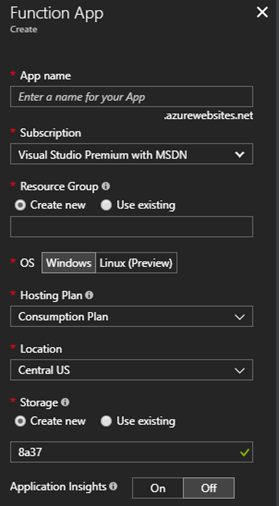
Press the Create button to get started. You will first be presented with a list of general options for your function app.
Notes:
- The app name must be globally unique, so you may want to preface it with your company or product name
- Be sure to read up and understand Resource Groups, Storage accounts, Locations, and the difference between Consumption Plan and App Service plan, as they can have a drastic impact on the charges incurred
Once you have setup the basics of the Function App, it is time to add an actual function. As of this writing, there are 33 different triggers to choose from! For our case we will use the Timer Trigger.
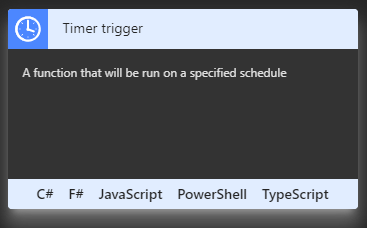
Add the Timer Trigger by finding the Timer trigger card and clicking on a language choice, such as C#. You will then be prompted for a name and a Timer trigger schedule. Don’t worry if you don’t understand cron expressions; there are plenty of examples and documentation within the designer. For our daily job, we use the expression “0 30 14 * * 1-5”, to specify Monday through Friday at 2:30 PM UTC (9:30 AM Eastern).
Setting up
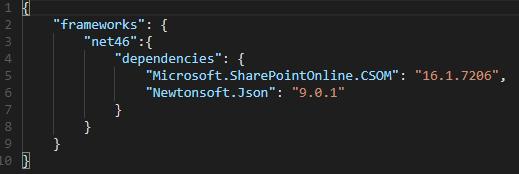
You should now be in the designer, with the file “run.csx” open. This will be the main entry point for your function. The default template will provice a Run method that passes in the time and a TraceWriter for logging purposes. Before we get too far along here, we need to think about what other libraries we want to use in order to gain access to SharePoint Online and the Project OData endpoints. To do this, expand the “View Files” pane on the right and select the “project.json” file. This is the “package reference” used to tell NuGet which packages to retrieve for your project. A reference can be found at https://docs.microsoft.com/en-us/nuget/archive/project-json. For this project, we are using the SharePoint Online CSOM library and the Newtonsoft Json library. Our library file will look like this:
This will implicitly create a project.lock.json file with all of the details regarding the individual assemblies brought into our application.
We’ll also want to add a few application settings for our mail configuration, rather than having them directly within the code. Application Settings can be configured by going to the top-level node of your function in the tree view, and selecting the “Application settings” tab. You can add, edit, or delete your settings in the Application settings section of that page, to be referenced within your code as needed.
On to the code!
Our code will start with our using statements, as well as some configuration data we’ll pull from application settings and/or hard code as desired.
using System.Text;
using System.Threading;
using System.Threading.Tasks;
using System.Net;
using System.Net.Mail;
using Microsoft.SharePoint.Client;
using Newtonsoft.Json;
// Mail server configuration
private static string mailHost = ConfigurationManager.AppSettings[“MailHost”];
private static int mailPort = Convert.ToInt32(ConfigurationManager.AppSettings[“MailPort”]);
private static string username = ConfigurationManager.AppSettings[“EmailUsername”];
private static string password = ConfigurationManager.AppSettings[“EmailPassword”];
private static string toAddress = ConfigurationManager.AppSettings[“ToAddress”];
// Mail message constants
private const string mailSubjectTemplate = @”Missing Hours for {0}”; // {0} = Date
private const string mailBodyTemplate = @”<h3>The following people were missing hours yesterday…</h3>{0}”; // {0} = List of users
// API constants
private const string pwaPath = @”https://timlin.sharepoint.com/teams/projects/PWA/”;
private const string pwaApiPath = @”_api/ProjectData/”;
Next up, we construct a Url to use to retrieve the prior day’s time. This call will use the TimesheetLineActualDataSet data, selecting just the columns we need and filtering to a specific day. The date value will be a string template that we format in at runtime. I would recommend working the exact syntax out in your own environment via a browser to make sure you have it right.
// Templates for REST OData calls
private const string getHoursPwaRequestPathTemplate = @”TimesheetLineActualDataSet?$filter=TimeByDay%20eq%20datetime%27{0}%27&$select=ResourceName,ActualWorkBillable&$format=json”;
Next we create and initialize a dictionary to store the list of users we want to track.
// Dictionary of users to report on
private static Dictionary<string, double> userHours = new Dictionary<string, double>() {
{ “John Doe”, 0.0 },
{ “Jane Smith”, 0.0 },
{ “Hapie Goluky”, 0.0 },
{ “Joe Piccirilli”, 0.0 }
};
We also have a few “helper” functions to keep our main code clean.
// Get the prior business date
private static DateTime GetYesterday() {
var date = DateTime.Today;
switch (date.DayOfWeek) {
case DayOfWeek.Sunday:
date = date.AddDays(-2);
break;
case DayOfWeek.Monday:
date = date.AddDays(-3);
break;
default:
date = date.AddDays(-1);
break;
}
return date;
}
private static dynamic DeserializeJsonObject(string content) {
return JsonConvert.DeserializeObject<dynamic>(content);
}
private static void SendMessage(string subject, string body) {
var smtpClient = new SmtpClient();
smtpClient.UseDefaultCredentials = false;
smtpClient.Credentials = new System.Net.NetworkCredential(username, password);
smtpClient.Port = mailPort;
smtpClient.Host = mailHost;
smtpClient.DeliveryMethod = SmtpDeliveryMethod.Network;
smtpClient.EnableSsl = true;
var mailMessage = new MailMessage();
mailMessage.From = new MailAddress(username);
mailMessage.To.Add(new MailAddress(toAddress));
mailMessage.Subject = subject;
mailMessage.Body = body;
mailMessage.IsBodyHtml = true;
smtpClient.Send(mailMessage);
}
Reading the Project Online data uses .Net’s HttpWebRequest object, with SharePointOnlineCredentials providing the authentication mechanism. We encapsulate the credentials and the web GET calls with other helper properties and functions.
private static SharePointOnlineCredentials _creds;
private static SharePointOnlineCredentials Credentials {
get {
if (_creds == null) {
var securePassword = new SecureString();
foreach (char c in password.ToCharArray()) securePassword.AppendChar(c);
_creds = new SharePointOnlineCredentials(username, securePassword);
}
return _creds;
}
}
private static string WebGet(string requestUrl) {
var req = (HttpWebRequest)WebRequest.Create(requestUrl);
req.Credentials = Credentials;
req.Headers[“X-FORMS_BASED_AUTH_ACCEPTED”] = “f”;
var resp = (HttpWebResponse)req.GetResponse();
var receiveStream = resp.GetResponseStream();
var readStream = new StreamReader(receiveStream, Encoding.UTF8);
return readStream.ReadToEnd();
}
One final helper method constructs the call to WebGet.
// Get hours from PWA OData service for the prior business day
private static string GetHoursPwa(string date) {
return WebGet(pwaPath + pwaApiPath + string.Format(getHoursPwaRequestPathTemplate, date));
}
Within our main Run method, we orchestrate the overall logic. First, we get the date and log a message to know what date we ran for. These messages are visible in the Logs panel below the code window, and in the Monitor page accessible from the tree view navigation for all execution.
public static void Run(TimerInfo myTimer, TraceWriter log)
{
_log = log;
// Get yesterday’s date
var date = GetYesterday().ToString(“yyyy-MM-dd”);
_log.Info($”Running for {date}”);
Next we get and deserialize the data into a “dynamic” object.
// Get the PWA OData
var data = GetHoursPwa(date);
// Deserialize to a dynamic object
var dynamicObject = DeserializeJsonObject(data);
We’ll then iterate over the data in the dynamic object and aggregate the hours for each resource’s time entries into our dictionary.
// Populate our userHours dictionary based on hours in timesheet
foreach (var user in dynamicObject.value) {
if (userHours.ContainsKey(user.ResourceName.ToString())) {
userHours[user.ResourceName.ToString()] += Double.Parse(user.ActualWorkBillable.ToString());
}
}
We only need to deal with users with no hours, so we’ll use a quick Linq statement to extract them.
// Extract the names of users with 0 hours
var usersWithNoHours = userHours.Where(x => x.Value == 0.0).Select(x => x.Key);
Finally, we’ll send an email message out to our distribution list if there are any offenders or log the fact that all is clear if not.
// Send the message, if there are any users without hours
if (usersWithNoHours.Any()) {
var subject = string.Format(mailSubjectTemplate, date);
var body = string.Format(mailBodyTemplate, string.Join(“<br />”, usersWithNoHours));
_log.Info(body);
SendMessage(subject, body);
}
else
{
_log.Info(“No offenders found!”);
}
Wrapping up
Once the code is in place, the App is running, and the timer function is enabled, the code will wake up every day, run through the logic, and go back to sleep until needed again. As we have this configured, using a Consumption pricing tier, this once-daily execution costs less than $0.10 per month beyond any standard subscription costs. As stated before, your mileage may vary based on the specifics of your plan, number of calls, disk / data usage, etc., so be sure to research these items first and monitor your application within Azure to ensure your costs are in line with expectations.
Enhancing Nintex Forms with JavascriptNintex Forms provide an intuitive interface for designers to quickly create form-enabled solutions.
However, some scenarios require us to go beyond the out-of-the-box capabilities. For example, we recently had a requirement involving two lists and the need to read in rate information from a second list. The complexity was that if a specific date field changes in one list, the form would have to refresh the rate information dynamically without closing the form.
The purpose of this blog post is to provide one post that contains the information you need to effectively enhance your Nintex Forms using JavaScript.
How To Enhance Nintext Forms With JavaScripts
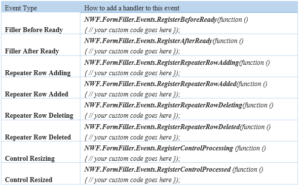
A Nintex Form is bound to both a SharePoint list and an associated content type within that list. To read from a second list requires the use of JavaScript. Form designers with JavaScript knowledge can now leverage the events shown below and are assured that their code runs safely as expected when these events occur during runtime. The following table summarizes the available events.
Embedding Custom JavaScript Within a Nintext Form
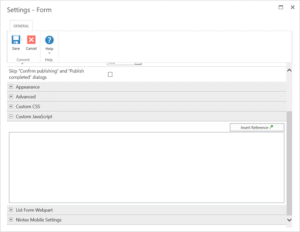
One of the simplest ways to include JavaScript within a Nintex form is to simply embed the JavaScript within the form itself. Within Form Settings, you will find a Custom JavaScript header under which you can include JavaScript. While this is a completely acceptable approach within the design of a single form, you may wish to consider using custom JavaScript includes if the JavaScript is to be reused.
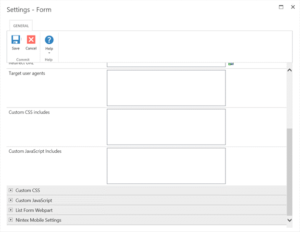
CUSTOM JAVASCRIPT INCLUDES
This setting is found in Form Settings within the Nintex Forms Designer and is used for including custom JavaScript files at runtime. These includes can use local includes from within SharePoint such as ‘/SiteAssets/example.js’ or external includes by simply adding the URL to the desired JavaScript file.
BUTTON ACTIONS
With Nintex Forms Designer, you can drop a Button control onto the Form. By right-clicking on the button control and selecting Settings you can choose to set the Button action to JavaScript. Additionally, under the Advanced header of the control settings you can provide the JavaScript to execute when a user clicks the button under the Client click setting
STORING CLIENT ID IN JAVASCRIPT VARIABLES
This option creates a JavaScript variable that references the Client ID of the form control and is used for allowing data processing between the Nintex Form and JavaScript. These settings are found under the control settings. To allow this to happen you must set Store Client ID in JavaScript variable to Yes and you must set a corresponding JavaScript variable name beside Client ID JavaScript variable name.
client_id_in_javascript.pngFORM CONTROLS AND CUSTOM VALIDATION FUNCTIONS
Nintex Forms allows for custom validation of form controls based on JavaScript. Within the form control settings under the Validation header, set Use Custom Validation to Yes and provide the relevant JavaScript within the Custom Validation Function setting.
form_controls.pngFILLER AFTER READY
By default, a Nintex form will focus on the first enabled input control on the form. However, now you can switch the focus to a specific control using JavaScript. We have demonstrated with the examples below:
Set initial mouse cursor focus in the Single Line Text Control
1. Open the Nintex Forms designer and drag a Single Line Text control onto the canvas.\
2. Click on the control and locate the CSS class field in the Ribbon. Type ‘singlelineFocus’.

3. Click on the Nintex Forms tab, and click on the Settings button in the Ribbon.

4. Expand the Custom JavaScriptsection, and enter the following code:
NWF.FormFiller.Events.RegisterAfterReady(function ()
{
NWF$(‘.singlelineFocus input.nf-associated-control’).focus();
});
Click Save and then publish the form. When you add a new item, you should notice that the initial focus of the form has changed, and it is now occurring in the Single Line of text control
Set initial mouse cursor focus in the Date/ Time Control
1. Open the Nintex Forms designer and drag a Date/Time control onto the canvas.
2. Click on the control and locate the CSS class field in the Ribbon. Type ‘datetimeFocus’.
3. Click on the Nintex Forms tab, and click on the Settings button in the Ribbon.
4. Expand the Custom JavaScript section, and enter the following code:
NWF.FormFiller.Events.RegisterAfterReady(function ()
{
NWF$(‘. datetimeFocus input.nf-date-picker’).focus();
});
Click Save and then publish the form. When you add a new item, you should notice that the initial focus of the form has changed, and it is now occurring in the Date/Time control.
Set initial mouse cursor focus in the People Control
1. Open the Nintex Forms Designer and drag a People control onto the canvas.
2. Click on the control and locate the CSS class field in the Ribbon. Type ‘peopleFocus’.
3. Click on the Nintex Forms tab, and click on the Settings button in the Ribbon.
4. Expand the Custom JavaScript section, and enter the following code:
NWF.FormFiller.Events.RegisterRepeaterRowAdding(function () {
var repeaterControl = NWF$(arguments[0][0]);
if (repeaterControl.hasClass(‘expensesRepeater’)) {
}
});
Click Save and then publish the form. Add a new item, and click on Add New Row to add another row to the repeating section. A message should appear at the top of the form informing you that you are about to add a new entry. When you click OK on the message, the new row should will be added.
Repeater Row Added
You can trigger this event when you want to inform the user that a new row has been added to the repeating section.
1. Open the designer and drag a Repeating Section control onto the canvas.
2. Click on the control and locate the CSS class field in the Ribbon. Type ‘expensesRepeater’.
3. Click on the Nintex Forms tab, and click on the Settings button in the Ribbon.
4. Expand the Custom JavaScript section, and enter the following code:
NWF.FormFiller.Events.RegisterRepeaterRowAdded(function ()
{
var repeaterRow = NWF$(arguments[0][0]);
if(NWF$(repeaterRow.parents(‘.nf-repeater’)[0]).hasClass(‘expensesRepeater’))
{
alert(‘new row has been added to the expenses1 repeater’);
}});
Click Save and then publish the form. Add a new item, and click on Add New Row to add another row to the repeating section. A new row will be added to the repeating section and then a message box will appear.
Repeater Row Deleting
You can trigger this event with you want to inform the user they are deleting a row from the repeating section.
1. Open the designer and drag a Repeating Section control onto the canvas.
2. Click on the control and locate the CSS class field in the Ribbon. Type ‘expensesRepeater’.
3. Click on the Nintex Forms tab, and click on the Settings button in the Ribbon.
4. Expand the Custom JavaScript section, and enter the following code:
NWF.FormFiller.Events.RegisterRepeaterRowDeleting(function ()
{
var repeaterRow = NWF$(arguments[0][0]);
if(NWF$(repeaterRow.parents(‘.nf-repeater’)[0]).hasClass(‘expensesRepeater’))
{
alert(‘you are about to delete a row from the expenses1 repeater’);
}});
Click Save and then publish the form. Add a new item, and click on Add New Row to add another row to the repeating section. Next, click on the delete icon to delete a row. A message will tell you that the row is about to be deleted. When you click OK, the row will be deleted.
Repeater Row Deleted
You can trigger this event when you want to inform the user that a row from the repeating section has been deleted.
1. Open the designer and drag a Repeating Section control onto the canvas.
2. Click on the control and locate the CSS class field in the Ribbon. Type ‘expensesRepeater’.
3. Click on the Nintex Forms tab, and click on the Settings button in the Ribbon.
4. Expand the Custom JavaScript section, and enter the following code:
NWF.FormFiller.Events.RegisterRepeaterRowDeleted(function ()
{
var repeaterControl = NWF$(arguments[0][0]);
if(repeaterControl.hasClass(‘expensesRepeater’))
{
alert(‘you have just deleted a row from the expenses1 repeater’);
}
});