In our first blog of this series, we discussed how entitlement management in Azure Active Directory (Azure AD) Identity Governance creates Access Packages to control the scope and duration of access to groups, applications, and SharePoint sites. The two additional primary tools designed to control and audit access to company resources include Access Reviews and Privileged Identity Management. These three functions work synergistically to help keep a watchful eye on the collaboration space without impeding productivity.
In Part 2, we’ll discuss Access Reviews in detail. These are about auditing access to ensure previously-granted permissions are still appropriate and necessary.
Access Reviews
Setting up an Access Review
An Access Review is a scheduled, guided review of a group of Microsoft 365 users to help determine if their continued access to tenant resources is required. The review can be performed by multiple users and can be set to report on dispositions and, in some cases, automatically take action based on the dispositions set.
The first step of creating an Access Review is naming and describing its purpose. You will also set a start date and frequency if the intention is to perform the review periodically. Frequencies include weekly, monthly, quarterly, semi-annually, and annually. Occurrences can run indefinitely or can end by a specified date or after a number of occurrences. The review will also have an end date, after which the review will close and the “upon completion settings” will be applied.
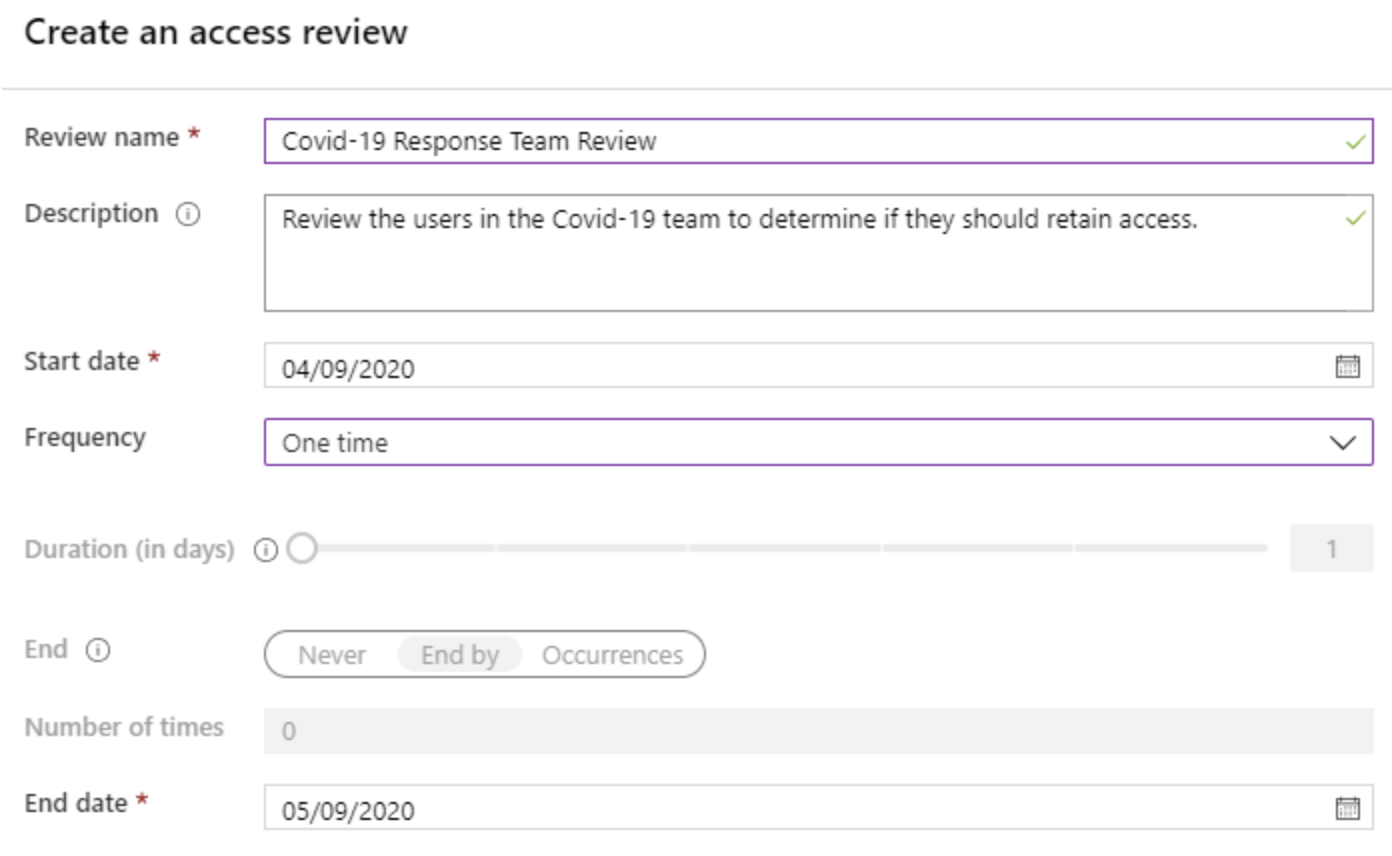
Next, you determine who will be reviewed and who will be performing the review. The users to review can be Members of a Group or users Assigned to an Application on the tenant. Additionally, you can scope the review to include Guest users only or include all users. For Reviewers, you can select the Group’s owners, specific tenant users, or allow for self-review by the users. You can also associate the review with a Program (similar in concept to a Catalog for Access Packages) or choose the Default Program.

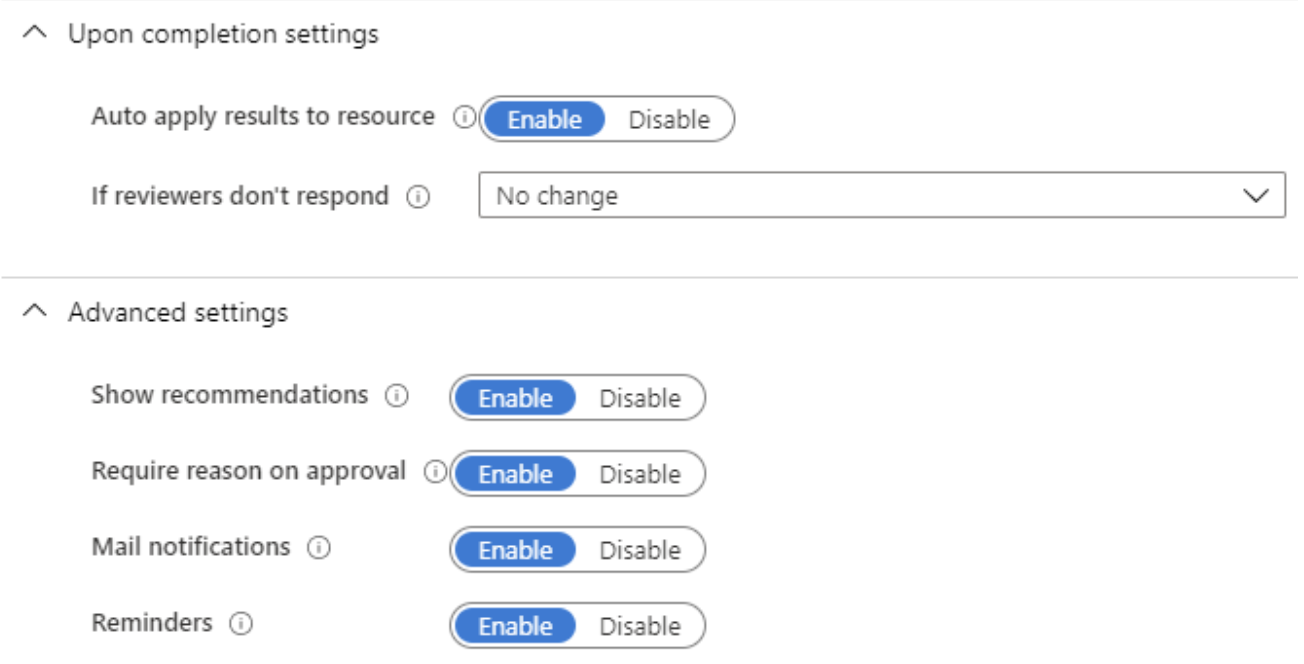
Next, we’ll set the “Upon completion settings,” which determine the action to take when the end date of the review is reached. The first choice is whether or not you’d like to auto-apply the results. With this setting enabled, any user whose disposition is to Deny access will automatically have their access removed upon the completion of the review. The second option is to determine what actions to take if reviewers don’t respond. These options include “No change,” “Remove access,” “Approve access,” or “Take recommendations.” The last option is based on Azure AD’s auto-set recommendations, which are primarily based on the last time the reviewed user utilized the system.
The final settings, under Advanced, include options to Show recommendations, Require a reason on approval, Mail notifications, and send Reminders to reviewers. All are currently enabled by default.
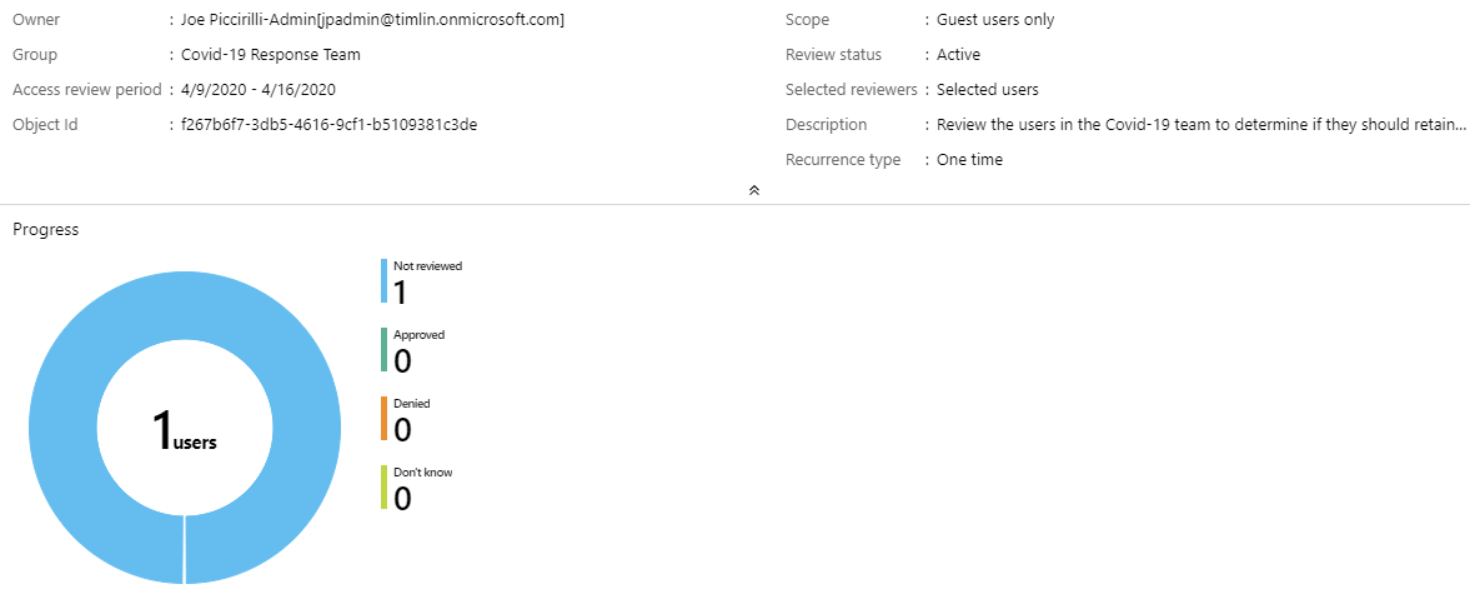
At this point, we are ready to start the review process. After pressing the Start button, the new Access Review will be added to the Access Reviews section within the Identity Governance module. The listing will include the name, the resource being reviewed, the status, and when it was created.

Clicking on the review will show an overview of the settings as well as a chart showing the status of the resources being reviewed. There are also pages to view the Results and the Reviewers. You can even send automated reminders for individual reviewers with the press of a button.
Performing a User Access Review
If the Mail Notifications option was set to Enabled, reviewers should receive an email with a link to begin their review. The email will have a hyperlinked button to take the user directly to the review page.
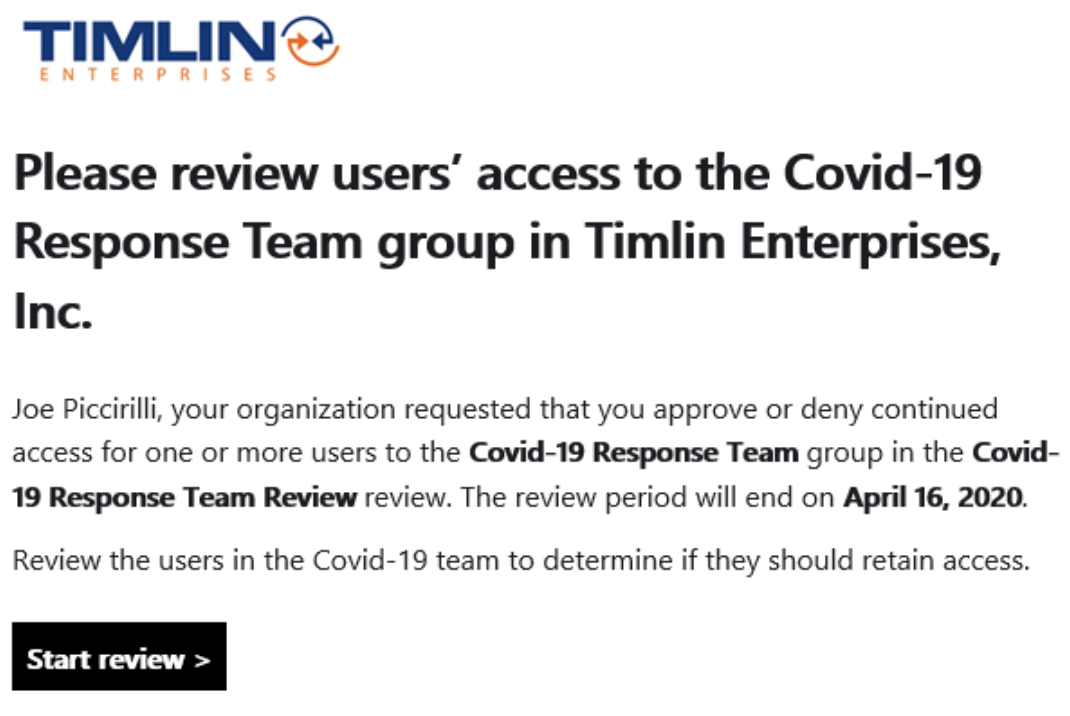
The Review page will show all relevant information, including who requested the review, when it is due by, the names of any other reviewers, and the progress made so far. It will also list each Resource being reviewed with their name, email address, Access Info (statement about whether they have recently logged in), and a recommended Action.
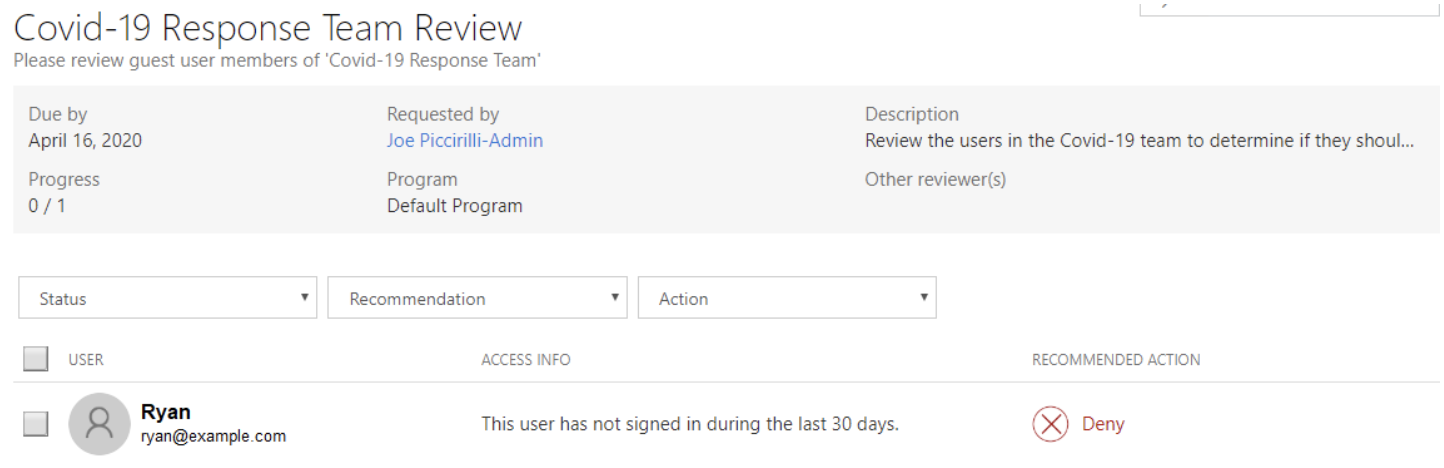
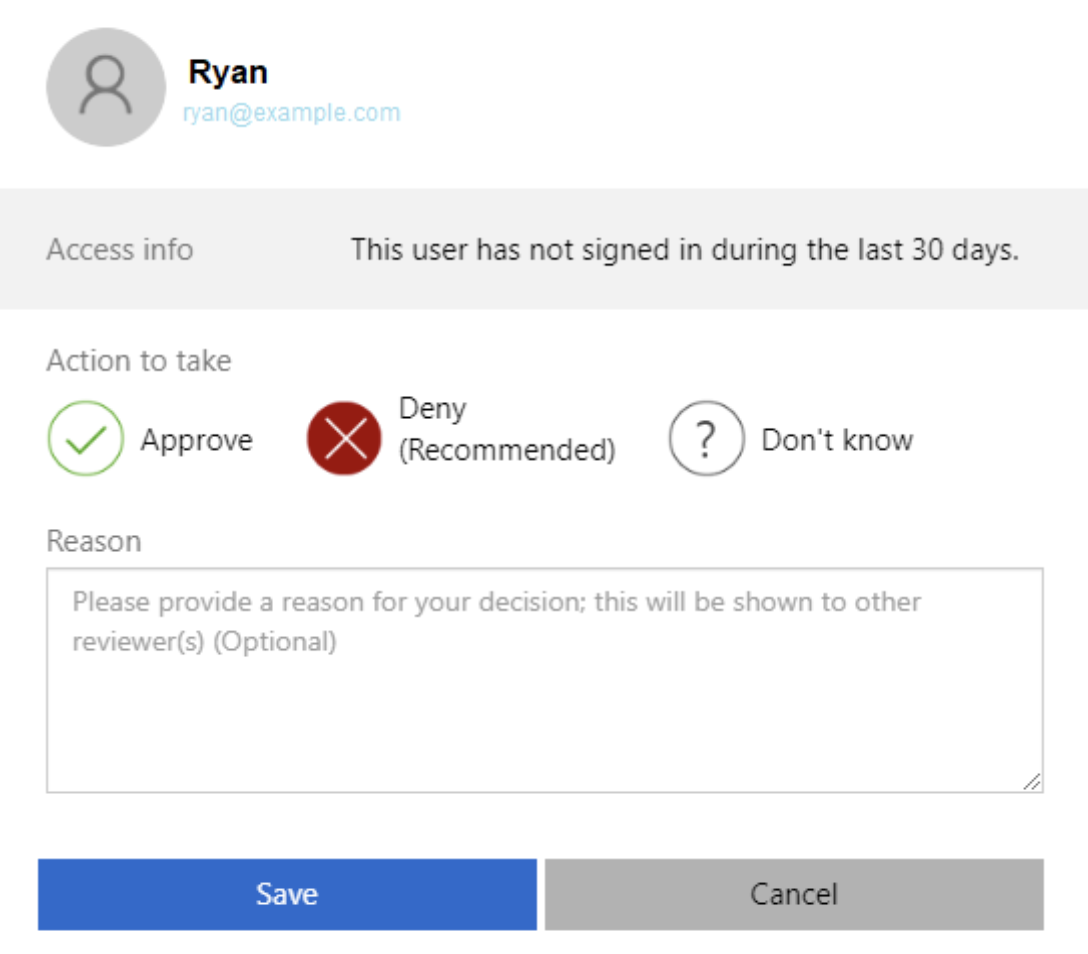
This list of users can be filtered based on Status (Reviewed, Not Yet Reviewed, All), Recommendation (Approve, Deny, All), or Action (Approved, Denied, Don’t Know, All). The reviewer can click on a single source to review or multi-select resources using the checkboxes, then press the “Review n user(s)” button. Reviewing resources opens a dialog with options for the disposition and comments. Actions can be Approve, Deny, or Don’t Know. The recommended action will be highlighted already. Don’t Know is useful if there are other reviewers who may have more insight or knowledge of the resource being reviewed.
Although all Resources may have been reviewed, the Access Review will stay open until its end date has been reached to allow for changes or other reviewers to provide input. If desired, a review can be manually stopped so action can be taken. This can be done by the user who originally set up the review using the Access Review overview screen. At that time, the actions will be automatically applied if the “Upon completion” setting’s “auto apply results to resource” is enabled, or the Apply Results button can be pressed if not.
The results of the review can be reviewed in the Results section of the Access Review.

Summary
Access Reviews in Azure AD Identity Governance provide a simple, consistent, and governed method of reviewing and controlling access to company tenant resources. By combining Access Reviews with Access Packages, administrators can tightly control who has access to which resources and ensure they retain the appropriate access only as long as required, all while maintaining agility and simplicity for users.
Next up: Privileged Identity Management. Configure just-in-time role escalation to implement a least-privileged security model for day-to-day operations while providing a rapid but governed path to escalated roles as required. Stay tuned!
Microsoft Teams vs. Zoom: Feature ComparisonFor those using Zoom, hopefully you are carefully reconsidering your use based on the recent security concerns exposed. In this blog, I’ll review the features of Zoom relative to Teams to make sure users are aware of what they get and are giving up with each platform in the event they could take advantage of features that allow them to communicate and work better.
Unlike a simple “review site,” I’ll address this from the view of a remote worker trying to get their job done and highlight the differences in functionality. This comparison is not intended to target the “social distancing cocktail party” crowd, though they may benefit from it as well.
Security
Zoom should essentially be treated like an “open conversation” until they get their security issues fixed. The platform is easy to hack and Zoom has previously admitted to collecting and sharing users’ personal data. If security is a real concern, I would not recommend Zoom for anything that you wouldn’t feel comfortable with any random person hearing.
Microsoft Teams does not use users’ data for anything other than to provide better services. The Microsoft 365 platform, in general, is designed around data loss prevention and information protection. However, it has more to protect as it is designed for persistent storage and collaboration on sensitive information, not just a simple video conferencing platform.
Web Conferencing
Zoom is simple — which is part of what made it vulnerable. It’s really just an audio/video conferencing tool. Zoom makes it easy to set up a virtual meeting, meet, chat, discuss, and be done. It also doesn’t require any advanced authentication or account management besides your name.
Teams has similar functionality, but may take a moment longer to set up a conference due to the intent of the platform. For example, Teams was built for integration with Microsoft 365, not as just a standalone product. Its scheduled meetings can be done from within its own calendar interface, which pulls directly from your Outlook/Microsoft calendar. You can also create meetings for Teams directly within Outlook and never open Teams.
Video Calls & Chat
When it comes to one-on-one or multi-person calls and chatting, Zoom is heavily built around the ID of a meeting or user, which is sent out for attendees to “join.” This system is designed to help users schedule meetings or start ad hoc video conferring meetings quickly, but it gets a lot less user-friendly when you want chat with someone, view their availability, jump on a video call, and add/remove people from that context.
Teams is designed around the individual, not the meeting. Chatting with someone, adding another person to a chat stream, sharing documents and notes, and collaborating on files are Teams’ main goal. It’s called “Teams” for a reason — it’s meant to let smaller groups of people work together.
It’s important to know that when sharing documents or data with people in ad hoc chats or video calls, that data is stored in OneDrive and available indefinitely if you want to continue working on it.
Since Teams is part of the overall Microsoft 365 ecosystem, all the data is searchable and discussion/chats can be sent out via email.
Telephone Integration
One of the biggest differences between Teams and Zoom is telephony. Zoom allows you to use a web link or a dial-in number for those joining from phones, but that’s pretty much where it leaves off. Teams has advanced integration with true calling capabilities because it was designed to replace telephone systems as well.
For example, with the proper licensing, I can call a telephone or join someone else’s conference via a traditional dial-in number with Teams, treating it like it was a telephone. In a voice meeting or chat, when I want to add a user, I can choose to call their telephone to dial them in. If Teams knows the user, it allows you to choose to invite them via telephone or their traditional online user account.
If you want the ability to add legitimate telephone capabilities (including receiving calls and voicemail), Teams is a much better choice.
Complete Internal Communication
Teams was created to be a complete internal communication hub — a context-based front-end to a lot of the work we perform on a daily basis. Its capabilities include: emailing, chatting, meeting, co-authoring documents, setting up calendar items, working on projects, and collaborating with both internal and external users on various secured topics and data.
Teams allows users to work with documents in secure channels, synchronize data to desktops, and co-author documents, adding workflow and automation to them as well. It also allows users to notify others when certain changes are made or reduce notifications on items they don’t need to hear about.
Teams provides for persistent notes integrated into meetings or work “locations” and @ mentions and hashtags to message people and groups specifically or allow them to search for tagged data and conversations.
One of the most important aspects of Teams is the ability to create multiple teams to work on specific content or projects and make sure those locations are private, secure, and audited, only accessible by the intended groups or users you define.
Platforms
Both applications are available on all typical platforms: PC, Mac, iOS, and Android. There isn’t a big distinction here in terms of availability, and both tools can be browser–based.
Price
Teams has a free version and the paid access starts with a $5 minimum licensing. However, most organizations already have Microsoft 365 Business Premium ($12.50) or E3 ($20) licensing, which includes a fully–functioning version of Teams at no additional cost. Prices increase if you want to use Teams as your office phone.
Zoom has a free version with some meeting time limitations, and their standard pricing is approximately $15-20 per month.
Bottom Line
The bottom line is that, in many ways, Teams and Zoom aren’t even comparable.
Security aside, if all you want to do is create a video/audio conference calls from a computer, Zoom is certainly easier to set up and use. Because the functionality is very specific and limited, there isn’t much else to do with it.
Teams, however, is designed to be an enterprise collaboration and productivity tool for business that do a lot more than calling and conferencing. The integration of documents, data, workstreams, permissions, and sharing all lend themselves to a deeper overall product. This product does come with some complexity and governance challenges that need to be addressed unless you simply want to use it for video conference calls.
If you want to do more with the tools you have and prefer software you can manage internally via settings, provisioning, and auditing, Teams is the clear choice for you.
Balancing Security and Productivity in Microsoft 365 During Times of Crisis – Part 1How Azure Active Directory (Azure AD) Identity Governance can assist your organization in responding quickly to new collaboration needs while maintaining security and governance.
The sudden onset of the COVID-19 pandemic sent much of the world into a frenzy. With businesses concerned for the safety and wellbeing of their employees and customers, and many governments strongly advising social distancing, the need to ramp-up the remote workforce went from a distant goal to a top priority almost overnight. One of the many groups greatly impacted by this new priority is the group of people responsible for collaboration platforms such as Microsoft 365. The need to quickly enable remote workers has made it seem necessary for many groups to ignore or postpone best practices and security considerations in favor of business continuity. Azure AD’s Identity Governance is one set of tools designed to help strike the balance between security and productivity, enabling quick turnaround on required resources while providing checks and balances to mitigate risk.
What is Azure AD Identity Governance?
Simply put, Azure AD Identity Governance is about “ensuring the right people have the right access at the right time.” More specifically, it is a set of 3 primary tools designed to control and audit access to company resources.
Entitlement Management is about creating Access Packages to control the scope and duration of access to groups, applications, and SharePoint sites.
Access Reviews are about auditing access to ensure previously granted permissions are still appropriate and necessary.
Privileged Identity Management covers the just-in-time elevation of tightly scoped roles to allow users to perform privileged operations when needed while maintaining lower permission levels during their day-to-day job functions.
These three functions work synergistically to help keep a watchful eye on the collaboration space without impeding productivity. Part 1 of this series will cover Entitlement Management in detail.
Entitlement Management
Setting up an Access Package
The key component of Entitlement Management is the creation of “Access Packages”. An Access Package is a collection of resources that users can be granted or request access to. Unlike simply adding users directly to Groups, these packages can control the duration, approval process, and periodic reviews of those assignments.
The first step of creating an Access Package is naming and describing its purpose. You can also create “Catalogs” to group multiple packages and delegate the administration of them to the appropriate users.

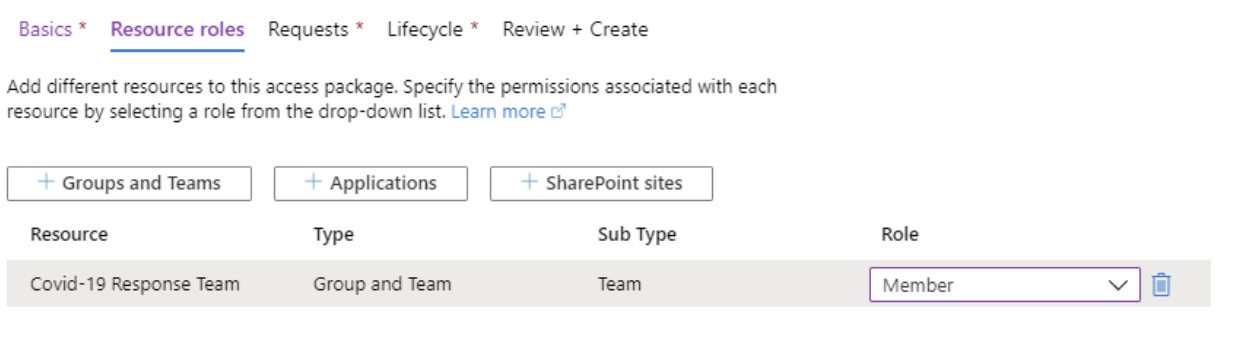
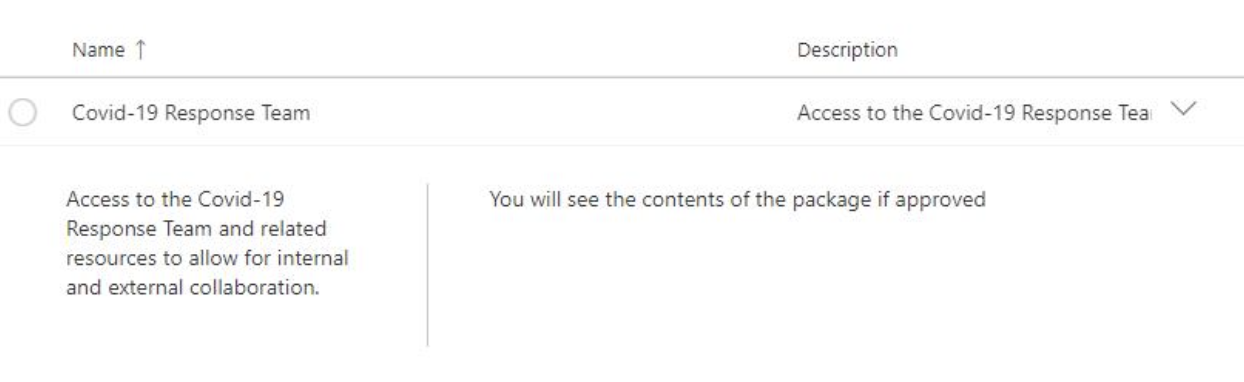
Next, you determine the Resource Roles that will be part of this package. It can be a combination of Groups/Teams, Applications, and SharePoint sites. In this case, we will grant access to the “COVID-19 Response Team” team in the Member role.
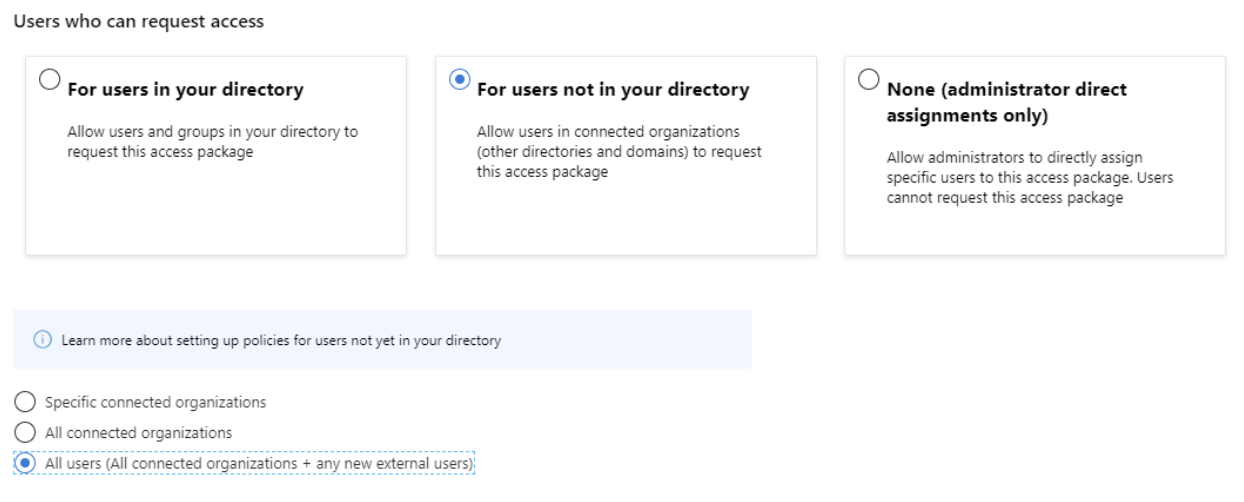
We’ll then move onto the Request process. Since this team may be made up of external collaborators who are unknown at this time, we’ll select “For users not in your directory”, and we’ll allow “All users (All connected organizations + any new external users)” to request access.
Since we are allowing as of yet unknown external users, we must require approval (other settings allow you to disable approval). We will set a specific user to provide approval, ensure a decision is made within 2 days, and force both the requestor and the approver to provide a justification for the access. We’ll enable this access request when we are ready to start requesting access.
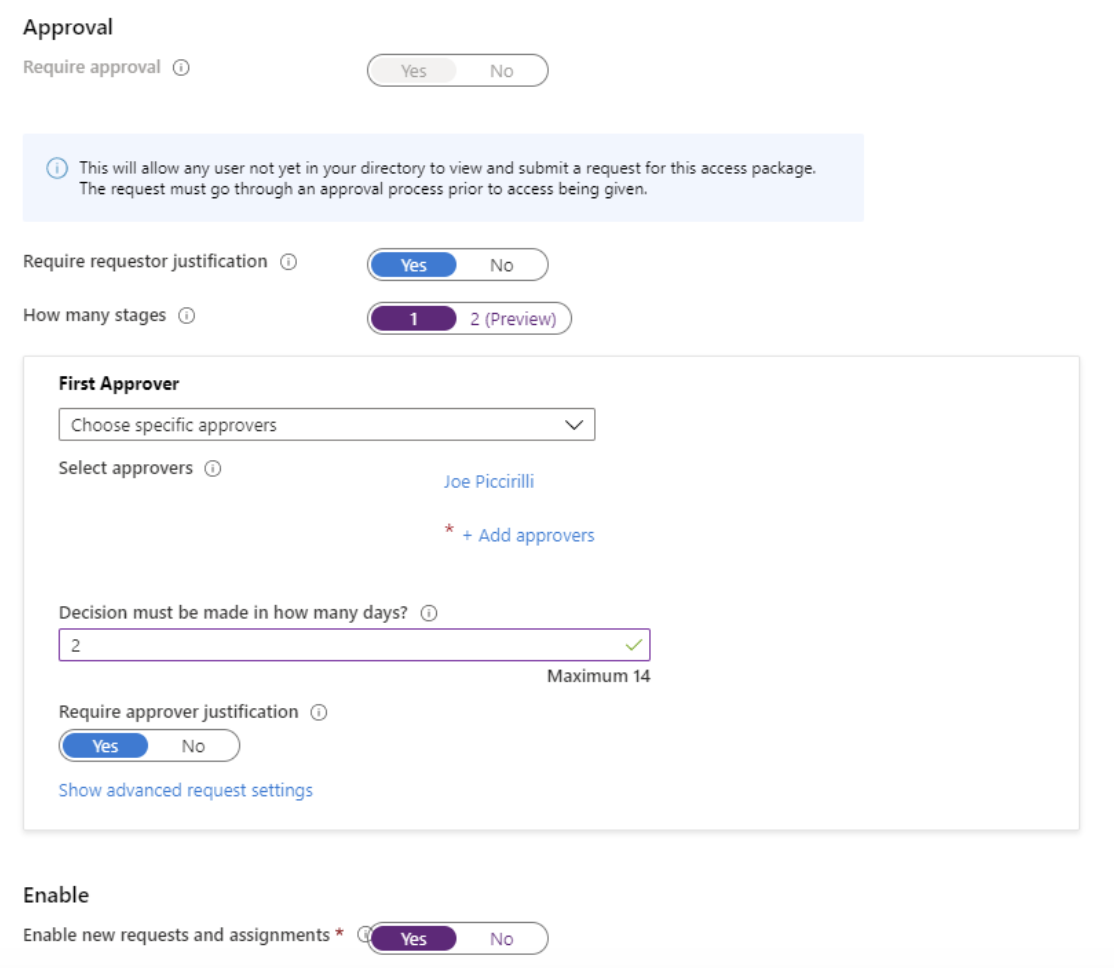
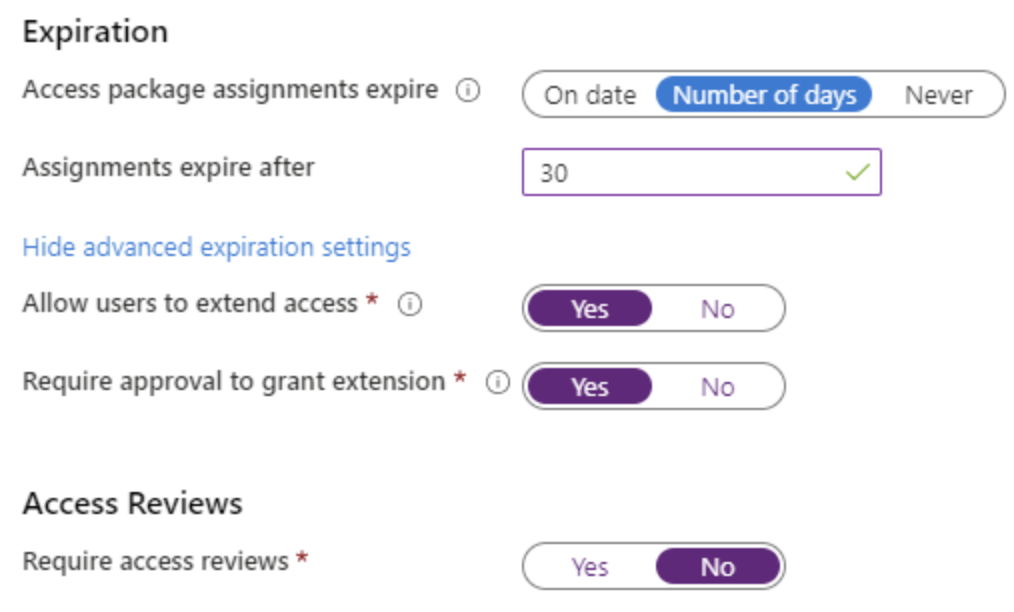
Next, we will set the lifecycle of the access being provided. In this case, we will allow for 30 days of access, with the ability to request an extension (which also requires approval). If this was a longer duration or did not expire, we could also tie access to an Access Review, which we’ll cover later.
The last page will show a summary of all the choices to allow you to make any desired changes before creating the package.
Once the package is created, the browser will display a list of all Access Packages the current user has access to. From here, you can use the ellipsis to copy the link used to request access. This link can be emailed, put on a public site, or shared in any other traditional way.

Requesting Access
To request access via an Access Package, a user can use the link generated during the creation process. Once they sign in to the 365 tenant, they will be presented details of the access being requested. The user would then select the package and push the “request access” button.
From there, because we require justification, the user will be presented an area to provide the reason they are requesting access.
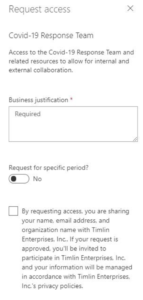
They will receive confirmation that their request was submitted.

Approving Access
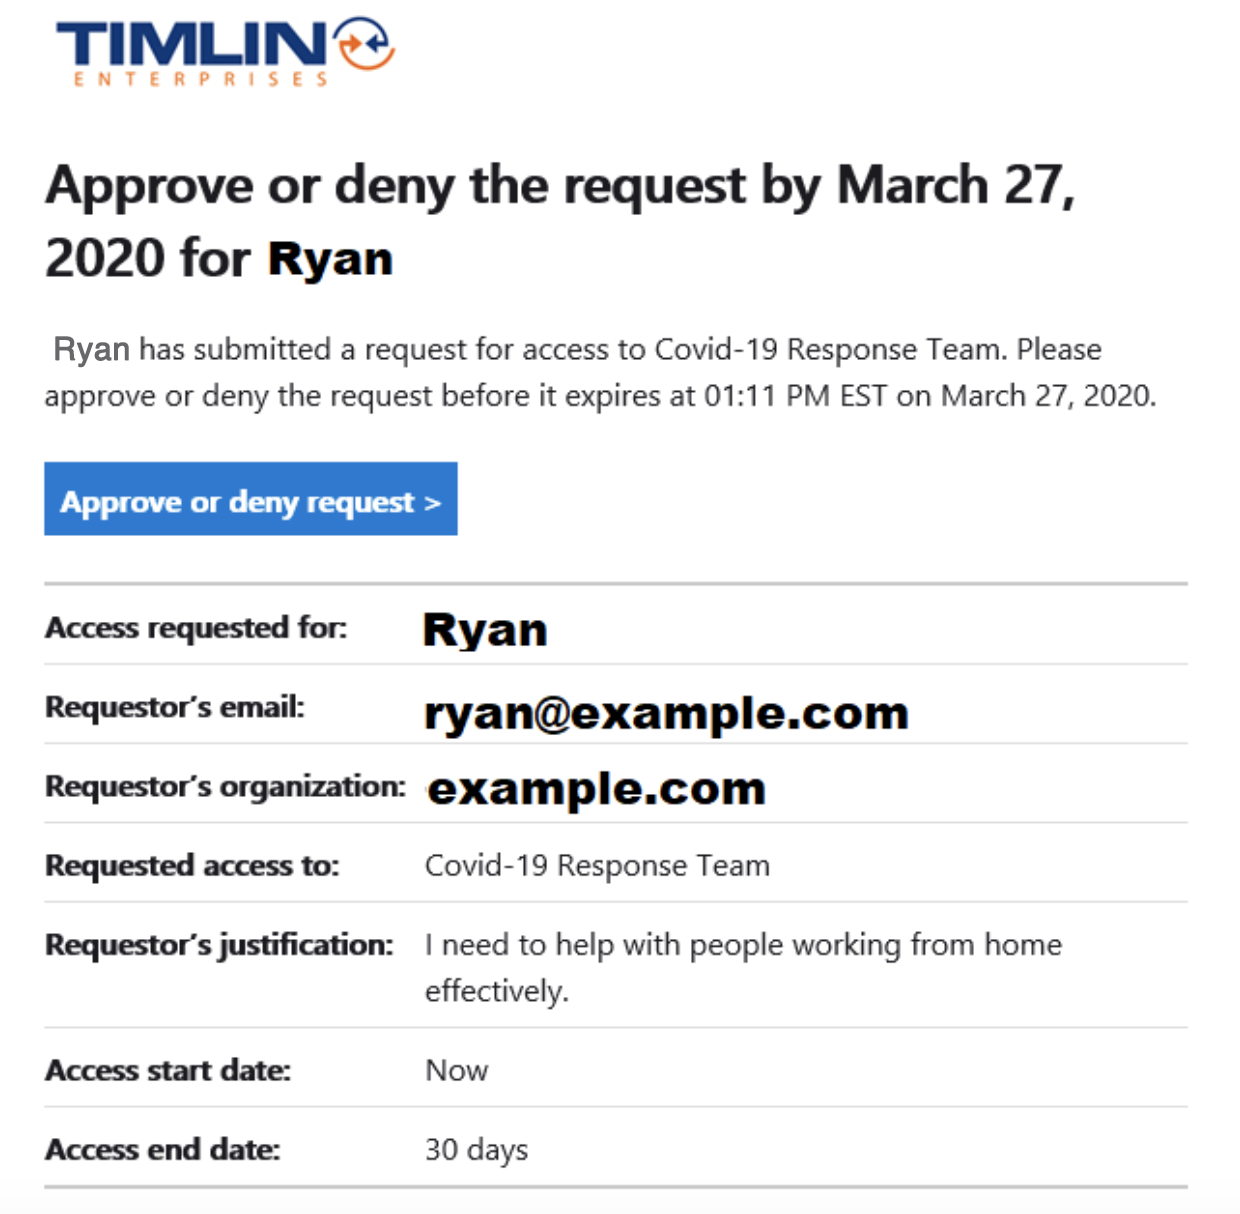
After requesting access, the Approver will receive an Email with actions to Approve or Deny the request, and a summary of the information about the request.
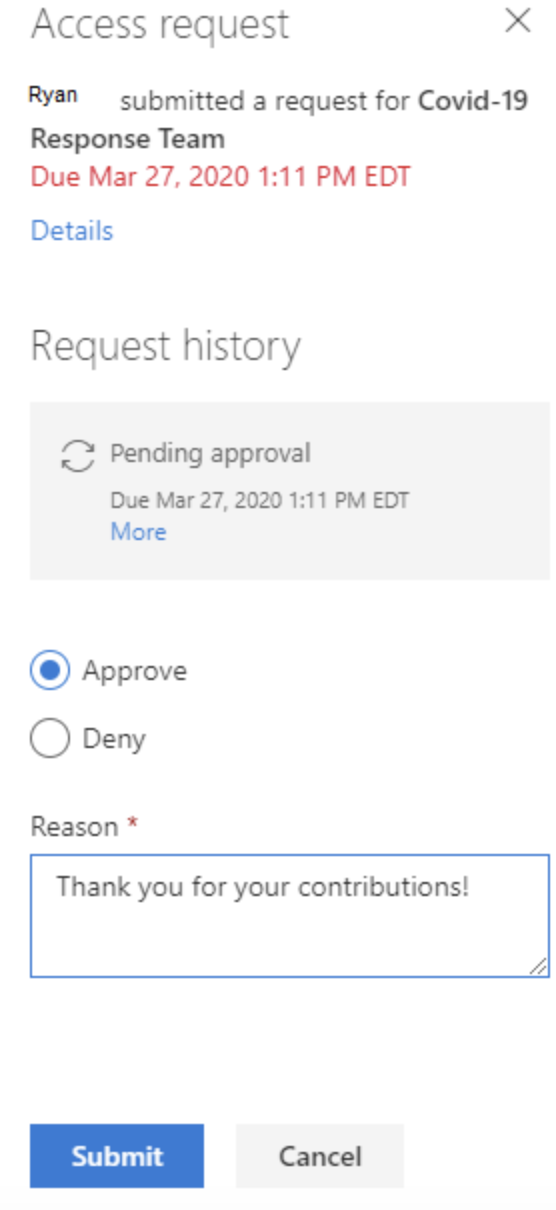
Pressing the Approve or deny request button takes you to an Approvals page where you can approve or deny and provide the required justification.
Now that the request has been approved, the user should have access to the Team as a Member. When the expiration date is reached in 30 days, that access will be revoked unless an extension is requested.
Summary
Entitlement Management using Access Packages is a great way to govern access to resources such as Teams, SharePoint sites, and Applications, especially when external users are involved or the context of the access is limited to a specific timeframe. Users can request access as needed, owners can be empowered to grant access on demand, and removal of access can be automated to prevent lingering exposure of company information.
Next up: Access Reviews
Configure periodic, guided reviews of access to resources with suggestions based on login activity and automated resolution based on dispositions.
Thrive Named to the 2020 Tech Elite 250 by CRN®
Tech Elite 250 List Honors the Highest-Achieving IT Solution Providers in Vendor Certifications
FOXBOROUGH, Mass. – March 23, 2020 — Thrive announced today that CRN®, a brand of The Channel Company, has named Thrive to its 2020 Tech Elite 250 list. This annual list acknowledges the top tier of North American IT solution providers that have earned the highest number of advanced technical certifications from leading technology suppliers, scaled to their company size. These organizations have differentiated themselves as premier solution providers, earning multiple, top-level IT certifications, specializations, and partner program designations from the industry’s most prestigious technology providers.
Each year, The Channel Company’s research group and CRN editors work together to identify the most customer-centric technical certifications in the North American IT channel. Solution providers that have earned these elite designations — enabling them to deliver exclusive products, services, and customer support — are then selected from a pool of online applicants.
Thrive’s unique career development program, ThriveUniversity, facilitates the growth of its talented engineering staff. At every level Thrive’s engineers are equipped with the tools to pass security, networking and Cloud certifications that strengthen their capabilities and skillsets. The investment made in its employees in turn allows Thrive to provide its near 1,000 clients with innovative NextGen services.
“Solution providers that continue to pursue vendor certifications and extend their skill sets across various technologies and IT practices are proving their commitment to delivering the greatest business value to their customers through an incomparable level of service,” said Bob Skelley, CEO of The Channel Company. “Our CRN Tech Elite 250 list recognizes leading solution providers with expansive technical knowledge and esteemed certifications for exactly that reason.”
“Thrive engineers dedicate themselves to continued learning of best-of-breed products and solutions. From entry-level to senior management, we understand that each certification achieved strengthens the individual, the company and relationships with our technology partners,” stated Rob Stephenson, CEO of Thrive. “Whether it’s earning a CCNA, CISSP, Security+ or other certification, we are proud of the hard work that our talented staff puts in to advancing their technical capabilities.”
Coverage of the Tech Elite 250 will be featured in the February issue of CRN, and online at www.CRN.com/TechElite250.
About Thrive
Thrive is a leading provider of NextGen managed services designed to drive business outcomes through application enablement and optimization. The company’s Thrive5 Methodology utilizes a unique combination of its Application Performance Platform and strategic services to ensure each business application takes advantage of technology that enables peak performance, scale, and the highest level of security. For more information, visit thrivenextgen.com.
Thrive: LinkedIn, Twitter and Facebook
MEDIA CONTACT:
Stephanie Farrell – Director of Corporate Marketing
774.276.1521 | sfarrell@thrivenextgen.com
How To Ensure Secure Collaboration In Microsoft TeamsIn a time where remote work and distributed teams are more common than ever, ensuring your team can collaborate freely while keeping information secure is imperative. In this session, experts from Timlin Enterprises, LiveTiles, and Nucleus Cyber discuss what secure collaboration in Microsoft Teams entails and why it is important for your organization.
Watch the Webinar:
Meet the Speakers:

 Ryan Thomas, CEO of Timlin Enterprises
Helping clients advance Office 365 capabilities to increase efficiency. Managed and professional services support migrations, administration, support, secure collaboration, automated business processes, and more.
 Brad Hannes, Innovation Executive at LiveTiles
Defining the intelligent workplace. Giving developers and business users tools to easily create dashboards, employee portals, and corporate intranets that can be further enhanced by artificial intelligence and analytics features.
 Steve Marsh, VP of Product at Nucleus Cyber
Provides a data-centric solution to secure collaboration. Delivers effective, intelligent security that minimizes data loss from internal misuse, rogue cloud environments, cyberespionage, and human error.
10 Reasons Why Your Company Needs An Intelligent IntranetAccording to Techterms, an intranet is a “private network that can only be accessed by authorized users.” In reality, it’s a lot more interesting than that. An intranet is an intelligent resource of organizational bliss that can improve internal communication, collaboration, knowledge sharing, and more.
One way to imagine an intranet is as a password-protected VIP club. Within this private club are virtual file cabinets full of information and areas for private, secure communication that only the club members have access to. With all information and members in one password-protected space, users can send out important messages and updates more simply and securely.
How Does an Intranet Compare to an Intelligent Intranet?
Intranets are designed to be the central location that an organization’s employees can access company updates, announcements, and resources — improving not only company culture but also internal communications and collaborations.
For example, the LiveTile’s Wizdom Intelligent intranet takes all of the ease, privacy, and connection of an intranet, and includes a wide range of leading productivity tools that employees can use in a cohesive, digital workspace.
Through our partnership with LiveTiles, your IT team can deliver a powerful digital workplace that surfaces the relevant tools, communications, and knowledge, wherever and whenever your employees are working. There are several benefits to implementing and using an intranet within your organization. Here are our top reasons:
10 Reasons To Implement An Intelligent Intranet
1. Security
Sensitive, private information can be saved in one specific location, with access given only to authorized personnel. In addition, groups, users, or teams are able to manage their workspaces with predefined security settings.
2. Reduced Meeting Times
Access to employee directories within the intranet gives employees a chance to locate the correct person to answer questions and chat about business-related matters from their desks in real-time. This lessens the time spent in meetings and prevents sidetracked conversations from taking over.
3. Improved Individual Productivity with Bots
LiveTiles Bots help to connect people to specific information, lists, or data that they need, allowing them to receive, create, and organize their work. The automation of otherwise mundane tasks helps to free up employee time to focus on more productive assignments. Bots can be customized based on each unique business and changed as a business evolves.
4. Quick, Efficient Access to Information
Access to information becomes more convenient, leading to enhanced productivity and less wasted time. Communication sites, like the Wizdom Noticeboard, provide a place to share anything from reports to news or anything else that may need to be communicated.
5. Boosts Team Collaboration
Individual teams can use tools and features in Office 365 to collaborate more efficiently on projects or tasks specific to their department or function. With more remote workers, it is imperative that you provide tools and capabilities that promote easy to use collaboration solutions making it simple to collaborate, hit deadlines, and increase productivity.
6. Customizability
The features of Modern SharePoint combined with the enhanced capabilities of LiveTiles allow you to deliver solutions using mostly out of the box tools. However, in order to deliver highly engaging solutions, organizations need to customize their intranets to add corporate branding, extended features, or integrations. The customization allows businesses to develop actual solutions to cover any need necessary, something that would be impossible with the use of a ready-made site. In addition, site designs can be applied at any time — at or after site creation.
7. Less Strain On Development Resources
The usability of Office 365 and a LiveTiles Wizdom Intelligent intranet means that a developer is no longer necessary to create what content editors are now capable of. The tools in both platforms allow business owners to configure solutions that meet their requirements. For times that development resources are needed, LiveTiles’ built-in intuitive interface allows you to design as quickly and efficiently with over 70 preconfigured tiles and a drag-and-drop interface.
8. Cross-Department Collaboration
More brainpower results in better ideas, especially when various departments are able to collaborate using an integrated approach. LiveTiles is easily integrated with CRM, ERP, BI, ITSM, and other software, making cross-department collaboration easier than ever.
9. Saves Time
The primary goal of a corporate intranet is to improve internal communications, ensure you have a hub for information and collaboration, and bring efficiency to internal processes. The implementation of a properly designed and governed intranet will drive time and cost efficiencies by improving how users find, act, and communicate internally. LiveTiles’ intelligence provides real actionable insights that allow for content evolution based on direct user feedback, analytics, and insights. Users are no longer spending hours trying to find a specific policy, fill out a vacation request form, or simply find the right person in the organization to solve an issue.
10. Greater Cost Control
The choice of different intranet deployment and payment models allows organizations to make financial decisions that are right for them. When site creation and design are being driven by organizations themselves, sites can be maintained with less effort. Additionally, there is no need to employ extra IT resources or experience developmental delays, saving both time and money.
Based on these ten reasons, a LiveTiles Wizdom Intelligent intranet can propel your organization towards greater success. The time and money saved, and improved collaboration across departments and increased team communication are equally priceless.
Interested in learning more about LiveTiles Wizdom Intelligent intranet? Reach out to our team to get your company on board.

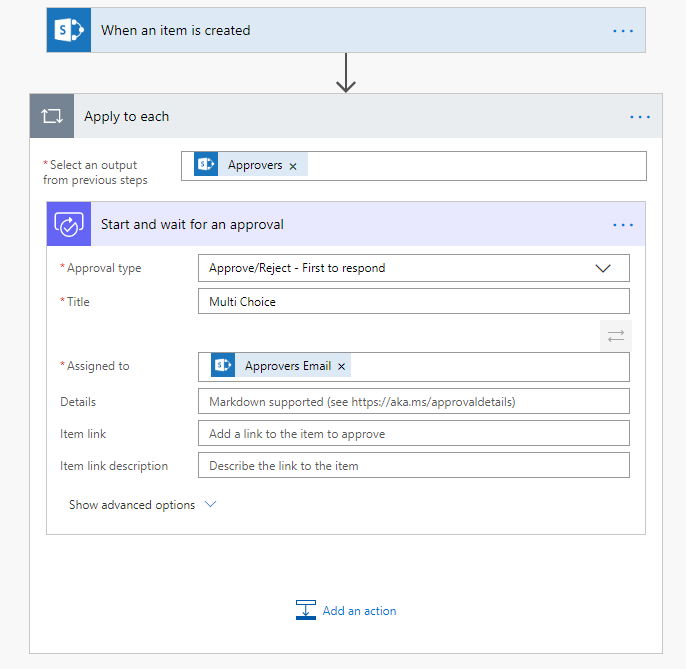
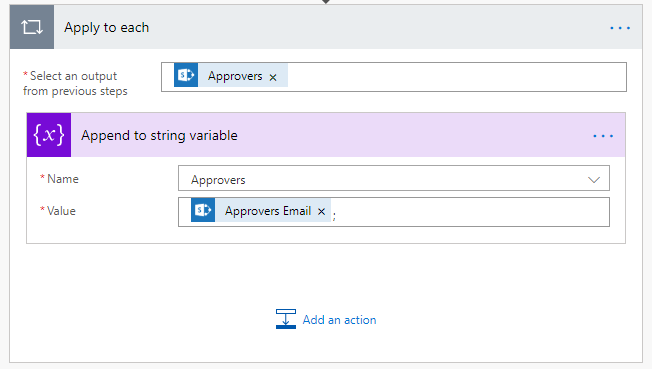
Users looking to assign an approval to multiple people in Power Automate (or Microsoft Flow) using a Multi Choice People Picker field in a SharePoint list, may find that it isn’t as straight forward as it might seem. When users feed the field value into any approval step, it will throw it into a for each loop (as shown below).
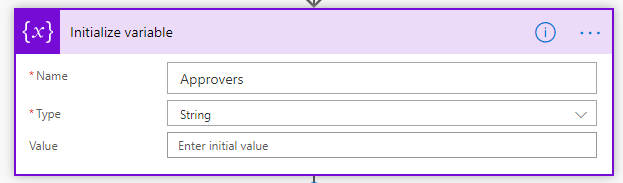
A challenge arises since users now face an approval being individually assigned to each person defined in the list item. The goal is to have one main approval and if someone in that list approves or denies it, the approval process is completed. To do this, users need to build a string array separated by semicolons and feed that into the “Assigned To” input. First, initialize a variable called “Approvers” and set it’s type to “String”.
Next, set up a for each loop based on the Approvers field in the SharePoint list and append each Approver Email to the string variable using the “Append to string variable” action. At the end of the variable, simply type in a semicolon so the completed string will be the email with a semicolon at the end.
Lastly, users can recreate an Approval step and feed it the new Approvers variable.
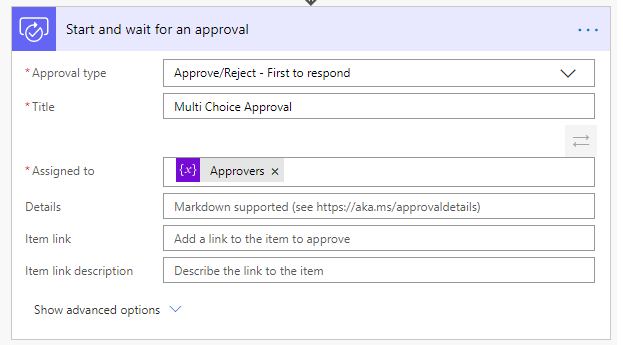
With this, users will notice notice that it is no longer thrown into a for each loop and they will get one single Approval tree to work with.
Microsoft Power Automate Flow Trigger ConditionsIt’s common to use the ‘When an item is created or modified’ trigger when creating Flows for SharePoint with Power Automate. This can be a very chatty trigger as every change can result in the Flow executing. Users can utilize Conditions, Scopes, and Run After settings within the Flow logic to determine if they should really act on an item. This still results in yet another unhelpful entry within the Run History.
Leveraging Trigger Conditions offers the option to check Trigger Properties and additional logic to determine if the Flow should run at all. Users can continue to use the same Trigger while streamlining both Flow logic and Run History.

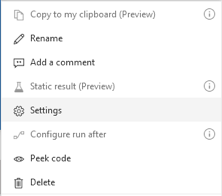
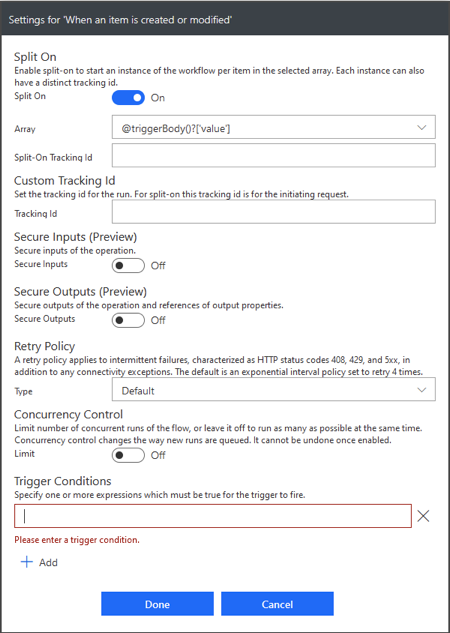
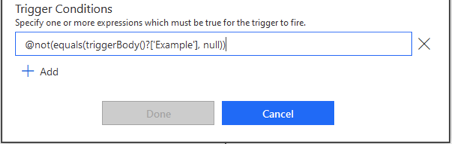
Trigger Conditions are found by selecting the menu from the three dots or ellipsis in the upper right-hand corner of the Trigger Card. Once there, look to Settings, then at the bottom, Trigger Conditions. Users can add more than one Condition and that the Trigger will only run when the Conditions of which at least one must evaluate as True.
Since the Dynamic Content menu isn’t available at this point, users must use the available Functions. Whatever expression is entered should return a Boolean value. A non-Null value like an Object or Number won’t allow the Flow to run at all.
| Expression | Result Type | Valid Condition |
| @add(1, 0) | Integer | No |
| @true | Boolean | Yes |
| @equals(1, 1) | Boolean | Yes |
| @json(triggerBody()) | Object | No |
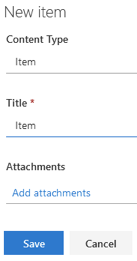
Note that List One which has two Content Types with differing Fields. Item has only the Title column and Item 2 adds the Example column.
| Content Type | Fields |
| Item | Title |
| Item 2 | Title, Example |
Normally, users would have no means of filtering processed items within the Trigger with When an item is created or modified as no OData filtering is provided. By using the following Trigger Condition, users can ensure Flow doesn’t process any items where Example is missing data.
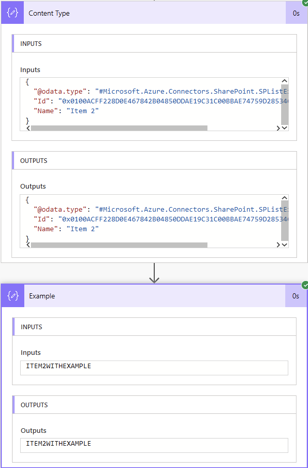
Two Compose actions are added to show the values of the Content Type and Example properties of the triggering items. When the Test functionality is used, three scenarios can be run:
Item Content Type:
Create a new Item which has only the Title column; no processing should occur.
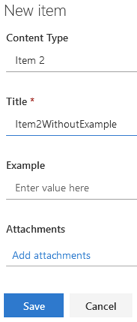
Item 2 Content Type Without Example Value:
Create a new Item 2 which has both Title and Example columns, complete only the Title; no processing should occur.
Item 2 Content Type With Example Value:
Create a new Item 2 which has both Title and Example columns, complete both; the Test should now fire and process the Trigger.
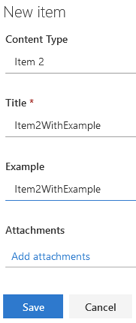
Here are the results showing the Item 2 Content Type and the text from the completed Example field:
Alternately, we could use the Content Type itself as the Trigger Condition:
@equals(triggerBody()?[‘{ContentType}’]?[‘Id’], ‘0x0100ACFF228D0E467842B04850DDAE19C31C00BBAE74759D28534CB0A8EEAFC9908541’)
Trigger Conditions can be grouped to create complex AND/OR logic. While adding multiple conditions acts as an AND, where all must be True, there is no UI method for OR. Adding @false as a secondary condition illustrates this as if we run a Test — it will never trigger.
Fortunately, Microsoft has provided both and() and or() logical comparison functions, allowing the introduction of OR in a single condition.
@or(equals(triggerBody()?[‘{ContentType}’]?[‘Id’], ‘0x0100ACFF228D0E467842B04850DDAE19C31C00BBAE74759D28534CB0A8EEAFC9908541’), not(equals(triggerBody()?[‘Example’], null)))
With this condition, the Flow would fire only if either the Content Type is Item 2 OR Example isn’t empty. This would run anytime the Content Type was Item 2, regardless of the value for Example, as well as for any other Content Type so long as Example isn’t empty. Tests do not fire when the Trigger Condition isn’t met, which means no more Run History entries when no real processing occurs.
Condition Breakdown:
@: Allows the use of a Function within an Expression (anytime it isn’t entered via the Dynamic Content / Expression menu).
or(<expression1>, <expression2>, …): Return true when at least one expression is true. Return false when all expressions are false.
equals(‘<object1>’, ‘<object2>’): Return true when both are equivalent. Return false when not equivalent.
not(<expression>): Return true when the expression is false. Return false when the expression is true.
[, ], and ?: These operators are used to navigate data structures. In addition to accessing indexes in an array, the square brackets also allow access to Properties or Keys.
For users currently filtering on Trigger properties with Action Cards, it’s recommended to use Trigger Conditions instead. Users can even leave your existing logic in place as a matching condition would ensure that the same values are passed. They work particularly well in instances where Flow may trigger itself, such as updating a column value when a List Item is modified. In organizations with complex Flows or a large inventory, Trigger Conditions can cut down on Nesting Depth, Actions Per Flow, and Flow Executions — all of which contribute to staying within service limits and getting the most value from your subscriptions.
How To Configure Microsoft Approval Flow For Multiple Unique ApproversAs a manager, portions of your day are typically associated with review and approval processes. You’re the one who pushes project progress along or allows your employees to take that much-needed vacation. Previously in Microsoft Flow, an Approval Flow would be a cumbersome process. Users would have to let a manager know that a file is ready for review, then the manager would have to email the reviewers and track progress via email in order to know if the review process was complete. Another email would then need to be sent in order to inform the user who submitted the review that they can move onto the next task. The process becomes even more complex when the people who have to review the file changes based on its content.
So how can you configure an approval Flow for multiple unique approvers without this manual effort?
This blog post will show you all the configuration steps necessary to support this scenario.
Configuring Approval Flow
Often when configuring approval Flows, we typically pull the manager information from a user’s profile and assign the approval task to said manager. This is a typical use case for a vacation request form. However, this is not always the use case where approver details are static.
Occasionally, who the approval task is assigned to depends on a file or list item being submitted for review. For example, you have a document library where users want to submit drafts to colleagues for review but the people reviewing file is not always the same. You can create a Flow that allows users to submit the approval Flow, and upon submission enter in the unique persons for this individual item that need to review. Colleagues can then go in and add comments or make updates to file prior to approving or rejecting it.
Follow along below to learn the steps on how to configure multiple unique approvers for an approval action in a Flow.
Create The Flow
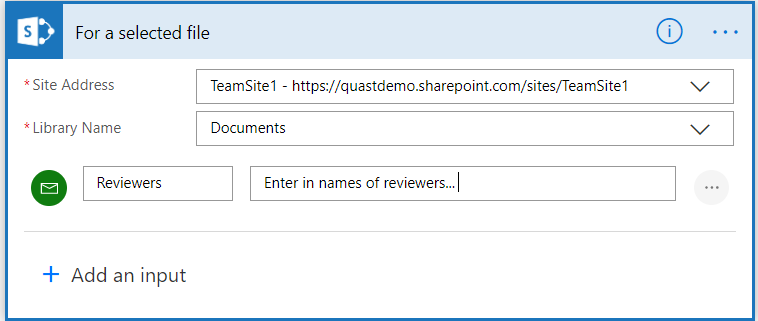
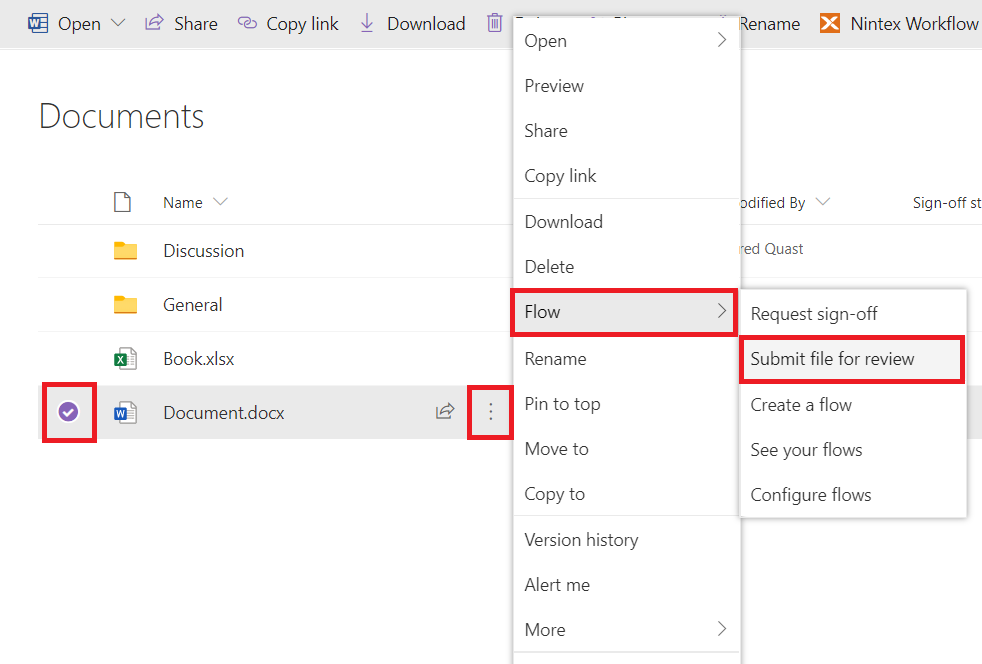
Build an instant Flow from Power Automate, and for trigger use “For a selected item” or “For a selected file” depending on your list.
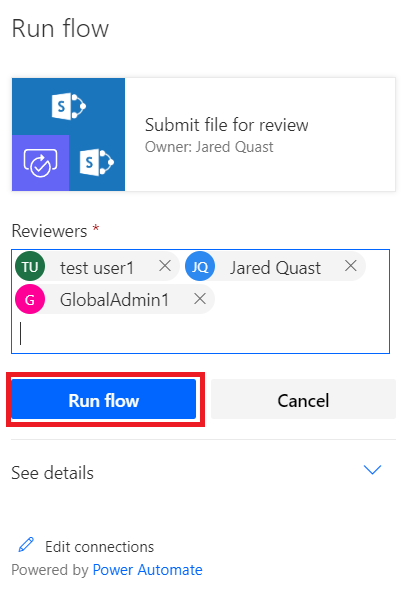
Begin by choosing your site and list the Flow will be ran on. Select “+ Add an Input” and choose Email. When users start the Flow, they will be prompted to add in “Reviewers” information via People Picker prior to kicking off Flow.
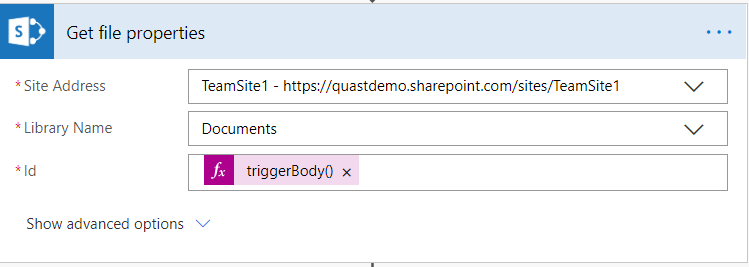
Next, add action to get properties of the file. The expression used to pull Id for file is triggerBody()?[‘Entity’]?[‘ID’]
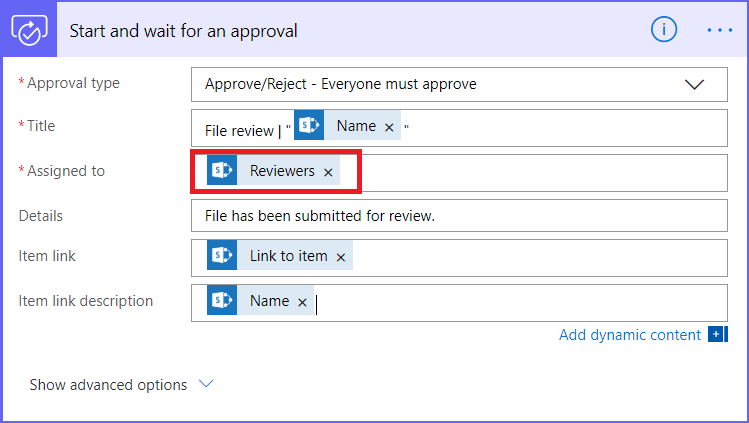
Add the approval action. In the ‘Assigned to’, configure it to the “Reviewers” variable that users are inputting when submitting the Flow.
Manually Trigger The Flow
Users can now execute the Flow on list items to submit them for review.
Read Next: How To Invite External Users Using Microsoft Flow And Microsoft Graph API
How To Invite External Users Using Microsoft Flow and Microsoft Graph API
Timlin recently helped a customer automate the creation of new SharePoint site collections designed for external sharing. Prior to our work, the client had a number of manual steps that included completing a PDF form, manually logging and tracking the request, spinning up the site and associated security, and manually inviting the external users. With the new automated process, the client simply fills out a Power Apps form that allows them to specify email addresses for the external access, and all the remaining steps are fully automated.
When looking for the underlying solution to automate this process, we decided on Microsoft Graph API. We needed to be able to authenticate with Microsoft Graph API and execute actions against it via Microsoft Flow. We have used this for many of our solutions, and in this post, we will detail just what is needed to authenticate with Microsoft Graph API and how to use its Invite API to invite guest users to your tenant.
Setting Up an Azure AD App Registration
The main requirement for this process to work is the Azure Active Directory App Registration. This App Registration serves as the authentication handshake between Microsoft Flow and Microsoft Graph API. You will need an elevated level of privilege to create the app registration and assign it the permissions we need in this example.
First, navigate to your Azure Portal (https://portal.azure.com) and click on Azure Active Directory.
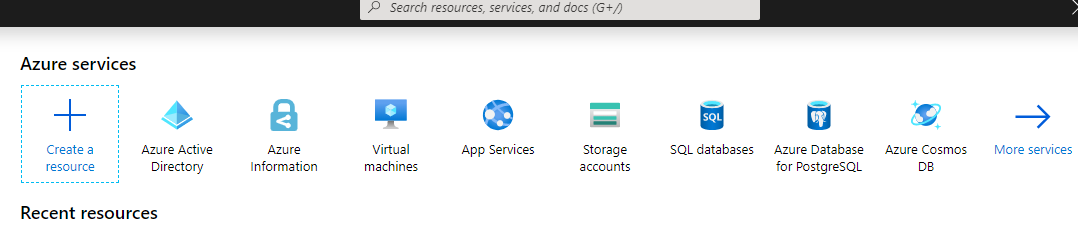
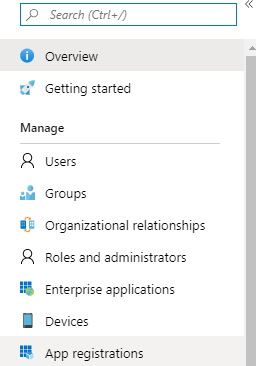
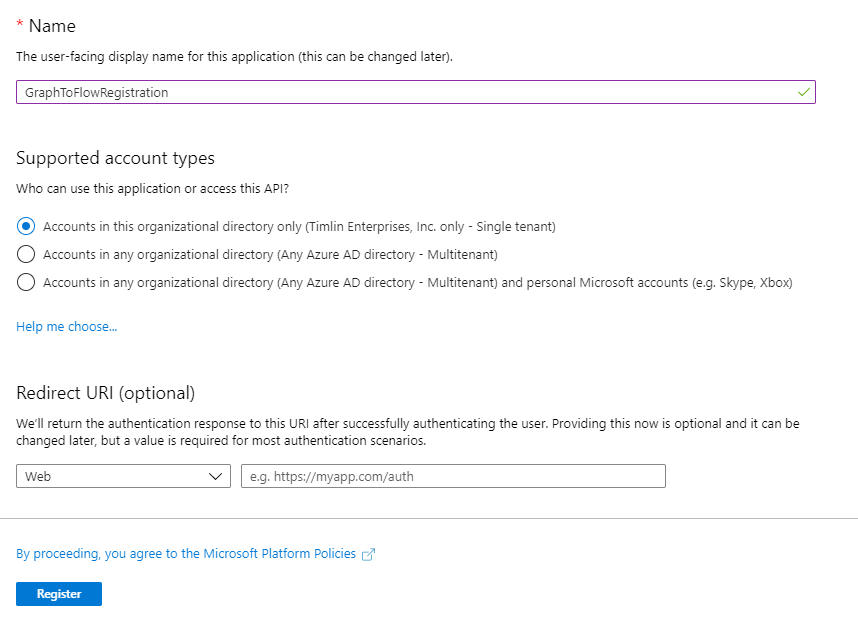
If Azure Active Directory is not present in your quick links section, simply search for it and click on it from there. Next, navigate to “App Registrations” on the left-hand navigation menu and then “New Registration”.

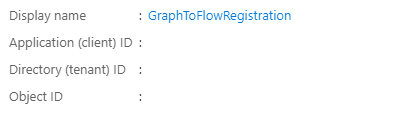
You can name this Registration whatever you’d like, leave the rest of the settings as they stand and click “Register”.
Authentication and Permissions for our Azure AD App Registration
Now that we have our App Registration created, we need to setup two things: our App Secret and the required App Permissions.
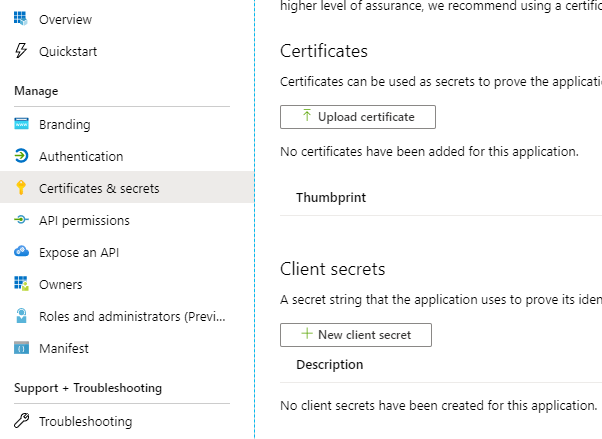
First, navigate to “Certificates & secrets” and click on “New Client Secret”.
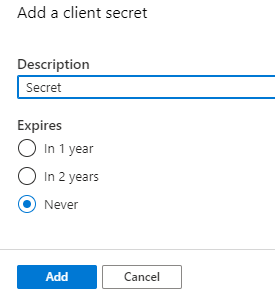
We can call our Secret anything we’d like. In this instance, we’ll just name it “Secret”. The expiration date is up to you but keep in mind if you select an expiration date other than “Never” that you will need to update this Secret key down the line in order for your functionality to continue working.
You should now have a Secret key appear. Make sure to copy and save the key somewhere safe as you will only see it this one time.

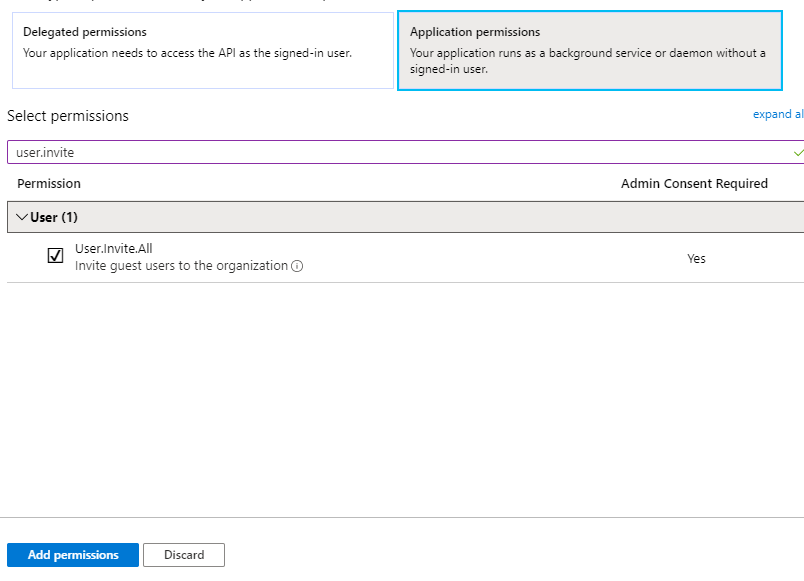
Next, we need to give our App Registration a single permission called “User.Invite.All”. This gives the App Registration access to invite guest users to our tenant. To do so, navigate to “API Permissions” and click on “Add a Permission”.
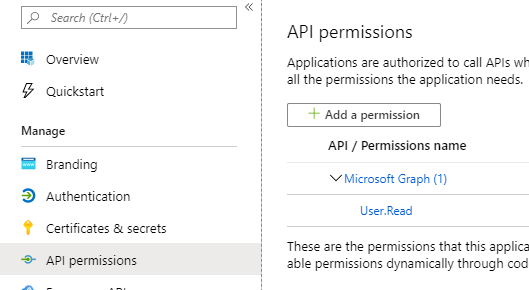
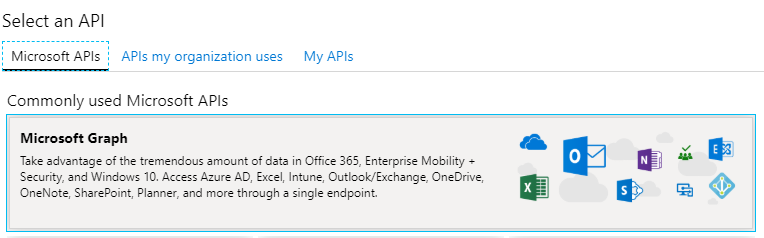
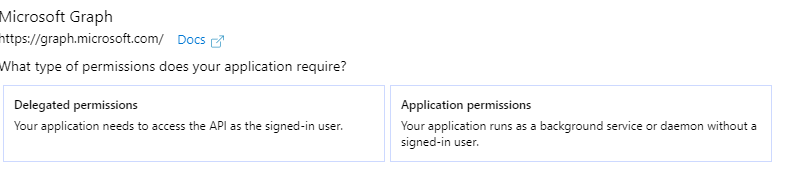
In the now visible pop-up menu, click on “Microsoft Graph” followed by “Application permissions”.
If we now search for “User.Invite”, we will see our required permission. Check it off and click “Add permissions”.
Lastly, we need to grant the permission itself to the Application. To do so, click on the “Grant admin consent” button found at the bottom of the screen. If this is greyed out for you, it means that you do not have admin permission on your tenant to execute this action.

Setting Up Our Microsoft Flow
Now that we have our App Registration setup, we can create our Flow that will invite external users to our tenant. Be sure to keep our App Registration up in a separate window/tab as we will need some information from this shortly.
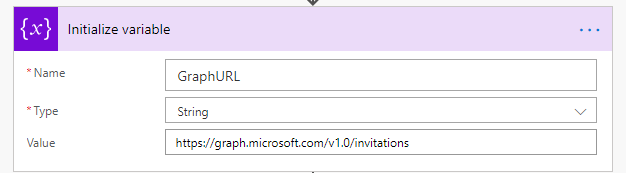
Our Flow consists of only two actions and a trigger. For now, we’ve set this up to be on a manual trigger, but you can always alter this for your needs. The two actions are an “Initialize Variable” action and an “HTTP” action (the HTTP action does appear as a Premium action but is available with appropriate licensing). The Initialize action will simply hold the Graph API invitation’s URL.
Next, our HTTP action will consume our GraphURL variable and build the JSON Body that we will send to the Graph Invite API.

Each property we specified in the Body is detailed below:
- Invited User Email Address – The email address of the external user we will be inviting
- Invite Redirect URL – The URL the external user will be redirected to once accepting the invitation
- Send Invitation Message – If set to false, the user will not receive their invitation email, but they will still be added into Azure AD. If set to true and no Customized Message Body is sent, the default invitation email will be sent to the external user.
- Invited User Message Info and Customized Message Body – This allows for you to send a customized invite message to the user. This object is optional.
Next, we need to take care of authentication on this HTTP call. Click on “Show advanced options” to reveal the authentication options.
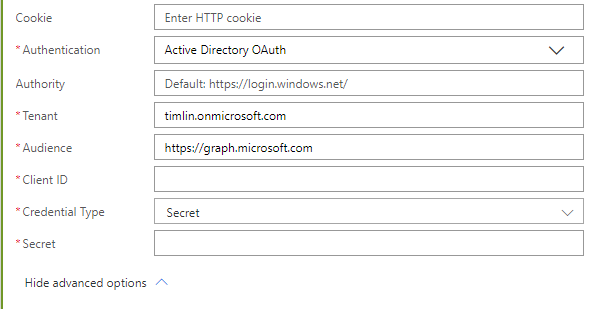
In your example, replace the first part of the tenant URL with your tenant name. For Client ID, this can be found in your newly created App Registration on the Overview page.
Next, select “Secret” for “Credential Type” and paste in the Secret you saved from earlier in the field labeled “Secret”.
You’re Finished!
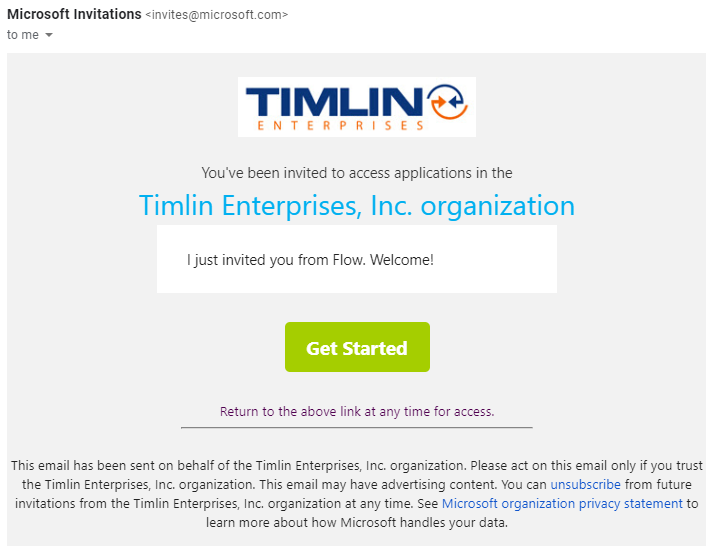
With this, the Flow should be fully configured and ready to go. If you run the Flow, you should be presented with the following email upon completion in the inbox you specified. The user will have a guest user profile generated in your tenant’s Azure Active Directory. Within 5 to 10 minutes after this invitation, the user will also have a SharePoint User Profile created as well.
Let us know if you have any questions on this process or would like us to help you set it up.