SharePoint
How To Create Full-Width SharePoint Modern Pages

Something that you’ll notice with SharePoint Modern pages is that they currently limit you to a restricted with container centered in the page.
The modern experience does have a full-width container on specific pages, but only certain web parts can be added to this area (the Hero and Image webparts). With SharePoint Framework, you can make web parts that are marked as being eligible for the full-width container but that doesn’t help you if you want web parts that already from with the Modern experience.
Making your Modern Pages Full Width
Before we continue, I want to make sure that it is noted that the method detailed in this article is not supported by Microsoft at this time. However, the method used will cause no harm to the environment or your page structure and is merely an easily implementable web part.
To start, create a new SharePoint Framework project using the yeoman generator. If you have not done this before, please refer to the documentation here for instructions on how to do this.
We are going to use this web part globally across the tenant so ensure you give it a name you’ll recognize. The name we will give it for this exercise is “Full Width Web Part”.
Once all of the solution files have completed downloading, open up the solution’s code with “code .” in your command prompt (while in the directory the project was created in). This will open the solution inside of Visual Studio Code. To start, we will need to install the npm package for jQuery.
To do so, type “npm install jquery –save” in your command prompt. This will download and load the package into the dependencies of your project.
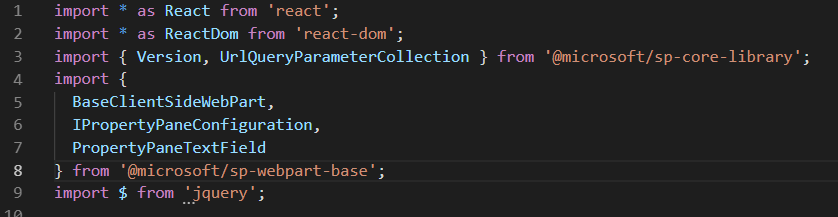
From here, we will want to import this dependency into the root BaseClientSideWebPart of our project. Add the line “import $ from ‘jquery’;” after the last default import statement in the file, as shown below.
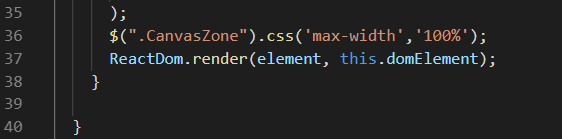
Next, we merely need to add a single line to the render statement on this same file. Add the line “$(“.CanvasZone”).css(‘max-width’,’100%’);” right before the ReactDom.render statement, as shown below.
At this point, we’ve done all we need to do in the code. Bundle and package the solution for deployment in your SharePoint App Catalog (using gulp bundle –ship and gulp package-solution –ship).
*Note: To use the –ship production pipeline, you will need to have enabled the public CDN for Office 365 in your tenant. If you have not done this or are not sure if it is enabled, review the instructions here.
Once the package is deployed, simply add the “Full-Width Web Part” that we just created and deployed to any modern page that you want to have a full-width container and we are good to go.