Uncategorized
Enhancing Nintex Forms with Javascript

Nintex Forms provide an intuitive interface for designers to quickly create form-enabled solutions.
However, some scenarios require us to go beyond the out-of-the-box capabilities. For example, we recently had a requirement involving two lists and the need to read in rate information from a second list. The complexity was that if a specific date field changes in one list, the form would have to refresh the rate information dynamically without closing the form.
The purpose of this blog post is to provide one post that contains the information you need to effectively enhance your Nintex Forms using JavaScript.
How To Enhance Nintext Forms With JavaScripts
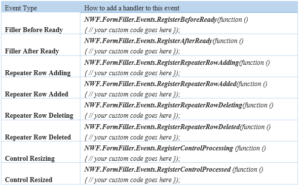
A Nintex Form is bound to both a SharePoint list and an associated content type within that list. To read from a second list requires the use of JavaScript. Form designers with JavaScript knowledge can now leverage the events shown below and are assured that their code runs safely as expected when these events occur during runtime. The following table summarizes the available events.

Embedding Custom JavaScript Within a Nintext Form
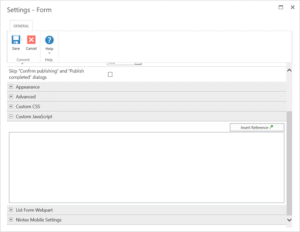
One of the simplest ways to include JavaScript within a Nintex form is to simply embed the JavaScript within the form itself. Within Form Settings, you will find a Custom JavaScript header under which you can include JavaScript. While this is a completely acceptable approach within the design of a single form, you may wish to consider using custom JavaScript includes if the JavaScript is to be reused.

CUSTOM JAVASCRIPT INCLUDES
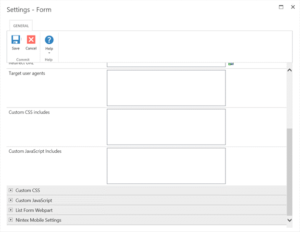
This setting is found in Form Settings within the Nintex Forms Designer and is used for including custom JavaScript files at runtime. These includes can use local includes from within SharePoint such as ‘/SiteAssets/example.js’ or external includes by simply adding the URL to the desired JavaScript file.

BUTTON ACTIONS
With Nintex Forms Designer, you can drop a Button control onto the Form. By right-clicking on the button control and selecting Settings you can choose to set the Button action to JavaScript. Additionally, under the Advanced header of the control settings you can provide the JavaScript to execute when a user clicks the button under the Client click setting
STORING CLIENT ID IN JAVASCRIPT VARIABLES
This option creates a JavaScript variable that references the Client ID of the form control and is used for allowing data processing between the Nintex Form and JavaScript. These settings are found under the control settings. To allow this to happen you must set Store Client ID in JavaScript variable to Yes and you must set a corresponding JavaScript variable name beside Client ID JavaScript variable name.
client_id_in_javascript.pngFORM CONTROLS AND CUSTOM VALIDATION FUNCTIONS
Nintex Forms allows for custom validation of form controls based on JavaScript. Within the form control settings under the Validation header, set Use Custom Validation to Yes and provide the relevant JavaScript within the Custom Validation Function setting.
form_controls.pngFILLER AFTER READY
By default, a Nintex form will focus on the first enabled input control on the form. However, now you can switch the focus to a specific control using JavaScript. We have demonstrated with the examples below:
Set initial mouse cursor focus in the Single Line Text Control
1. Open the Nintex Forms designer and drag a Single Line Text control onto the canvas.\
2. Click on the control and locate the CSS class field in the Ribbon. Type ‘singlelineFocus’.

3. Click on the Nintex Forms tab, and click on the Settings button in the Ribbon.

4. Expand the Custom JavaScriptsection, and enter the following code:
NWF.FormFiller.Events.RegisterAfterReady(function ()
{
NWF$(‘.singlelineFocus input.nf-associated-control’).focus();
});
Click Save and then publish the form. When you add a new item, you should notice that the initial focus of the form has changed, and it is now occurring in the Single Line of text control
Set initial mouse cursor focus in the Date/ Time Control
1. Open the Nintex Forms designer and drag a Date/Time control onto the canvas.
2. Click on the control and locate the CSS class field in the Ribbon. Type ‘datetimeFocus’.
3. Click on the Nintex Forms tab, and click on the Settings button in the Ribbon.
4. Expand the Custom JavaScript section, and enter the following code:
NWF.FormFiller.Events.RegisterAfterReady(function ()
{
NWF$(‘. datetimeFocus input.nf-date-picker’).focus();
});
Click Save and then publish the form. When you add a new item, you should notice that the initial focus of the form has changed, and it is now occurring in the Date/Time control.
Set initial mouse cursor focus in the People Control
1. Open the Nintex Forms Designer and drag a People control onto the canvas.
2. Click on the control and locate the CSS class field in the Ribbon. Type ‘peopleFocus’.
3. Click on the Nintex Forms tab, and click on the Settings button in the Ribbon.
4. Expand the Custom JavaScript section, and enter the following code:
NWF.FormFiller.Events.RegisterRepeaterRowAdding(function () {
var repeaterControl = NWF$(arguments[0][0]);
if (repeaterControl.hasClass(‘expensesRepeater’)) {
}
});
Click Save and then publish the form. Add a new item, and click on Add New Row to add another row to the repeating section. A message should appear at the top of the form informing you that you are about to add a new entry. When you click OK on the message, the new row should will be added.
Repeater Row Added
You can trigger this event when you want to inform the user that a new row has been added to the repeating section.
1. Open the designer and drag a Repeating Section control onto the canvas.
2. Click on the control and locate the CSS class field in the Ribbon. Type ‘expensesRepeater’.
3. Click on the Nintex Forms tab, and click on the Settings button in the Ribbon.
4. Expand the Custom JavaScript section, and enter the following code:
NWF.FormFiller.Events.RegisterRepeaterRowAdded(function ()
{
var repeaterRow = NWF$(arguments[0][0]);
if(NWF$(repeaterRow.parents(‘.nf-repeater’)[0]).hasClass(‘expensesRepeater’))
{
alert(‘new row has been added to the expenses1 repeater’);
}});
Click Save and then publish the form. Add a new item, and click on Add New Row to add another row to the repeating section. A new row will be added to the repeating section and then a message box will appear.
Repeater Row Deleting
You can trigger this event with you want to inform the user they are deleting a row from the repeating section.
1. Open the designer and drag a Repeating Section control onto the canvas.
2. Click on the control and locate the CSS class field in the Ribbon. Type ‘expensesRepeater’.
3. Click on the Nintex Forms tab, and click on the Settings button in the Ribbon.
4. Expand the Custom JavaScript section, and enter the following code:
NWF.FormFiller.Events.RegisterRepeaterRowDeleting(function ()
{
var repeaterRow = NWF$(arguments[0][0]);
if(NWF$(repeaterRow.parents(‘.nf-repeater’)[0]).hasClass(‘expensesRepeater’))
{
alert(‘you are about to delete a row from the expenses1 repeater’);
}});
Click Save and then publish the form. Add a new item, and click on Add New Row to add another row to the repeating section. Next, click on the delete icon to delete a row. A message will tell you that the row is about to be deleted. When you click OK, the row will be deleted.
Repeater Row Deleted
You can trigger this event when you want to inform the user that a row from the repeating section has been deleted.
1. Open the designer and drag a Repeating Section control onto the canvas.
2. Click on the control and locate the CSS class field in the Ribbon. Type ‘expensesRepeater’.
3. Click on the Nintex Forms tab, and click on the Settings button in the Ribbon.
4. Expand the Custom JavaScript section, and enter the following code:
NWF.FormFiller.Events.RegisterRepeaterRowDeleted(function ()
{
var repeaterControl = NWF$(arguments[0][0]);
if(repeaterControl.hasClass(‘expensesRepeater’))
{
alert(‘you have just deleted a row from the expenses1 repeater’);
}
});

