
Recently, we came across a problem with a constructed Microsoft Flow that takes incoming emails to a Shared Mailbox and posts the information into a SharePoint list. The Flow picks up on attachments and stores those as attachments in the list item created.
The issue: the majority of people include the company logo in their signature, but the name of the file itself would vary, so there was no way to easily filter out the logo in order to not store it as an attachment. This is where the Azure Custom Vision Intelligence came in – you can easily customize your own computer vision models that fit with your unique use cases.
Here are a few examples of labeled images and how Custom Vision can do the work once it’s set up properly.
Custom Vision Intelligence Overview and Setup
Custom Vision Artificial Intelligence allows you to train an AI to perform certain actions.
In this instance, we will be training our Custom Vision AI to recognize the Timlin Enterprises logo. It will tag the images fed to the AI as being the logo or not being the logo. We can trigger the Custom Vision AI and feed it the image we are curious about in a Microsoft Flow.
To start, navigate to https://www.customvision.ai and sign in or create an account*. Once signed in, we will want to create a New Project. Simply click on “New Project” and fill out the prompt as shown.
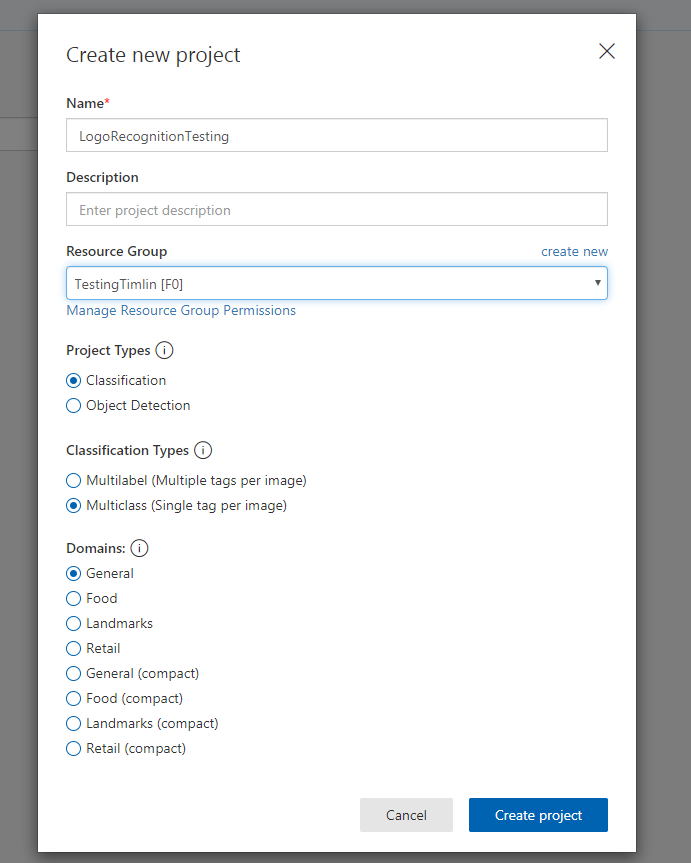
*Note: The account you use should be linked to an Azure Subscription that it has access to. Also, in our example, our Resource Group was already created and set to the F0 Plan (Free Plan). During the original creation process of a new Resource Group in Custom Vision AI, it only allows you to create a new resource group under the S0 plan. If you want to avoid any costs, be sure to switch the plan for this resource group to F0 after creation (this will be shown later on in this post). In addition, the resource group must remain as the South Central US location as the functionality we are using is only available in this location currently.
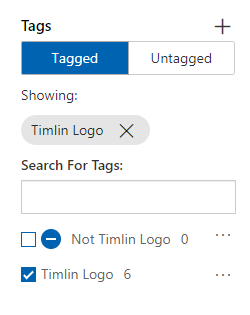
Once you’ve created the project, you want to start off by creating two tags on the left-hand side. One tag can be called “Timlin Logo” and the other can be called “Not Timlin Logo” to keep everything simple. The “Not Timlin Logo” will be marked as negative as images that fall in this category are the opposite of what we are looking for in the logo.
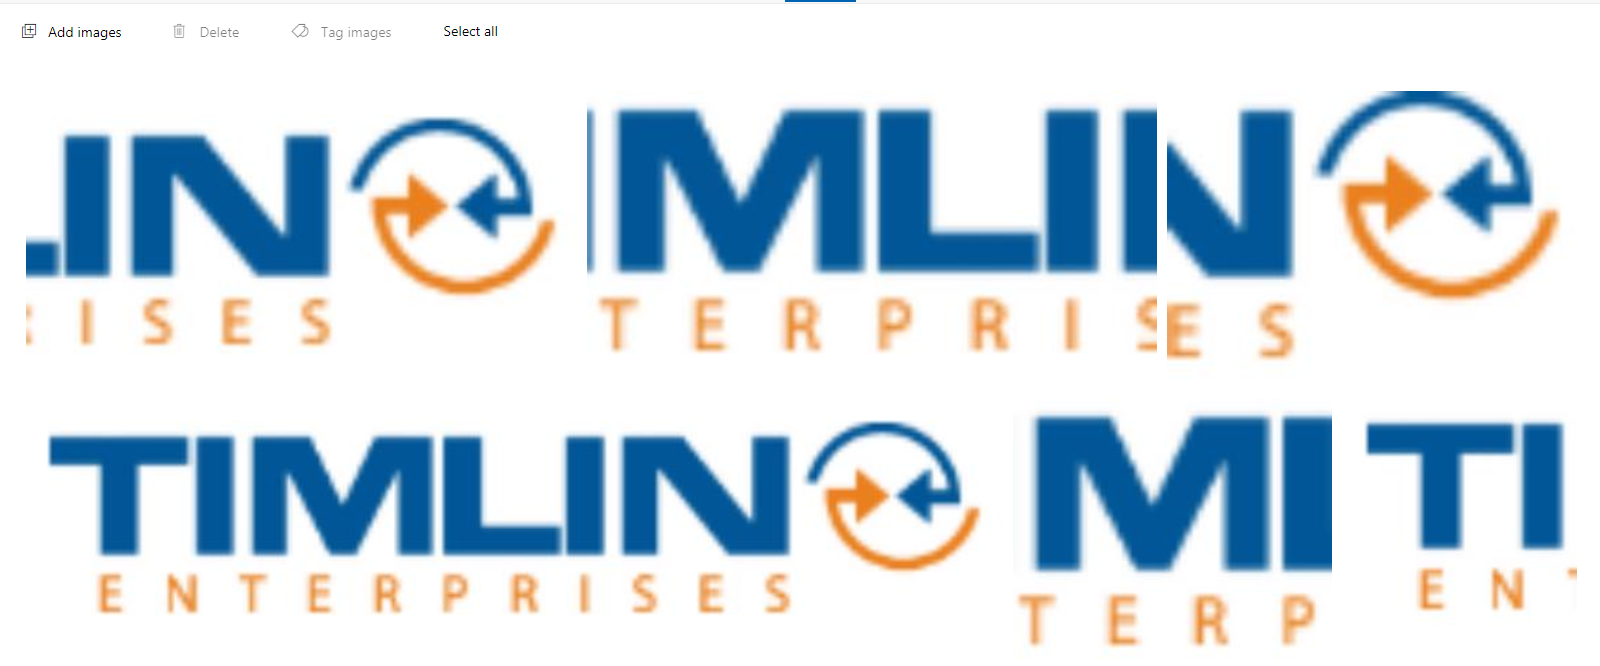
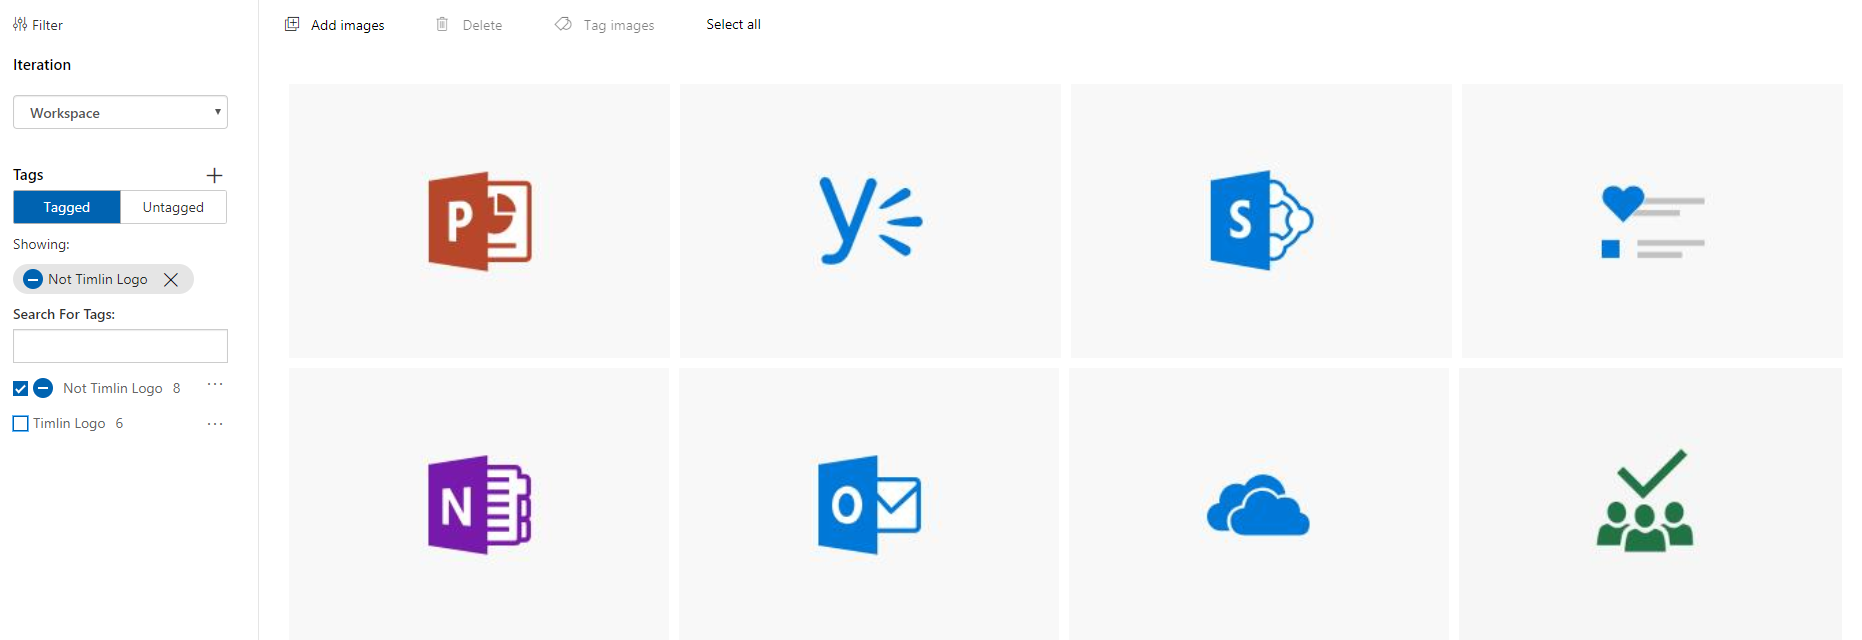
In order to have enough data for your workflow, the AI will require a minimum of 5 images per tag you create. What you want to do is give the AI between 5 and 10 images that either is or look like the Timlin Logo and 5-10 images that look nothing like it. An easy way to do something like this would be to take the logo and slice it into different quadrants (as shown below). Upload each of these spliced sections as separate images into the AI and assign them the “Timlin Logo” tag.
Spliced Images
Spliced Images in Custom Vision AI
Tags
Next, we will want to feed it the Negative images. You can use any image that does not resemble the logo. In this example, I’ve used some stock Office logo images (as shown below).
Training Our Custom Vision Intelligence
Now that you have your sample data, we can start to Train our AI. To start this process, navigate to the “Train” button at the top left-hand corner.
You are then given two options: Fast Training and Advanced Training. What you are looking for is rather unique and easily identifiable, so you can simply use the “Fast Training” process.
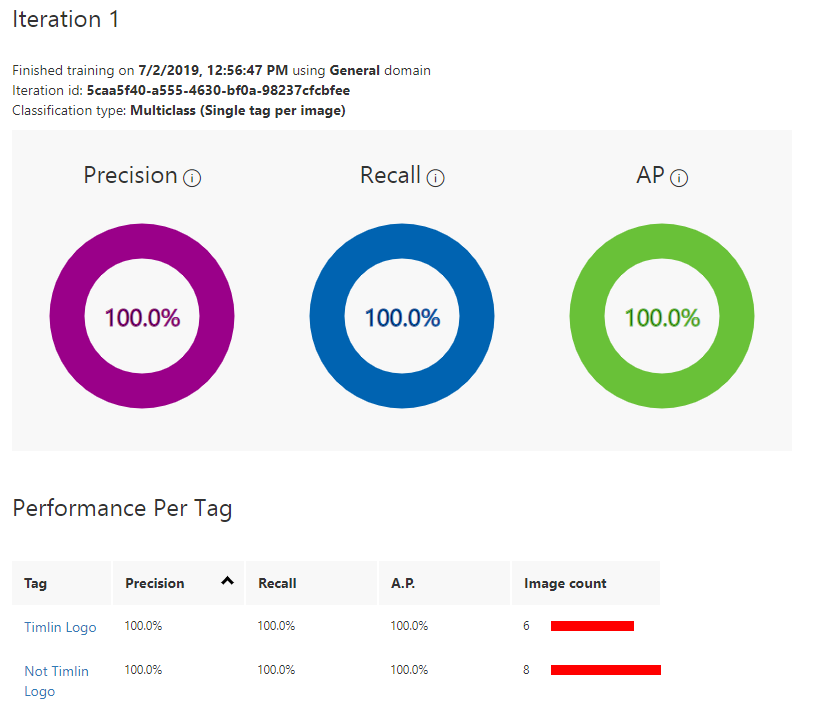
If you were training an AI on hundreds or thousands of images to identify a very particular object/set of objects, you may look into using the Advanced Training process which will train the AI over a specified period of time. For now, select “Fast Training”, navigate to “Train” and wait for the training process to complete. If all went well, you should get your two tags with (most likely) a 100% precision rate in identifying whether an image is the logo or not.
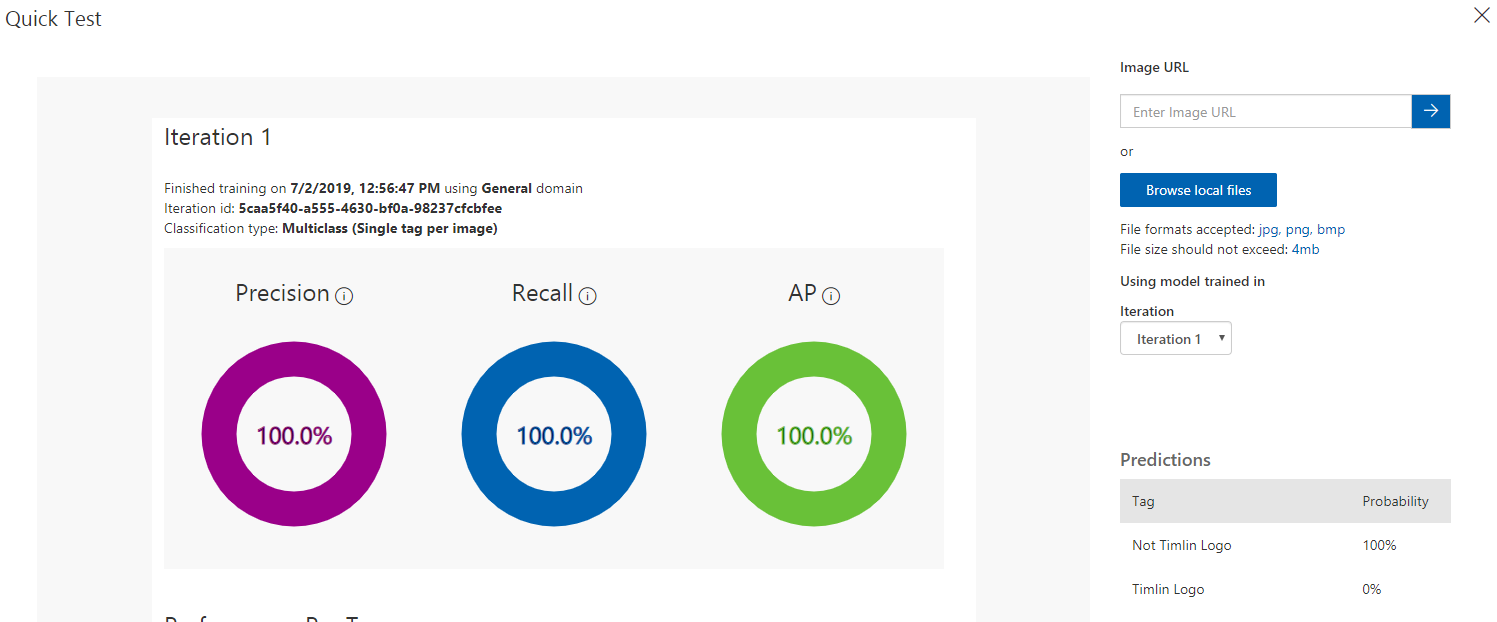
You can test this with other images that aren’t in your sample pool as well. If you click on “Quick Test” you can feed the AI a separate image and ensure that the proper tag is being pulled back. For example, if I feed it the last screenshot referenced in this post, I should receive “Not Timlin Logo” back (as seen below).
Triggering Custom Vision Intelligence from Microsoft Flow
Triggering your Custom Vision AI from Flow and feeding it an image to test is very straight forward.
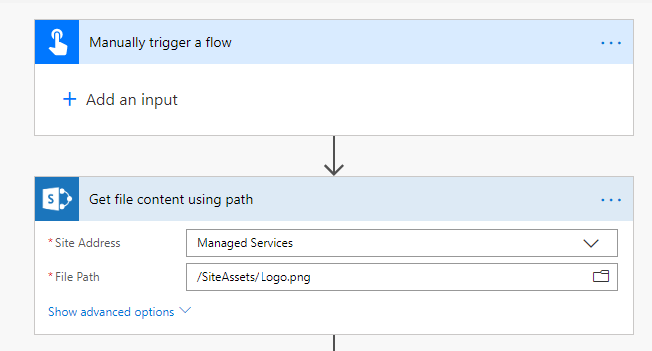
You can start by creating a new Instant Flow (one we can trigger manually). In this example, you will use a file stored in a library in our SharePoint tenant.
To do so, you first get the file content by using the “Get file content using path” function in Flow.
Now that you have access to the file and its content, you can add the action to determine the tags.
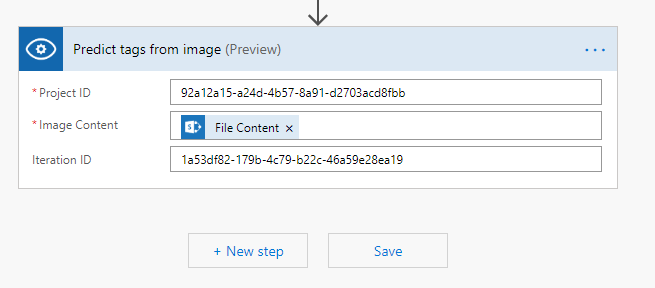
Search for and add the “Predict tags from image” action in Flow. You first need to configure the Custom Vision connection. Give the connection a name and your prediction key (found on the settings page of your Custom Vision application). Once that has been configured, the action itself will request your Project ID, which can be found from the Settings page of your Custom Vision AI project, the Image Content (which is the File Content stored in the last action) and you can also input an Iteration ID if no default is set.
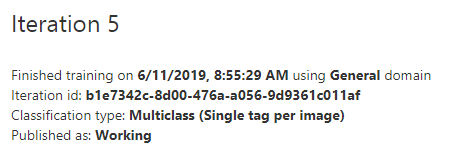
To find the Iteration ID, you can access the “Performance” tab within Custom Vision AI, click on an iteration and copy the “Iteration id” value into the Flow Action.
The completed Flow action will look like the one below.
When run, the Flow should trigger the Custom Vision AI and give you a JSON output that you can use for any future conditions with probabilities assigned to them.
With this, you will have completed your first Custom Vision Intelligence setup with Microsoft Flow integration.
If you have any questions on the setup, or anything else related to Microsoft Flow, let us know. Our team of Microsoft experts is available to help you!


You may have noticed recently that your lists and libraries in SharePoint Online had changed from the Classic Experience to the Modern Experience. While Microsoft continues to push the use of the Modern Experience, these changes may become more frequent.
However, there are definitely some instances where you may want to remain on the Classic Experience for the time being, branding being one of the biggest reasons. Customization of any kind that was developed in Classic SharePoint using Content Editor Web Parts, Script Editor Web Parts, Master Page changes, etc. will not carry over into the modern sites.
The same applies to any sort of custom web parts that may have been developed for SharePoint. Any custom development that was not constructed using SharePoint Framework would not be supported or carry over easily.
So, here is a quick and easy way to use PnP PowerShell to revert all your lists and libraries back to Classic.
The Code to Revert Back to SharePoint Online Classic
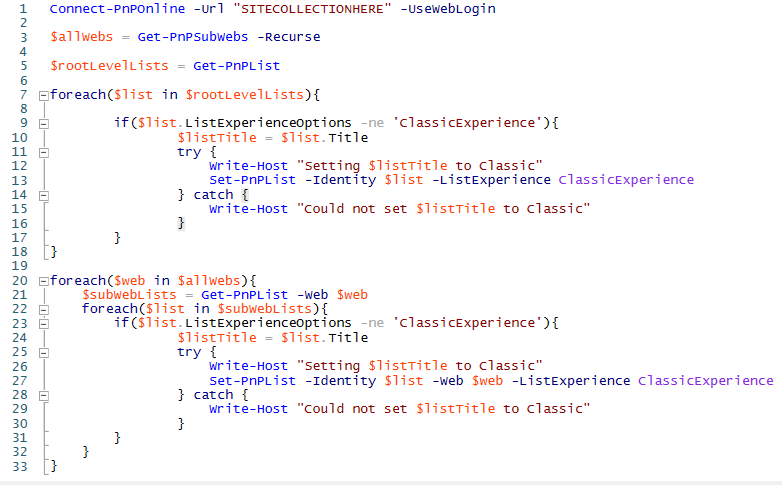
The code we use is less than 40 lines and will return all the lists and libraries back to the way they were. The code does need to be run per site collection, as it will grab each subsite and their respective subsites under them and collect the lists and libraries to change back. If you are in an environment that tends to lean toward separate site collections for most aspects of your intranet, the script can be slightly modified to first grab all site collections (using and storing Get-PnPTenantSite in a variable while connected to your admin SharePoint center) and executing this same code in a loop through that variable. The code is as shown in the following screenshot.
The Process Behind the Code
The code shown will connect to your site collection via Connect-PnPOnline and the -UseWebLogin flag.
- First, while we are connected to the root web, we can grab all of its lists and store them in $rootLevelLists.
- Then, we loop through each list, check if it is already in Classic Experience and if not, use the Set-PnPList command to set it to “ClassicExperience”. You’ll notice we don’t have to use the -Web flag here as we are already in the context of where these lists live in the root.
- On line 3, we can gather all of the subsites under the root using Get-PnPSubWebs. The -Recurse flag will ensure we also get every subsite nested within a subsite.
- From there, we can iterate through each site, get and store all of the respective site’s lists in $subWebLists.
- We then iterate through each list, check if it is already in Classic Experience and if it is not, use the Set-PnPList command to set the List Experience to “ClassicExperience”.
The code could be refactored a bit and thrown into a function, but in this format it may be a bit easier to read. Depending on the amount of site collections, sites, lists, and libraries you have this could take 5-10+ minutes to run.
Once completed, all lists and libraries across your tenant should now be set to Classic Experience. Should you want to change this at any point in time, you can replace all of the “ClassicExperience” strings in the code to either “Auto” or “NewExperience” and re-run the script.
If you have any questions on this process or anything else related to SharePoint Online, let us know. We support literally everything SharePoint.
How Automating 5 Key Business Processes Can Help Life Sciences Companies During High Growth Phases
Life sciences companies experience various degrees of growth based on their evolution through discovery and R&D efforts leading into clinical trials. As a company’s target drug receives positive feedback through initial clinical trials, they can experience 50% to 100% growth in one year. If they are granted approval, they also can experience growth as they add on more personnel to sales and operations.
This growth is exciting but results in insecure collaboration and significant challenges to operational efficiency.
As a life science company grows, what was once an efficient process quickly gets out of control and becomes an operational burden. Manual processes that were once simple and easy become cumbersome and inefficient. This may be simple HR processes like vacation requests or expense management, or it may be more complicated solutions such as employee reviews, contract management, or the onboarding of new employees.
Navigating the ups and downs of growth phases is successful only if your organization adopts the proper processes and technology to support its day-to-day operations.
Defined and automated solutions that can handle basic and complicated operational tasks – and automatically scale and retract as appropriate – will enable your organization to focus on developing and moving drugs through the FDA approval process.
In this blog post, we’ll explore five key areas where business processes automation can make a material difference, based on our work with 70+ life sciences organizations – from nimble start-ups to publicly-traded enterprises.
1.) Human Resources
We find many life sciences companies use 3rd party Human Resource (HR) providers/tools, such as ADP, that allow them to automate some business processes. Other companies use SaaS solutions for HR workflows that, depending on the solution, have some capability to automate processes.
Whether you have a separate HR solution or not, we have found that the tools in Office 365 can easily be used to automate and simplify many HR processes. The best part — you can implement these solutions at a relatively low cost without requiring any additional investment in software.
Here are some examples of how we’ve automated HR processes in Office 365 for our customers:
- Vacation Request and Carry Over
- Tuition Reimbursement
- Review Process
- Timesheet Tracking
- Employee Training and Tracking
These streamlined and automated processes save HR and your users a significant amount of time. Instead of managing your review process via emails and multiple versions of a review document, an automated solution ensures all individuals involved in a particular review are notified, their responses are tracked, and, if you have multiple managers submitting data on one review, and all responses are automatically tallied into one final review.
2.) Contract Management
A Confidential Disclosure Agreement (CDA) is one of the most widely used agreements in the life sciences sector. Although this is a simple agreement to execute, with the volume of CDA’s sent to partners, vendors, and contractors, finding and managing these documents can quickly get out of control.
Beyond CDA documents, contracts also need to be maintained for all your key relationships. These contracts need to be organized, searchable, and easily tracked for renewals. You also need to ensure proper rules are in place to approve and process contracts efficiently.
Timlin has built several solutions to manage the entire contract management process at life sciences firms. Historically we accomplished these solutions using 3rd party workflow and forms solutions. Recently, we have seen that the evolution of Microsoft Flow and Power Apps has allowed us to build these solutions using the tools and applications within Office 365, removing the need for our customers to purchase 3rd party solutions. Here’s an example below:
With the core document management and publishing capabilities in SharePoint Online, combined with the forms and workflow capabilities of Flow and Power Apps, and integration of electronic signatures, life science organizations can have a powerful contract management solution.
3.) Onboarding and Offboarding Employees & Contractors
Although technically an HR process, the critical nature of efficiently and securely onboarding and offboarding employees and contractors has proven to be a huge benefit to our customers. When you’re hiring 15 people a week, it’s essential to have a pre-defined and automated process to onboard everyone, so they add value and perform their tasks as soon as possible.
Life science organizations should consider automating the entire onboarding process. The process would begin before the new employee or contractor has set foot in the door.
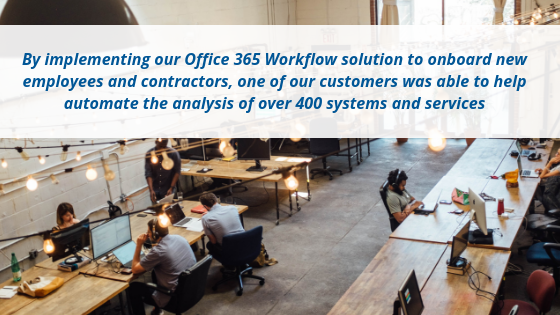
For example, we can build a workflow that will add a new record into your Active Directory (AD) when an offer is accepted, and then the flow triggers based on the employee start date to enable access to the appropriate systems on that date. Our onboarding solutions can integrate with your HR, finance, and other systems as required to ensure all required steps are handled based on pre-defined rules. One of our customers was able to help automate the analysis of over 400 systems and services with this solution.
In addition to onboarding new employees and contractors efficiently, it is equally important to shut down all access once someone leaves the organization.
Data and intellectual property protection are incredibly important for life science organizations to maintain. Not only does access need to be terminated, but these actions also need to be logged, especially for public companies who are under SOX compliance. We have delivered automated offboarding solutions at several organizations, and have built offboarding PowerShell scripts that:
- Capture last login date
- Last password set date
- Current AD security group membership
- Set new password
- Cancel O365 meetings
- Remove from all AD security groups
- Remove manager
- Set default group to “No Access”
- Move user to off boarded OU
4.) Finance
Finance is another key area ripe for automation in life sciences organizations. Imagine implementing expense request approvals and reporting that provide separate approval workflows based on the amount of the expense, requestor, or department.
Another key finance flow that has proven to greatly help finance operations is Purchase Order (PO) approvals and processing. An automated PO process allows users to enter details on a new PO Request, then a workflow is triggered to ensure the correct individual(s) approve the request based on the amount, requesting department or individual.
The workflow would also provide full transparency to the submitter on the status of their request. Lastly, the workflow can integrate with or allow finance to enter the required General Ledger items.
5.) Information Technology
There are two primary areas where automating IT processes make a material difference. First, life science organizations typically follow a specific documentation review and approval process. Imagine if that workflow was built into documentation development using SharePoint? Not only is the process streamlined, but also results in more effective document management and security.
The second area is the trouble ticket resolution. Given the speed at which life sciences organizations operate, uptime is critical. Providing self-service and automated trouble ticketing solutions ensure all IT requests are tracked and managed effectively.
Successful Growth Phases Are Dependent on Strategic and Sustainable Business Automation
When you are in a high-growth phase of your company’s lifespan, it’s critical to ensure business processes are efficient. It may feel stressful most of the time, but it’s a good problem to have. These phases mean you are receiving positive results in your drug development and clinical trials. With the proper levels of process automation, your life science organization will be able to easily and efficiently ride the waves toward FDA approval.
If you’re interested in learning more about the automation services we provide to life sciences organizations, reach out to our team of Office 365 and SharePoint experts here.

We recently brought together leaders in the Boston life sciences community for an Office 365 Life Sciences Symposium to share how they are solving real-world challenges – like document management, collaboration, security, compliance, and the need to operate more efficiently – using Office 365. It was an exciting and informative afternoon at bluebird bio’s office in Kendall Square, and we wanted to share the five top takeaways from the incredible presentations and conversations.
1. IT is becoming a key stakeholder to life sciences organizations
When Raj Padmanabhan joined Paratek Pharmaceuticals as VP of IT, they only had one person on the IT team, and the organization was growing fast. Technology had dramatically changed, and the team wasn’t able to stay on top of all the updates and innovations. They had limited resources for competing responsibilities. As a result, the company couldn’t collaborate efficiently or securely to get their jobs done.
Raj stepped in and identified Office 365 as the platform for all file sharing, process automation, and collaboration internally and externally. But identifying a technology wasn’t enough. In order to improve user adoption and productivity, Raj and his team also:
- Established a sense of urgency
- Created a guiding coalition
- Developed a change vision
Raj explained that the results they’ve seen to date wouldn’t have been possible if the organization had continued to treat IT like a project. Instead, IT became an integral part of the process and key stakeholder within the company. He explained that communication buy-in, training, and governance by the right teams were essential to turning IT from an after-thought to an integral part of the business.
2. Adopting OneNote for information storage in a fast-moving industry
Rapidly growing companies must balance focusing on multiple strategic objectives against completing a seemingly endless list of action items. Roles and responsibilities can shift quickly, resulting in undocumented processes and lost historical information.
Emily Mancini, Manager of Enterprise Solutions & Collaboration at bluebird bio, began using OneNote to track and organize her own meetings. As she realized the power of OneNote, she identified the potential for greatly improving the efficiencies for internal meetings. The next step was to gain broader internal adoption. Her perspective was that high user adoption rates are rooted in passion and authenticity.
She has trained hundreds of employees at bluebird bio and explained in her session at the Symposium that high user adoption rates are rooted in passion and authenticity. Emily drove the build of bluebird bio’s usage of OneNote and SharePoint with the end users in mind. When it came to training, she explained how important it was to creatively engage employees. For example, she would host training and provide exotic cuisine and drinks. She made the sessions personal, fun and relatable. Emily and her team realized that the best training didn’t focus on business processes — it focused on the efficiency benefits of Office 365 tools, especially OneNote, so their scientists and employees could focus on their tasks and projects.
Some of her keys to introducing OneNote internally were marketing the tool and driving adoption:
- Identify “why OneNote” for your organization
- Internal marketing campaign
- Evangelized by someone who has something in it for them too
- Focus message to current company challenges
- Prioritize getting them in the room
- Customize the training to what your end users care about
- Provide training materials & additional long-term support
These effective training practices have resulted in 90% Office 365 user adoption rates at bluebird bio.
3. Office 365 Tools and Best Practices Support M&A
Mergers and acquisitions are an inevitable part of the life sciences industry. In his session, Mike Gilronan discussed his lessons learned, best practices, and some tools of the trade that were used to help with the merger process now and also enable them to be prepared for any future M&A.
Shire is a large pharmaceutical that acquired Baxalta in 2016 and was then subsequently acquired by Takeda in 2019. In order to help facilitate a smooth transition, it was important the all employees could get the information they needed and effective collaboration could continue. This required a tremendous amount of migration and development to ensure intranets and team sites were fully functional, global navigation was available, and search could be utilized across the platform. With the scope of the migration, some key issues had to be addressed, including:
- Identifying who owns the content
- Analyzing and determining what content needs to migrate
- Ensuring they maintain security to sensitive information
- Minimize disruption
In our experience, while the scope of the issues at Shire was magnified due to the size of the organizations and their corresponding SharePoint infrastructure, the same issues need to be addressed for any migration. Shire developed a unique and robust set of tools, including their Hub Catalog to assist with the identification, notification, communication and analysis of the site data to address these critical issues.
Bottom line? Improve your content management to improve efficiency today and be better prepared for M&A tomorrow.
4. Consider Compliance from The Beginning
In 2017, Jounce went from being privately held to being publicly traded on the NASDAQ. Shortly after this transition, the IT team was tasked with implementing the company’s first set of controls to comply with the Sarbanes-Oxley Act (SOX). The team saw this as a unique opportunity to not only address the task at hand, but also look beyond it to also improve operational processes and implement automation while considering security and scalability.
Nathan Doyle, Senior IT Manager at Jounce Therapeutics, explained in his session how important compliance and security are in order to meet the requirements of a publicly traded life sciences company.
As part of that, he outlined in detail how they completely automated the onboarding and offboarding of employees. The previous onboarding solution was owned by Human Resources and was initiated by a SharePoint Form. Once submitted, the request was sent to the Jounce ticketing system run and controlled by the help desk. Changes required shoulder taps, e-mail, even text messages. Ultimately, time to implement at this stage was approximately 5-7 business days. This was highly inefficient and not secure. The help desk staff would then create AD accounts manually.
The new solution needed a way to manage the authorization and approvals process for access to the various systems deemed SOX applicable. A new SharePoint-based solution integrated with Active Directory (AD) automatically created the required user record and automatically enabled the AD account on the start date of employment. The solution supported multiple request types, including HR, Finance, Data Access, and Administrative. Jounce took their solution to the next level by handling and automating tasks such as determining if employees were still working at the company and handling staff change requests.
Specific takeaways from Nathan’s presentations included:
- Fail safes are critical!
- Hiring the right resources goes a long way
- Culture, Experience, and Personality
- Be fluid!
- Take time to automate and evolve the process and make sure to include other groups
- You are never done
- Documentation – often overlooked but always critical
5. Office 365 is Enabling The Life Sciences Industry to Run Full Speed Ahead
One common theme that permeated the entire afternoon was speed. Getting things done fast is paramount in an industry growing as fast as life sciences. It’s why so many organizations turn to the Office 365 platform to improve efficiency.
However, growth without the proper management and controls can cause inefficiencies and security headaches later. These forward-thinking organizations are leveraging the management and security aspects of the very platform they chose to improve effectiveness as well to avoid those headaches.
If you’re in the life sciences space, and you haven’t already, is it time to see how Office 365 can help you work more efficiently and effectively?
If you have any questions on the takeaways or specific use cases cited, Contact Us, as Timlin has had the opportunity to partner with each of speakers and their organizations.
Working with Repeating Sections Using JavaScript in Nintex Forms

Working with Repeating Sections can be a hassle, but once you’re able to target them properly, it can open a new world of possibilities within your forms. In this article, we’ll explore how to implement a repeated section and calculating sums of values from as many rows that are added.
Create The Form
First, you want to create a simple Nintex Form with a repeated section.
To do this, simply choose an existing SharePoint list or create a new custom list on a site that has the Nintex Forms application added already. If you aren’t sure how to add the Nintex application to a site, learn how here. If you don’t own a license, you can also sign up for a trial on their website here.
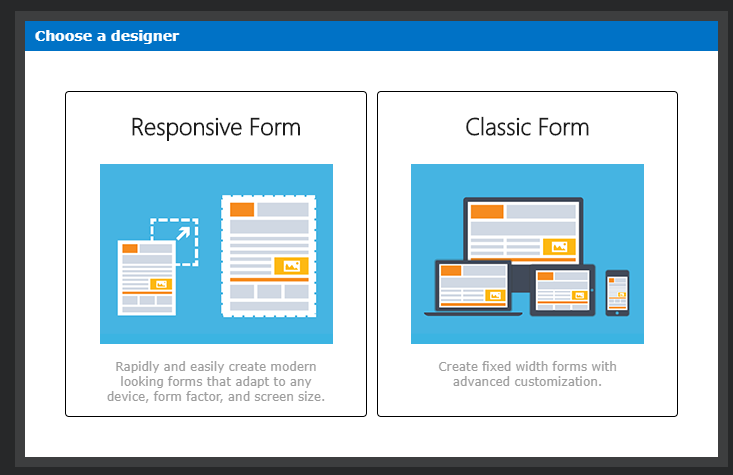
Once you are at the list, click on the “Nintex Forms” button, and when it loads, select “Classic Form”. We are using Classic as the “Responsive Form” which does not currently support JavaScript input. Responsive Forms are great to use, but for more complex actions we will want to stick with Classic.
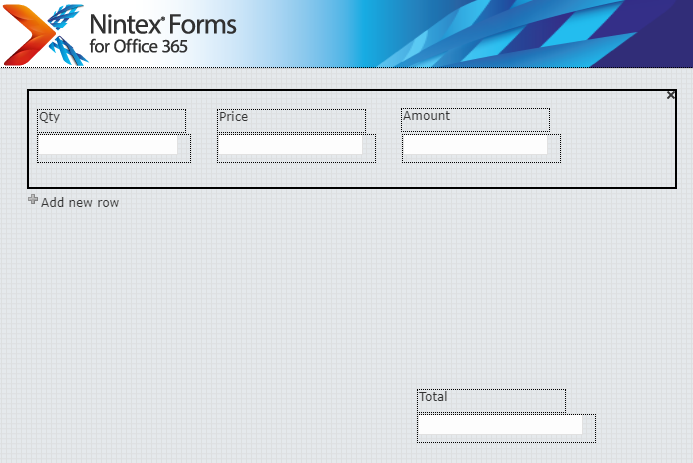
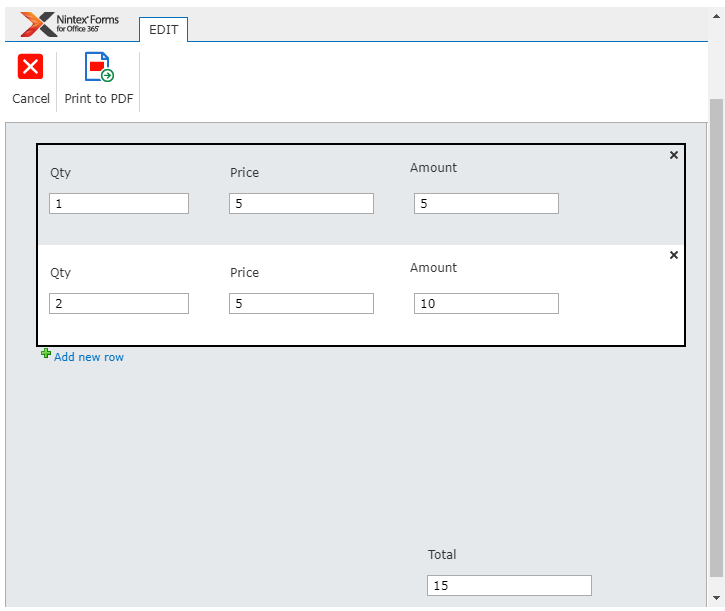
Next, for this exercise, we can remove everything currently on the form and simply add in a Repeating Section with a Quantity, Price, and Amount box (as shown below).
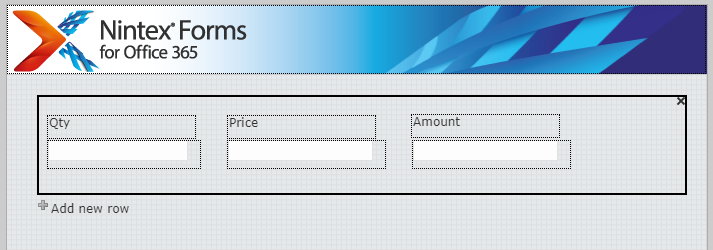
In addition, we can add a “Total” box outside of the repeating section element.
Assigning Variables and Classes to the Elements
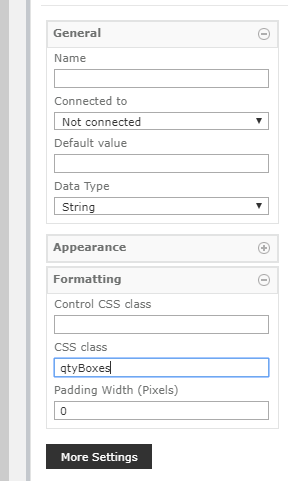
For repeating sections, don’t use the functionality to assign an element in the repeating section to a JavaScript variable. This wouldn’t work as this gets assigned as an ID which you can only target a single element with. For this to work, we will assign each element in the repeating section a CSS class.
Assign the Quantity box a class of “qtyBoxes”, the Price box a class of “priceBoxes”, and the Amount box a class of “amountBoxes” (one example shown below).
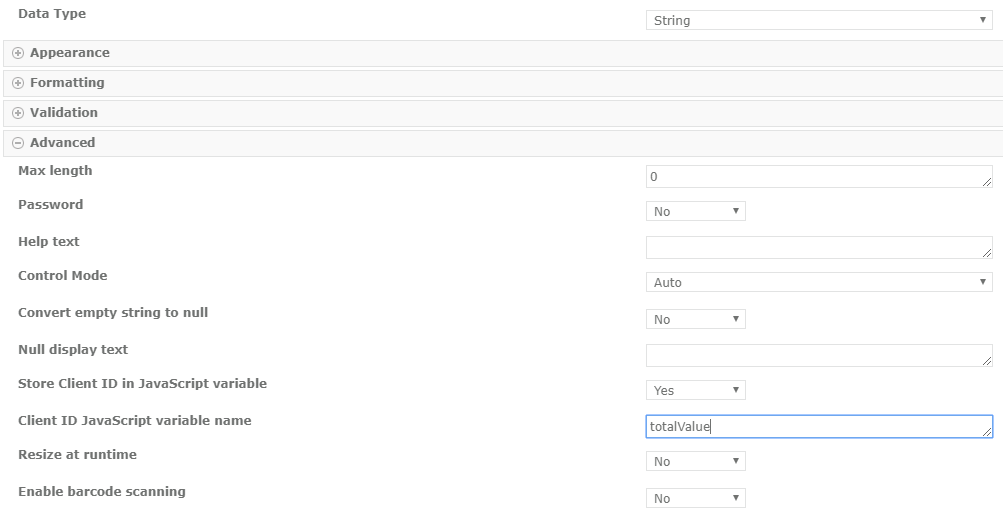
For the Total box, this isn’t in a repeating section and there is only one of these, so you can assign this a JavaScript variable of “totalValue”.
Lastly, you need to assign the repeating section itself a class. This is the same procedure as the elements and simply assign it a CSS class of “repeatedSection”.
Compiling and Implementing the Code
Next, the code for tying this all together is posted below, and you can walk through what it is doing.
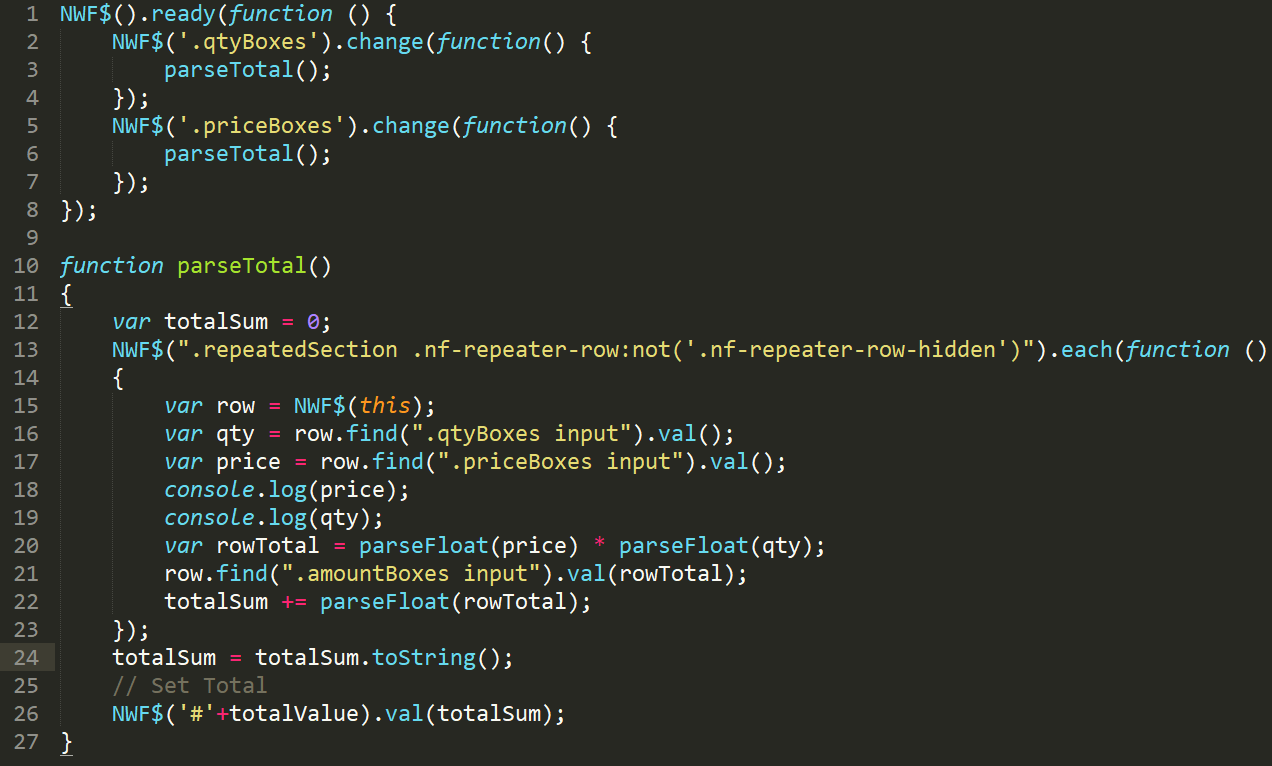
When working with JavaScript in Nintex Forms, you want to ensure that the form loads before trying to execute any code. To implement this code in the form, open up Form Settings and paste/type the code into the “Custom JavaScript” section.

The NWF$().ready function ensures that the form is ready. Inside of this function, we are monitoring whenever a change is made within the Quantity or Price boxes, so we can recalculate everything in the repeating section accordingly on the fly. The parseTotal function is called every time we need to recalculate the repeating sections.
It essentially loops throughout the default Nintex CSS classes for repeating sections and grabs each row that has been added. You set a variable outside of the for each loop to store the total value of all rows and set the “Total” text box to that value. Inside of the for each, you are grabbing the individual row and its respective quantity and price inputs (stored in the qty and price variables).
These then are multiplied together, after being converted to floats, and stored in the rowTotal variable. The “Amount” box is the total for each row, so we set its value in that row to the rowTotal amount. Lastly, we set the value of the “Total” text box to the totalSum variable and we are all set (results below).
Hope this helps! Contact us if you have any questions on Nintex forms and workflows.


Timlin’s focus is on helping customers with their digital transformation journey. Although we have worked with clients in several industries, our work in the Construction industry has illustrated some notable opportunities to transform business operations using the tools in the Office 365 platform.
The Construction Lag
The construction industry currently lags other industries in the implementation of technology. Technology advancements could boost productivity and operational efficiency through more effective communications, collaboration, business process automation, business analytics, and project management. Employees could be more empowered, optimize operations, and identify and address inefficiency.
It’s time for construction organizations to embrace technology, else they may find their peers gaining a competitive advantage. Consider that there are over 273,000 open jobs in the construction industry. Also, consider the average age of a construction employee is 43, and one-fifth of the workforce is over 55.
As companies replace their workforce with younger staff, they are going to find employees with expectations of higher-level digital tools and capabilities.
Opportunities to Achieve Digital Transformation in the Construction Industry
In our experience, we’ve found several areas where the tools in Office 365 can transform construction Operations:
In our experience, we’ve found several areas where the tools in Office 365 can transform construction Operations:
1.) Enable employees to access critical job-related information, regardless of location or device
Bandwidth can be an issue at construction sites, but a well thought out approach allows on-site and remote employees to access to information they need quickly and easily on a phone or tablet. This information typically includes from CAD files, design specifications, contract information, and project plans and schedules. The mobile applications available for Teams, SharePoint, or OneDrive all provide access to all the documents you may need to get the job done.

2.) Optimize – and even automate – business processes
Job delays are problematic and all too common in the industry. One of the biggest ways technology can transform operations is time savings from optimizing – and even automating – business processes. Employees in offices and in the field can move from manual processes, often using paper, to more effective document management, sharing, and security.
Such efficiencies can extend to supporting departments as well. HR can automate vacation tracking, employee reviews, or expense management. Legal can more effectively organize and secure documentation for faster claims response. And that’s just a start. All of this automation can be provided through the implementation of Microsoft Flow workflows and PowerApps forms, and they are available to the desktop, tablet or phone users.
3.) Improve internal communications
With a large number of remote workers, it is critical to bring the team together, communicate key news, and reinforce your company culture. As you move to a younger workforce, this type of communication is going to be assumed.
A SharePoint intranet makes it easy to access and share information and documents, regardless of where employees reside. It does not have to be too elaborate but it should be kept up to date with effective communication. The result is an improved sense of community that allows you to enforce your brand and culture through electronic communications.
4.) Enable efficient and secure project management and collaboration
Microsoft Project Online and Teams are tools to enable efficient project management and collaboration. These tools allow your internal and contract resources to work together, and your IP is protected through proper security measures. The structured nature of Project Online also allows you to more effectively resource your projects, track your variances, and get projects done on time.
5.) Increase and improve business analytics to make better, data-driven decisions
Power BI is a powerful reporting tool that can be used to build dashboards that present the KPIs you need to track and act on to improve operations. Dashboards that present your gross revenue, profit, and other project financials in real-time ensure you act on these metrics quickly and are not surprised by actual results.
6.) Eliminate time-wasting activities
Construction operations produce a lot of documentation. And, as mentioned, it’s often paper-based documents. With highly-organized document repositories, employees can access a document based on its content classification, if it’s specific to a project, architecture, engineering, supply chain, vendor, or another category. With proper content classification, you can set up powerful search capabilities that eliminate wasting time looking for documents.
Timlin has successfully implemented the tools in Microsoft Office 365 for several construction companies. For example, read our case study about we helped The Middlesex Corporation achieve digital transformation with Office 365.
And contact us if you’d like to have a quick conversation to see how we can help you as well.

In most programming languages, we have access to an extremely helpful function called substring. We can use this function to extract snippets of a string that we need the most. Microsoft Flow is no different in the fact that it offers us the use of this function, but the way we use it is a bit different than typical modern approaches.
How Does Substring Work in Microsoft Flow?
In a programming language like JavaScript, we can use the substring functionality in various ways. Microsoft Flow, however, has one way of using it. When entering the substring expression into a Flow, you will see the inputs required to complete the function (shown below).
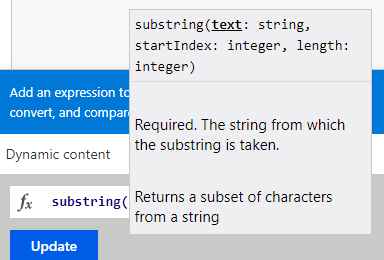
This looks relatively standard, but the one part of this that might throw you off is the length parameter. In normal conditions, the length of the string would simply be exactly that, the length of the entire string you are trying to pull a substring out of. However, in this case, if we wanted to subtract a file extension from the name of a file, it would not work.
Let’s take MyWordDocument.docx as an example.
We want to extract “docx” from the string. Typically, we could use the string as the “text” parameter (which would be MyWordDocument.docx), start index would be the index in which the period is, and length would be the entire length of the string. If we do this, we will encounter an error saying that the length parameter we used cannot be longer than the length of the string itself.
There’s a reason this happens — the length is assumed from the starting index. If we had a starting index of 5 and the length of the string was 8, we would come out with a length of 13 instead of the original length of 8, resulting in the error.
How to Use Substring without Error
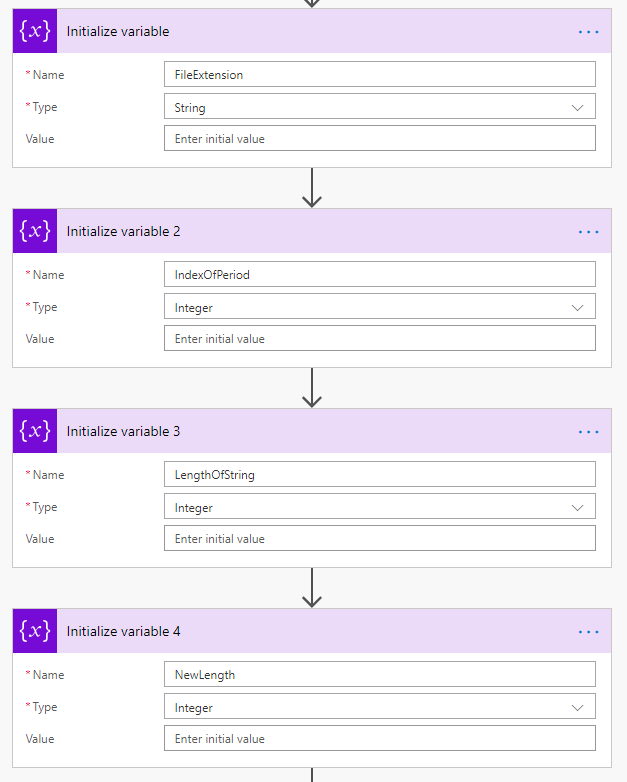
In order to remedy this problem, we need to do a couple of extra steps. Let’s initialize four parameters in our Microsoft Flow: FileExtension, IndexOfPeriod, LengthOfString, and NewLength as shown below.
First, we will get the index of the period in the string using the following expression:
indexOf(“MyWordDocument.docx”,‘.’)
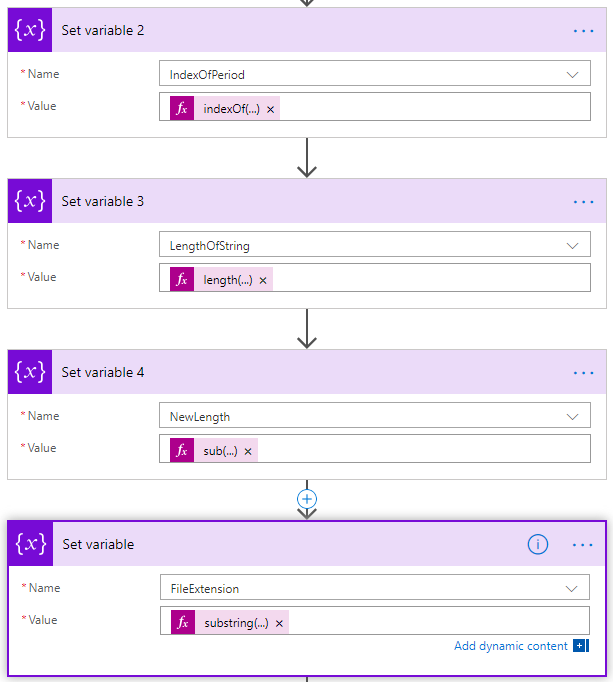
We can store this in the “IndexOfPeriod” variable by using the “Set Variable” command in Flow. Next, we can store the entire length of the string in our “LengthOfString” variable using the following expression:
length(“MyWordDocument.docx”)
Now, in order to get the actual length, we are going to put into the substring function, we need to subtract the full length of the string from the index in which the period sits. We can store this in the “NewLength” variable and process this using the following expression:
sub(variables(‘LengthOfString’),variables(‘IndexOfPeriod’))
Finally, we can use the substring function to store the final output (which should just be “docx”) in our “FileExtension” variable using the following expression:
substring(“MyWordDocument.docx”,variables(‘IndexOfPeriod’),variables(‘NewLength’))
With that, we should now see that the FileExtension variable now stores the output “docx”, which is exactly what we were looking for. Below is a screenshot of how the Set Variable commands look within Microsoft Flow.
If you have any questions about Microsoft Flow, please reach out to our team here!
Read Next: Thrive’s Shift from SharePoint Designer to Flow & PowerApps
Timlin’s Shift from SharePoint Designer to Flow & PowerAppsSharePoint Designer has been a go-to tool for SharePoint admins and developers for over a decade. And it has been a great tool, in the right hands of an accomplished developer. When combined with the powerful forms capabilities in InfoPath, it proved to be a powerful tool to automate business processes but did require extensive expertise.
However, with the move to the cloud, Designer-based solutions have struggled.
Not only do Flow and PowerApps dominate the headlines, but they also enjoy nearly all of Microsoft’s R&D dollars for no/low-code solutions in Office 365. SharePoint Designer has been stagnant with no new releases since the 2013 version. Mainstream support for the product ends on 7/13/2021. It is actually quite surprising that the tool is still used as much as it is.
There also have been recent advisories where Designer solutions could not be opened or edited for several days. And I have personally witnessed Designer blow away an entire section of a workflow when the desktop application suddenly crashed. Unfortunately, the version restoration capabilities available for Designer solutions running in on-prem environments does not work for SharePoint Online.
As risk continues to increase for Designer-based solutions, advancements in Flow and PowerApps make these the new, go-to tools for new solution creation at Timlin.
We have recently engaged with a number of customers with complicated SharePoint designer based solutions where we have rebuilt those solutions using the Flow and PowerApps tools. With the recent innovations in Flow and PowerApps, the time is right to look closely at retiring SharePoint designer based solutions. Thus, we recommend performing an inventory of your SharePoint environment and noting all Designer solutions and develop a rebuild strategy.
If you have any questions or need assistance, you can reach out to our team here and we will happily give guidance on performing a SharePoint inventory.
How To Avoid Chaos By Following An Office 365 Governance Plan
Office 365 has over 30 different applications. While you may not use all of them, failure to implement some level of governance for your critical and frequently used applications and lead to chaos — and a lot of trouble to unwind down the road. The following are just some of the pain points that are likely to arise when you don’t follow a governance plan:
- Symptom 1: Users can’t find information, use outdated materials, and don’t know where to put company documentation and materials.
- Symptom 2: You can’t get anyone to use the tools, or you don’t know what they’re using
- Symptom 3: You stumble on data that is being shared with unknown outside accounts
- Symptom 4: You get a lot of phishing emails, and are very concerned about private data escaping
- Symptom 5: When the IT person who managed your Intranet left the company, everything just stopped getting used
- Symptom 6: You don’t know what these tools are good for within your organization
- Symptom 7: The features are always changing and you’re not sure when and how to stay on top of it
- Symptom 8: You struggle with Shadow IT
Have you encountered any of the above issues?
These problems arise when you have organic growth and use. Content, data collections, teams, sites, folders, permissions, etc. are created, used, and shared at the discretion of most or all end users. Little to no information architecture has been completed. Business users lack awareness in the capabilities, so they only use a small fraction of the features or none at all. There’s a strong need for alignment.
Establishing and executing a governance strategy enables organizations to:
- Understand and close the gap on corporate policies relative to the technology available that can break or help follow those policies
- Align the configuring and security of the technology and tools to align with corporate policies
- Provide guidance to the organization regarding how these tools can help solve real-world business problems in an IT-supported manner
- Bring a group of people together to help define and follow objectives that marry the technology to the needs of the business
- Define specific training opportunities and requirements
- Understand the type of internal support needed for these tools
- Maintain a process to continuous improvement by meeting regularly to discuss how to adjust to the changing needs of the business along with the changing capabilities of the tools that serve it.
- Remove IT as a single point of failure and single “owner” of the technology.
What do you ACTUALLY need to Govern?
Not everything needs governance, some tools are pretty specific and relatively independent. It certainly depends on how your organization runs culturally, but the following are the common tools and applications that are often cross-used enough to require governance:
- Microsoft Teams
- Intranet (not an application, but common use of the tools)
- SharePoint
- Planner
- OneDrive
- OneNote
It’s important to keep in mind that one of the main goals of governance is to drive user adoption, predictable usage, and trust in the IT department to serve the business. These factors will drastically help cut down on Shadow IT and the unsanctioned and unsupported use of external tools and sharing of organizational IP.
Microsoft Teams
Teams is new on the scene but is being adopted faster than any other new Microsoft product I’ve ever seen. This is good and bad news for those of us trying to help ensure proper long-term use of such applications. The tendency for early sprawl is very high, and without a history of experience to rely on, it makes proactive governance more difficult for this type of application.
However, there are governance plans that will help with Teams. The process is generally the same as the other tools or applications, but you need to understand what Teams is capable of offering so that you can understand what questions to ask to ensure proper guidance.
Teams governance should conclude with an understanding of how you agree your organization will start using Teams, but not necessarily how they will be using it down the road. You want to understand configuration, naming conventions, permissions, content, lifecycles, sharing, training, support, guidance, and administration. You also want to know which folks on your team(s) will be responsible for helping to support this plan tactically.
Intranet
Your intranet is your place to disseminate important company information in an organized and “findable” manner. It makes sense to understand the needs of different departments, ensure they have the training and understanding to follow the process, and the diligence to follow-through on the plan. Having an agreement and guidance on the type and location of content from multiple stakeholders, and plan to ensure the intranet does not become stale is critical to its long-term success.
Intranets tend to be a cultural phenomenon as opposed to a technical masterpiece. User Adoption is the primary goal of this type of application. Keep that in mind as you envision your organization’s needs over time. The best intranets are the ones where people need to use them to find information. If you don’t really need one, consider using Microsoft Teams as a quasi-Intranet instead. Any movement away from using Email as storage mechanism for corporate knowledge and data is a good thing.
SharePoint
SharePoint has had a bad rap over the years because it’s essentially just a platform and set of services. It doesn’t solve a whole bunch of problems by itself. It’s not the dining room table and chairs, it’s a pile of lumber and set of nice power tools. Most people hammer together a couple of 2x4s and then say “SharePoint sucks”, I should have just bought a table and chairs. Having worked on this platform for over 12 years, I completely understand. I will offer the counter-point with a Governance spin:
The beauty of SharePoint is that the pile of lumber and tools can make almost anything, but we need to think about what we really need, can build, use, and support. It’s generally our own fault when our SharePoint implementation fails. The key is to understand what clearly identified and agreed upon problem is being solved, before planning the build out, use, and support for it.
Governance forces us to ask for what we intend to use technology, and how we plan to use and maintain it. If we want to use SharePoint for project management, we would create a strategy for naming conventions, permissions, templates, data contained within these sites, their lifecycle and archival plan, ownership, and more. Most importantly, the governance team would agree to monitor, adjust, and enforce decisions that drive the guided user adoption as intended.
Planner / OneDrive / OneNote
I bundle these three together not because they don’t deserve their own attention, but because of the somewhat more fluid and individual nature of their use. Planner could definitely have a more guided strategy if teams have expectations around how a board is built and used, but there is a lot of freedom in these particular applications.
Governance around these tools is generally kept at the policy, security, sharing, and training level because restricting how someone takes notes is not the control we want to achieve. However, guidance for the type of data stored in OneDrive versus a Team or SharePoint site makes a lot of sense. Knowing that a OneDrive repository will eventually be deleted after an employee departs means that data stored there needs to be user-based, not team-owned.
OneNote can be used as an agreed upon source for certain collaboration tasks within Teams and Sites, with a predictable format of naming conventions for notebooks, sections, and pages, but also allowing for the individual/personal use of these tools in whatever manner suits the employees.
Each application has some elements that can and should be governed while opening up the other aspects for freedom of use. The key is awareness and training to help business users understand what the tools can do for them.
Build It And They Will Come
Governance does not have to be a multi-month, drawn-out project. In these cases, most organizations will abandon the effort before the go-live date.
Instead, Governance should involve some initial up-front effort, and then a small and consistent (habit-forming) commitment to making minor modifications moving forward. Just like anything else, once the system is built for ongoing success and is well understood, the torch can be passed to other folks on the team to continue the process.
Start small, don’t worry too much about backing yourselves into a corner. Meeting on a regular basis with your governance committee and other stakeholders to discuss the usage and guidance will allow you to make course corrections based on critical feedback from your user base.
Instead of building something without the user in mind, a governance plan allows the process to be intentional and deliberate, as it reinforces to those users that you are there for long-haul to continue the digital transformation journey.


What Are SharePoint Image Renditions?
Image Renditions in SharePoint allow for users to dynamically generate different resolution outputs of images stored within SharePoint. This option is available in a SharePoint site collection if you have publishing enabled.
Typically, Image Renditions are utilized by creating pre-defined width and height renditions so you can then call in a URL parameter to get that output template for an image of your choosing.
However, there is a way in SharePoint Online that will allow you to dynamically set these parameters on the fly, giving you the freedom to theoretically create custom image galleries or customized image content in general.
Creating the Renditions
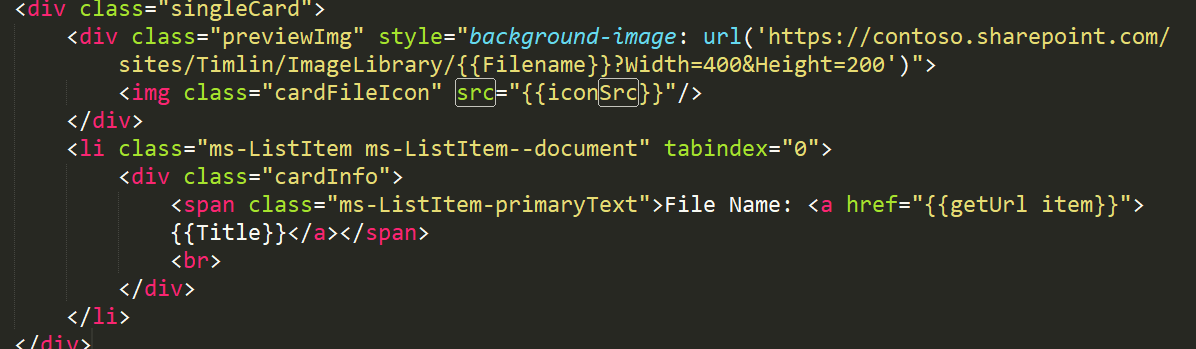
Let’s say for example we have a document library in SharePoint Online that is comprised of only images. You can use the SharePoint REST API to pull back all of the items we have in that library. From there, you can use predefined styles from Microsoft (using their ms-grid system and singleCard elements) in a SharePoint Framework web part to start building a custom image gallery.
In typical scenarios, you can either pull back the entire file or the small thumbnail version of an image. This can cause several issues:
- The thumbnail version of the photo will come across extremely small and will be blown up to a large size in the card element leaving it blurry.
- The full version of the file will cause performance issues based on how large the file is and how many the web part might need to load.
However, we can pull back the full file and optimize it to a more manageable size.
Let’s say you have a very large image (2-3k resolution or higher) and you need to generate a thumbnail for it that is not blurry. In this instance, we can actually resolve the full name of the file (https://contoso.sharepoint.com/sites/Timlin/ImageLibrary/FilePath) and append the follow parameters to the end: ?Width=400&Height=200.
This leaves you with a full example URL of: https://contoso.sharepoint.com/sites/Timlin/ImageLibrary/FilePath?Width=400&Height=200.
In the background, each one of the images we pull back and append those parameters to, will be optimized and scaled for the defined width and height. This cuts down on loading time and allows you to generate easily readable thumbnail content for these files.
Handlebars Example Code for Single Card Output
Interested in this solution for your SharePoint investment and working with the Timlin team?